Mounting of the projector
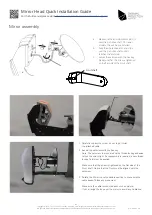
Check if mounting of an adapter plate is required for your model - if unsure check online compatibility list on our website:
https://www.dynamicprojection.com/compatibility/
Caution: Handle the mirror cautiously to avoid any damage to the lens or projector.
5
A
Copyright © 2014 - 2022 Dynamic Projection Institute GmbH. All rights reserved. http://www.dynamicprojection.com
Weights and dimensions shown are approximate. Specifications and appearance are subject to change without notice.
1.
If spacers are provided, make sure to use them.
2.
Mount the Mirror Head to the projector and
secure all screws - do not fully tighten them.
1.
If spacers are provided, make sure to use them.
2.
Mount the adapter plate to the projector, and then
mount the Mirror Head to the projector and secure
all screws - do not fully tighten them.
3.
Adjust the Mirror Head to reach the recommanded
distance of 5-10 mm.
4.
When the clearence is confirmed and the mirror can
move along the tilt axis without touching the lens secure
all screws.
5.
Connect the RS232 and the AC power-cord from
the Mirror Head control unit to the projector.
Please take into account that your projector lens might extend.
Min. 5mm
Adjust the distance between Mirror and Lens
With adapter plate
Please note that your adapter plate might come with its own manual.
Without adapter plate
QIG - Version 2.8
Mirror Head Quick Installation Guide
For the full manual please visit
https://www.dynamicprojection.com/mh-support/


