8
9
PREPARING THE LIFT FOR USE
Positioning the lift for use
1. With the legs of the base open,
use the steering handle to push the
patient lift into position.
2. Lower the patient lift for easy
attachment of the sling.
WARNING:
The legs of the lift must be in
the maximum open position for optimum
stability and safety. If it is necessary to
close the legs of the lift to maneuver the
lift under a bed, close the legs of the lift
only as long as it takes to position the
lift over the patient and lift the patient off
the surface of the bed. When the legs
of the lift are no longer under the bed,
return the legs of the lift to the maximum
open position and lock the shifter handle
immediately.
Attaching slings to the lift
1. Position the patient on the
appropriate sling.
2. Place the straps of the sling over
the hooks on the boom.
3. Match the corresponding colors on
each side of the sling for an even lift
of the patient.
Lifting/moving the patient
WARNING:
Before lifting or transferring
the patient, the base legs MUST be in the
open position for optimum stability and
safety. DO NOT engage the rear locking
casters when patient is in the lift.
1. Using the steering handle, push the
patient lift underneath the bed. Leaving
enough space between the knee pad
and the bed for the patient to position
their legs. Instruct the patient to hold on
to the hand grips on the boom.
2. With the sling securely attached to the
lift, press the UP ( ) button to raise
the patient to a standing position with
their legs against the knee pad.
3. Using the steering handle, move lift
away from the bed.
Transferring the patient
to a wheelchair
WARNING:
The wheelchair wheels MUST
be locked before lowering the patient into
the wheelchair for transport.
1. The legs of the lift (with patient) should
be in the open position.
2. Move the wheelchair into position.
3. Ensure the rear wheels of the
wheelchair are locked to prevent further
movement of the chair.
4. Lower the patient by pressing the
DOWN ( ) button on the lift controller.
5. Once the patient is in a seated position,
assist the patient to lift their feet off the
foot stand.
6. Disconnect the sling from the patient
lift.
7. To return to the bed, reverse
procedures concerning lifting
the patient, operation and sling
attachments.
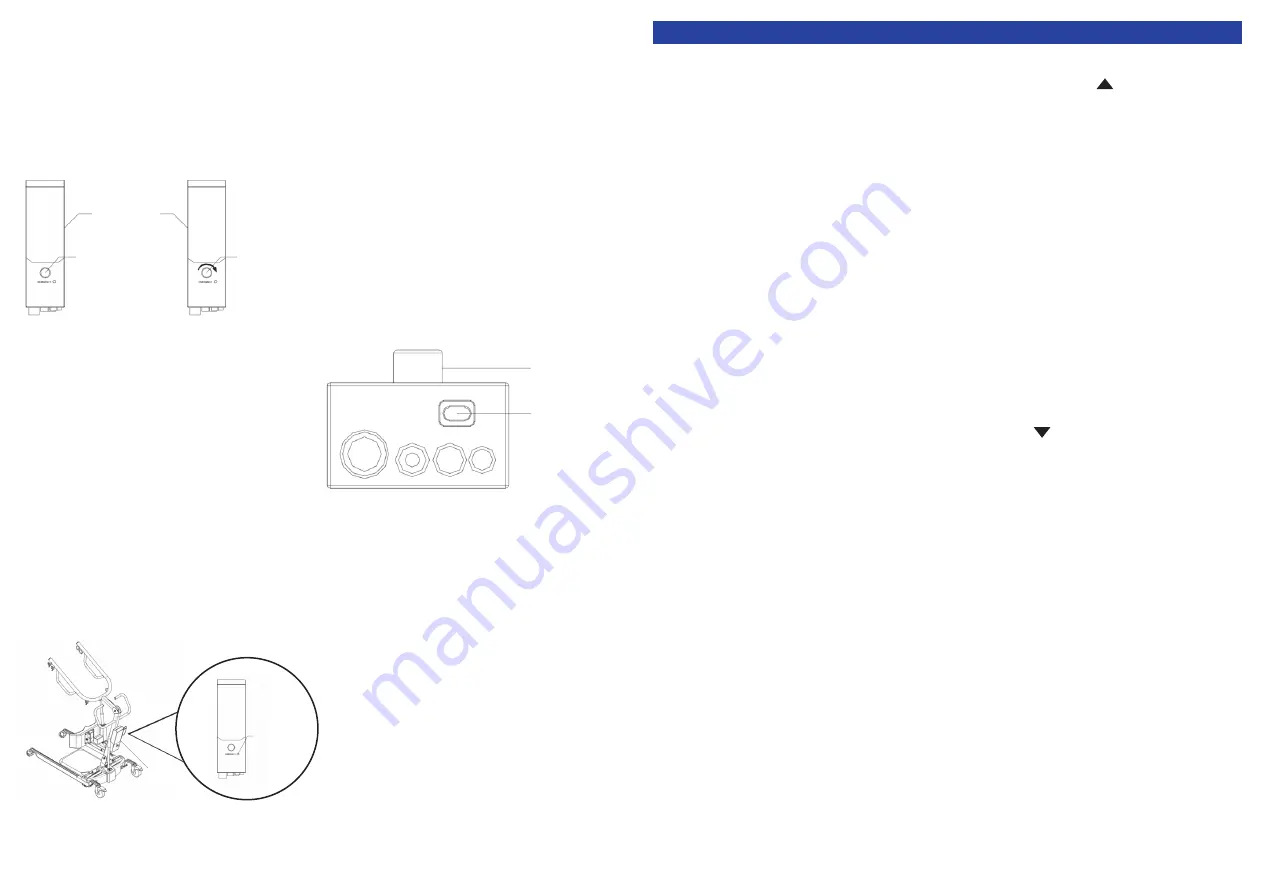
Activating the emergency stop
Press the RED emergency button on the
control box to stop the boom assembly
and patient from raising or lowering.
Rotate the RED emergency stop button
clockwise to disengage the emergency
stop.
Activating the mechanical
emergency release
All lift actuators are built with a mechanical
emergency release. The mechanical
release enables the actuator to retract
without the use of hand pendant. To
activate the emergency release, insert a
pen into the hole labeled “EMERGENCY”
on the control box of the lift and push
down on the boom at the same time. The
actuator will only retract while under load
and the mechanical emergency release is
engaged. The release hole is labeled with
the word “EMERGENCY” spelled out in
white.
Charging the battery
It is recommended that the battery should
be recharged daily to prolong battery life.
The battery status can be viewed on the
LCD display at the front of the control box.
Charging the battery with power cord
Insert one end of the power cord into the
corresponding socket on the underside of
the control box. Plug the other end into an
appropriate grounded electrical socket.
The indication light on the control box will
be illuminated to indicate the battery is
being charged.
NOTE:
The lift will not be operable while
the battery is being charged. Keep the lift
casters locked and lift stationary.
Mounting a wall charger
The wall charger is an accessory and
should be ordered separately.
LIFTING THE PATIENT
Emergency
Stop Button
Power Cord
Socket
Bottom View of Control Box
Control
Box
Press IN to activate
Emergency Stop
Control Box &
Battery Pack
Rotate
CLOCKWISE
to disengage
Emergency Stop
Emergency
Release
Hole
Summary of Contents for 10702
Page 7: ...R191002 ...


