

Do not adjust or operate rollator without carefully reading all
instructions in this manual.
1. First remove all contents from carton: backrest, handle with
tube, rollator frame and basket.
2. Open the frame. Ensure that the folding hinge is locked into
place. Slide the backrest into frame brackets making sure
snap bottoms protrude through holes.
3. Unscrew height adjustment knob from the frame and insert
handle tube into frame at desired height, lining up holes
appropriately. Slide bolts through holes from the inside and
screw on tightening knob until secure.
Always engage and disengage wheel locks on both
sides simultaneously.
1. To slow down or come to a temporary stop — pull up slowly
on the loop locks with four fingers until unit slows down or
comes to a temporary stop.
2. To temporarily lock wheels in position — press down on both
loop locks with palms until you hear a “click” that will tell you
wheels are locked. Always lock the wheels when using the
rollator as a seat
3. To release wheel locks — push up on both loop locks with
palms of hand to original position.
1. Please make sure the rollator is fully opened, seat is down
and the folding bar under seat is locked in the down position.
2. Be sure that both knobs are fully tightened and are at equal
heights. Test rollator for stability before applying full weight to
hand grips.
3. Test the loop locks before operating the rollator. When
wheels are locked (see illustrations for locking and releasing
locks), lock bar on rear wheels should prevent wheels from
turning. If the wheels turn while the brake is engaged, follow
the instructions to adjust the hand brake system. When locks
are released, the wheels should turn freely.
4. Always lock loop locks before sitting and do not use seat
when unit is on an incline or uneven ground.
5. Replace tires when significantly worn or damaged.
ASSEMBLY INSTRUCTIONS
LOOP LOCK OPERATION
Hold firmly in place. Do not turn.
To tighten the hand brake
adjustment, turn the nut clockwise.
To loosen the hand brake adjustment,
turn the nut counter clockwise.
Important Safety Notice
The hand brake system fitted on this rollator complies with the
manufacturer’s quality standards. The hand brake system has
been preset (adjusted) to the best performance setting. To better
suit you personally, please follow the instructions set out on left
side. You may need to adjust the hand brake systems from time
to time as they will wear out with normal use.
INSTRUCTIONS TO ADJUST
THE HAND BRAKE SYSTEM
SAFETY PRECAUTIONS
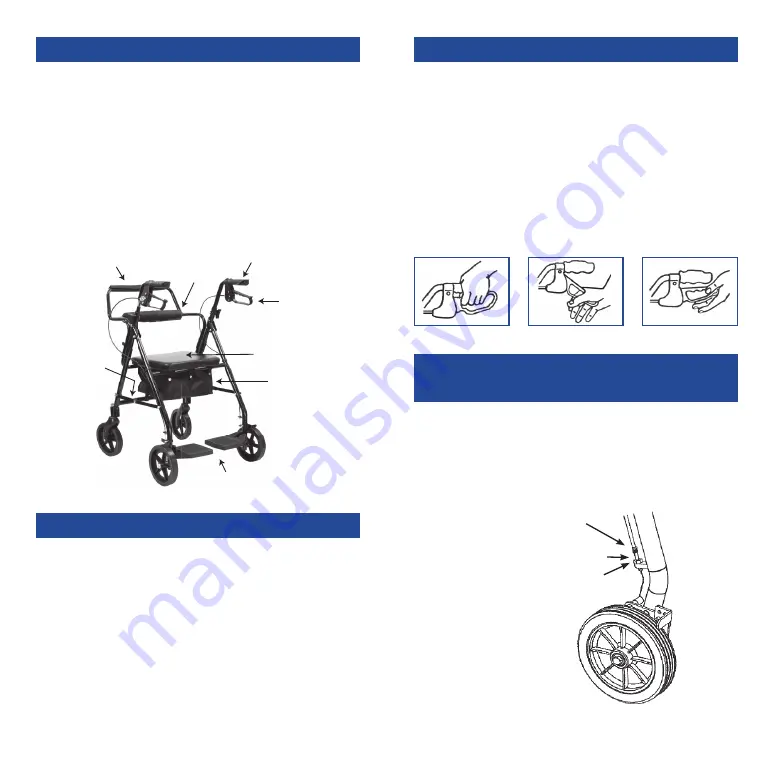
Orthotic Hand Grips
Wide
Comfortable
Seat
Loop Locks
Safest System
Available
Backrest
Hanging Bag for
Functionality
and Storage
Folding
Hinge for
Portability
Foot Rest for
Transport Mode
Push Handle for
Transport Mode


