background image


Rev.  01/11 


-3.8-                   


         TFXL-X 


Flow Filter Hysteresis

 entry), this adaptive filter will increase 

the number of successive flow readings that are averaged 
together up to this maximum value. If flow changes outside of 
the 

Flow Filter Hysteresis 

window, the Flow Filter adapts by 

decreasing and allows the meter to react faster.  Increasing this 
value tends to provide smoother steady-state flow readings and 
outputs. 



Flow Filter Hysteresis 

creates a window around the average 

flow measurement reading; whereby if the flow varies within that 
window, greater 

Flow Filter Damping 

will occur. The filter also 

establishes a flow rate window where measurements outside of 
the window are captured by the 

Bad Data Rejection Filter

. The 

value is entered as a percentage of actual flow rate. 


Example:


If the average flow rate is 100 GPM and the Flow Filter 
Hysteresis is set to 5%, a filter window of 95-105 GPM is 
established. Successive flow measurements that are 
measured within that window are recorded and averaged in 
accordance with the 

Flow Filter Damping 

setting. Flow 

readings outside of the window are held up in accordance 
with the 

Bad Data Rejection Filter



Flow Filter MinHysteresis 

sets a minimum hysteresis window 

that is invoked at low flow rates, where the “of rate” 

Flow Filter 

Hysteresis

 is very small and ineffective. This entry is entered in 

picoseconds and is differential time. This value is factory set and 
should not be altered without consulting the Dynasonics 
technical services department. 



Flow Filter Sensitivity 

allows configuration of how fast the 

Flow 

Filter Damping 

will adapt in the positive direction. Increasing 

this value allows greater damping to occur faster than lower 
values. Adaptation in the negative direction is not user 
adjustable. 



Bad Data Rejection 

is a value related to the number of 

successive readings that must be measured outside of the 

Flow 

Filter Hysteresis 

and 

Flow Filter MinHysteresis 

windows 

before the flow meter will use that flow value. Larger values are 
entered into the Bad Data Rejection when measuring liquids that 
contain gas bubbles, as the gas bubbles tend to disturb the 
ultrasonic signals and cause more extraneous flow readings to 
occur. Larger Bad Data Rejection values tend to make the flow 
meter more sluggish to rapid changes in actual flow rate. 

PART 3 - PROGRAMMING 

Summary of Contents for TFXL series

Page 1: ...Series TFXL Transit Time Ultrasonic Flow Meter Remote Mount System Operations Maintenance Manual REV 01 11 ...

Page 2: ......

Page 3: ...2 Input Output Connections and Options 4 20 mA Output 1 13 1 14 Pulse Output 1 15 1 16 Application of Power and Troubleshooting 1 17 1 18 Transducer Installation General 2 1 Transducer Mounting Location 2 2 2 3 Transducer Spacing 2 4 2 7 Transducer Mounting Pipe Preparation 2 8 DTTN V Mount W Mount 2 9 2 10 DTTH High Temp 2 11 DTTS DTTC Small Pipe 2 11 2 14 DTTN Z Mount 2 14 2 16 Mounting Rail 2 1...

Page 4: ...3 9 3 10 DISPLAY MENU 3 11 Flow Meter Calibration 3 12 3 14 Appendix Hazardous Area Installation Drawing Fluid Characteristic Table TFX Error Codes Pipe Dimension Chart ST SS PVC Pipe Dimension Chart Copper Pipe Dimension Chart Ductile Iron Pipe Dimension Chart Cast Iron Velocity to Volumetric Conversion Statement of Warranty Customer Service General Terms and Conditions Part 3 Programming Appendi...

Page 5: ...oned so that the pipe remains full when the liquid is flowing through it On horizontal pipes the transducers should be located on the sides of the pipe See Figure 1 2 on page 1 4 See Table 2 1 on page 2 3 for additional configurations B Select a mounting method Figure 1 1 for the transducers from Table 2 2 on page 2 5 based on pipe size and liquid characteristics In general select W Mount for plas...

Page 6: ... the wiring diagram located on the inside of the TFXL cover and Figure 1 4 on page 1 10 for proper power and transducer connections Verify that the voltage level listed on the product identification label located on the side of the instrument enclosure matches the power source where connection is being made 4 INITIAL SETTINGS AND POWER UP A Apply power to the instrument B Verify that SIG STR is gr...

Page 7: ...ransducers is required The flow meter operates by alternately transmitting and receiving a frequency modulated burst of sound energy between the two transducers and measuring the time interval that it takes for sound to travel between the two transducers The difference in the time interval measured is directly related to the velocity of the liquid in the pipe The TFXL flow meter can be successfull...

Page 8: ... Output Options 1 4 20 mA and TTL Pulse 2 Totalizer Pulse D T T Type N Standard 250 F CPVC Ultem H High Temp 350 F PTFE Vespel Cable Length 020 20 feet 6 1 m 050 50 feet 15 m 100 100 feet 30 m Maximum length 990 feet 306 m in 10 foot 3 m increments Conduit Type N None Bare RG59 Cable A Flexible armored Options N General Purpose F CSA Class I Div 1 Groups C D Conduit Length Standard construction Co...

Page 9: ...ng from 10 100 of measuring range 0 01 FPS 0 003 MPS at rates lower than 10 of measuring range and units 1 FS Refer to Form TFXL for applicable measuring ranges for each DTTS DTTN transducer model Repeatability 0 5 of reading Response Time 0 3 to 30 seconds adjustable Protection Reverse polarity surge suppression Installation DTTN and DTTS Transducer General Requirements ANSI ISA 82 02 01 Hazardou...

Page 10: ...Rev 01 11 1 8 TFXL X PART 1 TERMINOLOGY PC INTERFACE CABLE ...

Page 11: ...rs are available To add cable length to a transducer the cable must be the same type as utilized on the transducer Twinaxial cables can be lengthened with like cable to a maximum overall length of 100 feet 30 meters Coaxial cables can be lengthened with RG59 75 Ohm cable and BNC connectors to 990 feet 300 meters 2 Mount the TFXL transmitter in a location that is Where little vibration exists Prote...

Page 12: ...ly move it out of the way Do not over stress the ribbon cable located between the display and the microprocessor circuit boards 1 Guide the transducer cables through the transmitter conduit holes located in the bottom of the enclosure Secure the transducer s flexible conduit with the supplied conduit nut if flexible conduit was ordered with the transducer or tighten the cord grip on the coaxial ca...

Page 13: ...r most installations A sealed cord grip or NEMA 4 conduit connection should be utilized to retain the NEMA 3 integrity of the flow meter enclosure Failure to do so will void the manufacturer s warranty and can lead to product failure Wiring methods and practices are to be made in accordance with the NEC National Electrical Code and or other local ordinances that may be in effect Consult the local ...

Page 14: ...required Skip to Page 1 17 PART 1 TRANSMITTER INSTALLATION Figure 1 5 DC Power Connection 11 30 VDC DC Ground 11 to 30 Vdc IMPORTANT NOTE Not following instructions properly may impair safety of equipment and or personnel IMPORTANT NOTE Must be operated by a power supply suitable for the location IMPORTANT NOTE Do not connect or disconnect either power or outputs unless the area is known to be non...

Page 15: ...ally located within a data acquisition system or other receiving instrument The maximum resistance that the TFXL can accommodate is directly related to the DC power source that is powering the flow meter and the 4 20 mA loop Chart 1 1 illustrates the range of load resistance that can be used with a given power supply voltage Ensure that the loop load resistance is within the shaded region of the g...

Page 16: ...nnect the wires to the appropriate Field Wiring Terminals within the TFXL enclosure See Figure 1 7 PART 1 INPUT OUTPUT CONFIGURATION Figure 1 6 4 20 mA Block Diagram 4 20 mA Ground 4 20 mA Output Figure 1 7 4 20 mA Connections ...

Page 17: ...actor is For example the full scale flow for a 1 pipe is 15 GPM The K factor would then be Two pulse output options are available with the TFXL Turbine meter simulation SW1 ON This option is utilized when a receiving instrument is capable of interfacing directly with a turbine flow meter s magnetic pickup The output is a relatively low voltage AC signal that is not ground referenced The minimum AC...

Page 18: ...round and is not polarized so wiring polarity is not important See Figure 1 9 The TTL output is referenced to DC ground and is polarized When using the TTL pulse connect the plus field terminal in the flow meter to the frequency input on the receiving instrument Connect the negative field terminal to the frequency input negative or DC common connection in the receiving instrument See Figure 1 9 PA...

Page 19: ...blink 4 Upon entering RUN Mode the TFXL2 and TFXL4 will provide one of the following responses The display may indicate ERROR 0010 which indicates low signal strength NOTE ERROR 0010 alternates with the flow totalizer value Low signal strength is caused by one of the following an empty pipe gas locked gas content in the liquid is excessive inadequate acoustic grease between the flow meter transduc...

Page 20: ...FXL X TFXL1 and TFXL3 Responses The TFXL1 and TFXL3 are not equipped with a display so troubleshooting requires the use of a computer and a PC interface cable See Part 3 of this manual PART 1 STARTUP AND CONFIGURATION ...

Page 21: ...d receiver elements that eliminate the requirement for spacing measurement and alignment Extra care should be taken to ensure that these instructions are carefully executed Mounting of the DTT clamp on ultrasonic transit time transducers is comprised of three steps In general these steps consist of 1 Selection of the optimum location on a piping system 2 Entering the pipe and liquid parameters int...

Page 22: ...where the pipe may become partially filled Partially filled pipes will cause erroneous and unpredictable operation of the meter A piping system that contains lengths of straight pipe such as those described in Table 2 1 on page 2 3 The optimum straight pipe diameter recommendations apply to pipes in both horizontal and vertical orientation The straight runs in Table 2 1 apply to liquid velocities ...

Page 23: ...Rev 01 11 2 3 TFXL X PART 2 TRANSDUCER INSTALLATION Table 2 1 Straight Pipe Requirements ...

Page 24: ...ference pictures located under Table 2 2 on page 2 5 The appropriate mounting configuration is based on pipe and liquid characteristics Selection of the proper transducer mounting method is not entirely predictable and many times is an iterative process Table 2 2 contains recommended mounting configurations for common applications These recommended configurations may need to be modified for specif...

Page 25: ...ll types 4 12 in 100 300 mm Carbon Steel Stainless Steel Copper 4 30 in 100 750 mm Ductile Iron 2 12 in 50 300 mm Cast Iron Z Mount Plastic all types 30 in 750 mm Carbon Steel 12 in 300 mm Stainless Steel Copper 30 in 750 mm Ductile Iron 12 in 300 mm Cast Iron TSS Total Suspended Solids W Mount Configuration V Mount Configuration Z Mount Configuration PART 2 TRANSDUCER INSTALLATION Table 2 2 Trans...

Page 26: ...th is to configure the display to show signal strength fix one transducer on the pipe and then starting at the calculated spacing move the remaining transducer small distances forward and back to find the maximum signal strength point PART 2 TRANSDUCER INSTALLATION Entering Pipe and Liquid Data Table 2 3 Transducer Mounting Modes DTTS DTTC Size Frequency Transducer Mounting Mode Size Frequency Tra...

Page 27: ...und speed1 6 Pipe relative roughness1 7 Pipe liner thickness 8 Pipe liner material 9 Pipe liner sound speed1 10 Fluid type 11 Fluid sound speed1 12 Fluid viscosity1 13 Fluid specific gravity1 1 Nominal values for these parameters are included within the TFXL operating system The nominal values may be used as they appear or may be modified if exact system values are known After entering the data li...

Page 28: ...astic pipes typically do not require surface preparation other than soap and water cleaning The DTTN and DTTH transducers need to be properly oriented on the pipe to provide optimum reliability and performance On horizontal pipes the transducers should be mounted 180 radial degrees from one another and at least 45 degrees from the top dead center and bottom dead center of the pipe See Figure 2 1 F...

Page 29: ...ust as necessary Tighten transducer strap securely 3 Place the downstream transducer on the pipe at the calculated transducer spacing See Figure 2 3 on page 2 10 Using firm hand pressure slowly move the transducer both towards and away from the upstream transducer while observing Signal Strength Clamp the transducer at the position where the highest Signal Strength is observed Signal Strength of b...

Page 30: ...L with very high Signal Strength is that the signals may saturate the input amplifiers and cause erratic readings To decrease the Signal Strength move one transducer a small distance radially around the pipe as shown in Figure 2 4 PART 2 TRANSDUCER INSTALLATION Figure 2 3 Transducer Position Top view of pipe Figure 2 4 High Signal Strength Condition ...

Page 31: ...ctions on page 2 9 of this manual DTTS and DTTC Small Pipe Transducer Installation The small pipe transducers offered by Dynasonics are designed for specific pipe outside diameters Do not attempt to mount a DTTS or DTTC transducer onto a pipe that is either too large or too small for the transducer contact the Dynasonics factory to arrange for a replacement transducer that is the correct size DTTS...

Page 32: ...s Do not over tighten 4 If Signal Strength is less than 7 remount the transducer at another location on the piping system 5 If Signal Strength is greater than 100 contact Dynasonics to obtain a lower power strategy to load into the TFXL meter NOTE If a DTTS DTTC small pipe transducer was purchased separately from the TFX meter the following configuration procedure is required DTTS DTTC Small Pipe ...

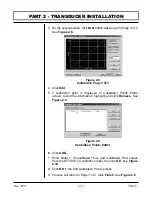
Page 33: ...ormation highlight and click Remove See Figure 2 9 6 Click ADD 7 Enter Delta T Uncalibrated Flow and Calibrated Flow values from the DTTS DTTC calibration label the click OK See Figure 2 10 8 Click OK in the Edit Calibration Points screen 9 Process will return to Page 3 of 3 Click Finish See Figure 2 8 PART 2 TRANSDUCER INSTALLATION Figure 2 8 Calibration Page 3 of 3 Figure 2 9 Calibration Points ...

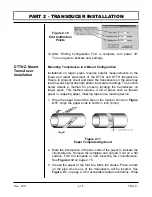
Page 34: ...s This method requires a roll of paper such as freezer paper or wrapping paper masking tape and a marking device 1 Wrap the paper around the pipe in the manner shown in Figure 2 11 Align the paper ends to within inch 6mm 2 Mark the intersection of the two ends of the paper to indicate the circumference Remove the template and spread it out on a flat surface Fold the template in half bisecting the ...

Page 35: ... prohibits the wrapping of the paper around the circumference cut a piece of paper to these dimensions and lay it over the top of the pipe Length Pipe O D 1 57 Width Spacing determined on page 2 6 Mark opposite corners of the paper on the pipe Apply transducers to these two marks 5 For DTTN transducers place a single bead of couplant approximately inch 12 mm thick on the flat face of the transduce...

Page 36: ...owards and away from the upstream transducer while observing Signal Strength Clamp the transducer at the position where the highest Signal Strength is observed Signal Strength of between 7 and 100 is acceptable On certain pipes a slight twist to the transducer may cause signal strength to rise to acceptable levels 8 Certain pipe and liquid characteristics may cause Signal Strength to rise to great...

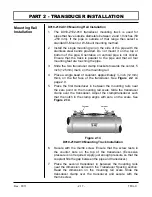
Page 37: ...ch 12 mm thick on the flat face of the transducer See Figure 2 2 on page 2 9 5 Place the first transducer in between the mounting rails near the zero point on the mounting rail scale Slide the transducer clamp over the transducer Adjust the clamp transducer such that the notch in the clamp aligns with zero on the scale See Figure 2 14 6 Secure with the thumb screw Ensure that the screw rests in th...

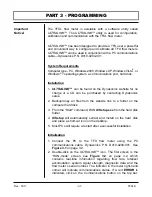
Page 38: ...sales 2 Backup Copy all files from the website link to a folder on the computer hard disk 3 From the Start command RUN UlSetup exe from the hard disk folder 4 UlSetup will automatically extract and install on the hard disk and place a short cut icon on the desktop 5 Most PCs will require a restart after a successful installation Initialization 1 Connect the PC to the TFX flow meter using the PC co...

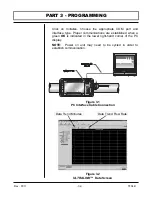
Page 39: ...tions are established when a green OK is indicated in the lower right hand corner of the PC display PART 3 PROGRAMMING Figure 3 1 PC Interface Cable Connection Figure 3 2 ULTRALINK Data Screen NOTE Power on unit may need to be cycled in order to establish communication Data Trend Flow Rate Data Trend Minutes ...

Page 40: ...portion of the screen and that the TFXL have its power cycled Standard Configurations contains the most popular applications for the TFXL TFXL flow meters with DTTN DTTH transducers have been constructed and configured at the Dynasonics factory per the specifications provided with each customer order If the Standard Configuration does not match the pipe schedule or material select the proper confi...

Page 41: ...llustrates the Scientific Notation values and their respective decimal equivalents MIN Flow is used by the TFXL to establish filter settings in its operating system Enter a flow rate that is the minimum flow rate anticipated within the system For unidirectional systems this value is typically zero For bi directional systems this value is set to a negative number that is equal to the maximum negati...

Page 42: ...se ceiling and should not be indicative of a successful flow meter startup The entry has three purposes It provides an error indication Low Signal Strength Error 0010 on the TFXL display when liquid conditions within the pipe have changed to the point where flow measurements may not be possible It warns if the pipe s liquid level has fallen below the level of the transducers It can also signal tha...

Page 43: ...measures the velocity of the liquid in the pipe and converts that velocity to volume by multiplying the velocity by the cross sectional area of the pipe If there are gas bubbles within the liquid the gas is displacing some of the liquid and errors can occur When Vol Correction Sig Str Limit is set to zero the compensation function is not operational To use the feature enter the maximum Signal Stre...

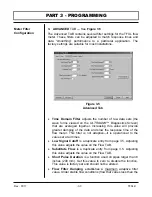
Page 44: ...d slow the response time of the flow meter This filter is not adaptive it is operational to the value set at all times Low Signal Cutoff is a duplicate entry from page 3 5 Adjusting this value adjusts the value on the Flow TAB Substitute Flow is a duplicate entry from page 3 5 Adjusting this value adjusts the value on the Flow TAB Short Pulse Duration is a function used on pipes larger than 8 inch...

Page 45: ...ngs outside of the window are held up in accordance with the Bad Data Rejection Filter Flow Filter MinHysteresis sets a minimum hysteresis window that is invoked at low flow rates where the of rate Flow Filter Hysteresis is very small and ineffective This entry is entered in picoseconds and is differential time This value is factory set and should not be altered without consulting the Dynasonics t...

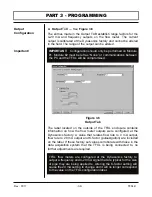
Page 46: ...pulses gallon are included on the label If these factory set values corroborate with those in the data acquisition system that the TFXL is being connected to no further adjustments are required PART 3 PROGRAMMING Figure 3 6 Output Tab TFXL flow meters are configured at the Dynasonics factory to output a frequency and 4 20 mA signal that are typical for the size of pipe they are being applied to Al...

Page 47: ...rate to gallons second then multiply by the desired K factor pulses gallon This value equals the maximum frequency output from the flow meter Multiply this value by four to calculate the value to be entered into the 10 kHz Calibration box Press the Download button to save and establish the new K factor By altering the factory setting the 20 mA setting will not be correct Example Maximum Flow Rate ...

Page 48: ... Select Net to display the accumulated difference between the positive and negative totalizers This feature will subtract backflow drain back from the totalizer value Select Positive to display only flows moving in the forward direction Select Negative to display only flows moving in the backwards direction Display Dwell Time Enter a value between 1 and 10 seconds to establish how long the flow me...

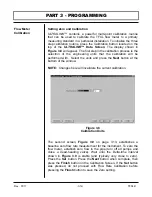
Page 49: ...th Select the units and press the Next button at the bottom of the window NOTE Changes here will invalidate the current calibration The second screen Figure 3 9 on page 3 13 establishes a baseline zero flow rate measurement for the instrument To zero the flow meter establish zero flow in the pipe turn off all pumps and close a dead heading valve Wait until the Delta time interval shown in Figure 3...

Page 50: ...ress the Set button Repeat for as many points as desired NOTE If only one point is to be used it is preferred that a flow rate as high as anticipated in normal operation is used as the calibration point If an erroneous data point is collected the point can be removed by pressing the Edit button selecting the bad point and selecting Remove Press the Finish button when all points have been gathered ...

Page 51: ...meters or may be recalled should the same pipe be surveyed again or multiple meters programmed with the same information Printing a Flow Meter Configuration and Calibration Report Select File from the upper task bar and Print to print a calibration and configuration information sheet for the flow meter installation Maintenance No periodic maintenance is required for this product Figure 3 10 Flow R...

Page 52: ......

Page 53: ...APPENDIX ...

Page 54: ......

Page 55: ......

Page 56: ...3836 1 Carbon dioxide 1 10 839 2752 6 7 7 0 137 0 151 Carbon tetrachloride 1 60 926 3038 1 2 5 0 607 0 968 Chloro benezene 1 11 1273 4176 5 3 6 0 722 0 799 Chloroform 1 49 979 3211 9 3 4 0 550 0 819 Diethyl ether 0 71 985 3231 6 4 9 0 311 0 222 Diethyl Ketone 1310 4295 1 Diethylene glycol 1 12 1586 5203 4 2 4 Ethanol 0 79 1207 3960 0 4 0 1 390 1 097 Ethyl alcohol 0 79 1207 3960 0 4 0 1 396 1 101 E...

Page 57: ...3 9 2932 7 4 79 Refrigerant 113 1 56 783 7 2571 2 3 44 Refrigerant 114 1 46 665 3 2182 7 3 73 Refrigerant 115 656 4 2153 5 4 42 Refrigerant C318 1 62 574 1883 2 3 88 Silicone 30 cp 0 99 990 3248 30 000 29 790 Toluene 0 87 1328 4357 4 27 0 644 0 558 Transformer Oil 1390 4557 4 Trichlorethylene 1050 3442 6 1 1 1 Trichloro ethane 1 33 985 3231 6 0 902 1 200 Turpentine 0 88 1255 4117 5 1 400 1 232 Wat...

Page 58: ...ged Initiate a meter RESET by cycling power or by selecting SYSTEM RESET in the SEC MENU 1002 System configuration has changed Initiate a meter RESET by cycling power or by selecting SYSTEM RESET in the SEC MENU Class B Errors 3001 Invalid hardware configuration Upload corrected file 3002 Invalid system configuration Upload corrected file 3003 Invalid strategy file Upload corrected file 3004 Inval...

Page 59: ...8 6 6 625 6 407 0 109 6 357 0 134 6 065 0 280 6 065 0 280 8 8 625 8 407 0 109 8 329 0 148 8 125 0 250 8 071 0 277 7 981 0 322 7 981 0 322 10 10 75 10 482 0 134 10 42 0 165 10 25 0 250 10 13 0 310 10 02 0 365 10 02 0 365 12 12 75 12 42 0 165 12 39 0 180 12 25 0 250 12 09 0 330 12 00 0 375 11 938 0 406 14 14 00 13 50 0 250 13 37 0 315 13 25 0 375 13 25 0 375 13 124 0 438 16 16 00 15 50 0 250 15 37 0...

Page 60: ...3 0 625 6 6 625 5 761 0 432 5 761 0 432 5 501 0 562 5 187 0 719 8 8 625 7 813 0 406 7 625 0 500 7 625 0 500 7 437 0 594 7 178 0 719 6 183 1 221 10 10 75 9 750 0 500 9 75 0 500 9 562 0 594 9 312 0 719 9 062 0 844 8 500 1 125 12 12 75 11 626 0 562 11 75 0 500 11 37 0 690 11 06 0 845 10 75 1 000 10 12 1 315 14 14 00 12 814 0 593 13 00 0 500 12 50 0 750 12 31 0 845 11 81 1 095 11 18 1 410 16 16 00 14 ...

Page 61: ...5 Wall 0 39 0 43 0 47 0 51 0 55 0 59 0 63 I D 8 51 8 45 8 39 8 33 8 27 8 21 8 15 I D 31 22 31 14 31 06 30 98 30 90 30 82 30 74 10 O D 11 10 11 10 11 10 11 10 11 10 11 10 11 10 Std 0 123 Dbl 0 250 36 O D 38 30 38 30 38 30 38 30 38 30 38 30 38 30 Std 0 250 Dbl 0 500 Wail 0 39 0 32 0 35 0 38 0 41 0 44 0 47 Wall 0 43 0 48 0 62 0 58 0 45 0 68 0 73 I D 10 32 10 46 10 40 10 34 10 28 10 22 10 16 I D 37 44...

Page 62: ...025 1 055 1 062 I D 4 805 4 875 4 907 5 063 4 874 1 O D 1 375 1 375 1 375 1 660 6 0 D 6 125 6 125 6 125 6 625 6 000 Wail 0 065 0 055 0 042 0 146 Wall 0 192 0 140 0 122 0 250 0 063 I D 1 245 1 265 1 291 1 368 ID 5 741 5 845 5 881 6 125 5 874 1 O D 1 625 1 625 1 625 1 900 7 O D 7 625 7 000 Wall 0 072 0 060 0 049 0 150 Wall 0 282 0 078 I D 1 481 1 505 1 527 1 600 I D 7 062 6 844 2 O D 2 125 2 125 2 1...

Page 63: ...11 84 11 84 48 O D 50 55 50 80 51 40 51 98 Wail 0 50 0 57 0 62 0 68 0 74 0 80 0 86 0 92 Wall 1 26 1 42 1 71 1 99 I D 10 10 9 96 10 16 10 04 10 12 10 00 10 12 10 00 I D 47 98 47 96 47 98 48 00 12 O D 13 20 13 20 13 50 13 50 13 78 13 78 14 08 14 08 54 O D 56 66 57 10 57 80 58 40 Wall 0 54 0 62 0 68 0 75 0 82 0 89 0 97 1 04 Wall 1 35 1 55 1 90 2 23 I D 12 12 11 96 12 14 12 00 12 14 12 00 12 14 12 00 ...

Page 64: ...03 39 758 59 636 79 515 99 394 119 3 139 15 159 03 178 91 198 80 218 67 238 50 258 40 278 30 298 20 318 10 337 94 357 82 5 5 05 62 430 93 645 124 86 156 07 187 3 218 50 249 72 280 93 312 10 343 36 374 60 405 80 437 00 468 20 499 40 530 65 561 87 6 6 06 89 899 134 85 179 80 224 75 269 7 314 65 359 60 404 55 449 50 494 45 539 40 584 30 629 30 674 20 719 20 764 14 809 09 8 7 98 155 89 233 83 311 78 3...

Page 65: ...7 2 9562 5 10758 11953 13148 14344 15539 16734 17930 19125 20320 21516 34 33 25 2706 4 4060 0 5413 0 6766 0 8119 2 9472 4 10826 12179 13532 14885 16238 17592 18945 20298 21651 23004 24358 36 35 25 3041 8 4563 0 6084 0 7604 5 9125 4 10646 12167 13688 15209 16730 18251 19772 21292 22813 24334 25855 27376 42 41 25 4165 4 6248 0 8331 0 10414 12496 14579 16662 18744 20827 22910 24992 27075 29158 31241 ...

Page 66: ...horoughly cleaned and any process chemicals removed before it will be accepted for return The purchaser must determine the applicability of the product for its desired use and assumes all risks in connection therewith Dynasonics assumes no responsibility or liability for any omissions or errors in connection with the use of its products Dynasonics will under no circumstances be liable for any inci...

Page 67: ... have an operation problem require service or need to schedule field service please contact our Service Department DYNASONICS Division of Racine Federated Inc 8635 Washington Avenue Racine WI 53406 PHONE 800 535 3569 or 262 639 6770 FAX 262 639 2267 Return Goods Authorization When returning equipment it is necessary for you to contact our Service Department at 800 535 3569 or 262 639 6770 to obtai...

Page 68: ...hipment shall apply This warranty is exclusive and is in lieu of all other warranties express implied or statutory including the warranty of merchantability 6 DELIVERY The Seller shall not be liable for loss or damage of any kind resulting from delay or inability to deliver on account of flood fire labor trouble riots civil disturbances accidents acts or orders or regulations of civil or military ...

Page 69: ......
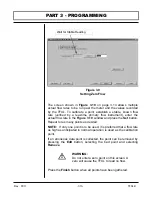
Page 70: ... of General Electric Co VESPEL is a registered trademark of E I DuPont de Nemours and Company NATIONAL ELECTRICAL CODE is a registered trademark of NFPA WINDOWS and VISTA are registered trademarks of Microsoft Corp UL is a registered trademark of Underwriters Laboratories 8635 Washington Avenue Racine WI 53406 Toll Free in U S and Canada Tel 800 535 3569 Fax 800 732 8354 Tel 262 639 6770 Fax 262 6...

Reviews: