background image

Manuale di Installazione e Manutenzione unità di recupero calore ad altissima efficienza  - 

Very high efficiency heat recovery unit

pag. 39

4) Rilasciare il pulsante, si vedrà il LEd di stato lampeggiare con colori

blu rosso e verde, mentre gli altri LEd si accenderanno a seconda

che la velocità minima attuale sia 60% (un LEd acceso), 70% (due

led accesi), 80% (tre LEd accesi),  90% (quattro LEd accesi) o

100% (cinque LEd accesi).

5) Per modificare l’impostazione della minima velocità premere il tasto

portando al valore desiderato con il corrispondente livello di LEd

accesi.

6) Attendere alcuni secondi l’uscita dalla funzione di impostazione con

memorizzazione automatica di quanto selezionato.

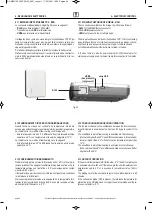
5.9 DESCRIZIONE DEI TASTI E DISPLAy DEL PANNELLO DI 

COMANDO - WUI

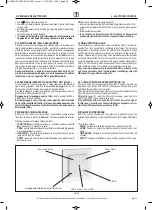
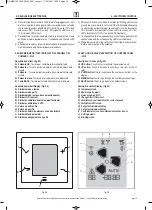
Descrizione dei tasti (fig. 23)

A) Pulsante OK.

Toccare per confermare le scelte effettuate

B) Pu.

Toccare per incrementare il numero del valore sele-

zionato

C) Pulsante -.

Toccare per decrementare il numero del valore sele-

zionato

D) Pulsante menù.

Toccare per accedere ai menù disponibili

E) Tasto BACK.

Toccare per tornare alla schermata principale

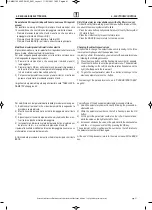
Descrizione simboli Display  (fig. 24)

A) Simbolo modo a tempo

B) Simbolo modo party

C) Simbolo modo lontano da casa (unità spenta)

D) Simbolo filtri sporchi

E) Simbolo ventilatore (indica la velocità attuale)

F) Simbolo ventilazione  AUTO

G) Valore a quattro cifre

H) Valore a due cifre

I) Simbolo allarme (combinato con altri simboli)

J) Simbolo Menù parametri

K) Simbolo collegamento con unità

4) Release the button, you will see the status led flashing with red and

green blue colors, while the other LED’s will illuminate depending

on whether the current minimum speed is 60% (one led illuminate),

70% (two LED’s illuminate), 80% (three LED’s illuminate), 90% (four

LED’s illuminate) or 100% (five and LED’s illuminate).

5) to change the minimum speed setting, press the key leading to the

desired value with the corresponding LED’s level illuminate.

6) Wait a few seconds for the output from the Setup function with au-

tomatic memorisation of the selected.

5.9 KEY AND  DISPLAY DESCRIPTION,  OF CONTROL PANEL

- WUI

Description of the keys (fig.23)

A) OK button: 

touch to start or activate the selected mode.

B) UP button:

touch to increase the number or the item on the di-

splay.

C) DOWN button: 

touch to decrease the number or the item on the

display.

D) MENU button: 

touch to go through the available menu settings.

E) BACK button:

touch to go back to the default screen.

Description simbol Display 

(fig. 24)

A) Temporary mode

B) Boost or party mode

C) Away mode (unit off)

D) Change filter / Filter reset

E) ventilator speed. (indicates the current speed)

F) ventilator AUTO mode.

G) 4-digit actual value display

H) 2-digit actual value display

I) Fault indicator (can be combined with other icons.)

j) Settings mode

K) Binding mode 

5 - REGOLAZIONE ELETTRONICA

5 - ELECTRONIC CONTROL


A  

B


E  

C


D


fig. 23

fig. 24

DC MAN I 05 000 PRH 03_0421_Layout 1  11/05/2021  16.55  Pagina 39

Summary of Contents for RENOFRESH DRH

Page 1: ... USO E MANUTENZIONE INSTALLATION USE AND MAINTENANCE MANUAL RENOFRESH DRH RENOFRESH PLUS DRH UNITÀ DI RECUPERO CALORE RESIDENZIALE RESIDENTIAL HEAT RECOVERY UNITS DC MAN I 05 000 PRH 03_0421_Layout 1 11 05 2021 16 55 Pagina 1 ...

Page 2: ...ridge di rete Ethernet Rf BdG 46 5 12 funzionamento in free cooling free heating 46 5 13 funzionamento in sbrinamento 46 5 14 funzionamento in pre riscaldamento 47 5 15 funzionamento in post riscaldamento 47 6 MANUTENZIONE ORdINARIA 6 1 Informazioni preliminari 48 6 2 controlli con cadenza almeno bimestrale 48 6 3 controlli con cadenza almeno annuale 49 7 GESTIONE ANOMALIE dI IMPIANTO 52 7 1 Guida...

Page 3: ... as a consequence must be kept carefully and must ALWAYS accom pany the appliance even if transferred to other owners or users or transferred to another plant If damaged or lost request another copy from the Manufacturer Gli interventi di riparazione o manutenzione devono essere eseguiti da personale autorizzato o da personale qualificato secondo quanto previsto dal presente libretto Non modificar...

Page 4: ...s for accessing the internal parts of the appliance without first having switched off the master switch of the system È vietato disperdere abbandonare o lasciare alla portata di bambini il materiale dell imballo in quanto può essere potenziale fonte di pericolo It is prohibited to disperse abandon or leave the packing mate rials within the reach of children as they are a potential source of danger...

Page 5: ...el Consiglio del 4 luglio 2012 sui rifiuti di apparecchiature elettriche ed elettroniche RAEE Regolamenti della commissione UE N 1253 2014 e 1254 2014 di attuazione delle Direttive 2009 125 CE e 2010 30 UE riguardo alle specifiche per la progettazione ecocompatibile delle unità di ventilazione residenziali Giorgio Bertani Nonliìiativo Niire Via Terezin 9 lndiriuo Address Reggio Emilia Città City E...

Page 6: ...icativo the units feature a rating plate that describes the following A Mark of the manufacturer B Address of the manufacturer c Unit model D Unit serial number E Voltage number of phases frequency of the power supply f Max absorbed current G Unit code H Manufacturing date I cE mark L Bar code 0DGH LQ WDO 9LDOH Terezin 9 REGGIO EMILIA RE 0RGHOOR 0RGHO 0DWULFROD 6HULDO 1XPEHU 7HQVLRQH DVL UHTXHQ D ...

Page 7: ...at tare immediatamente la rete di vendita per segnalare il pro blema IDENTIFICATION AND ENERGY LABELLING OF THE UNIT In the picture below is showed the identify and energy class labels po sition the energy label is under the commission Delegated Regulation EU 1254 2014 implementing Directive 2009 125 Ec and 2010 30 EU regarding the specific eco design and labelling of residential ventilation units...

Page 8: ...ssere forniti in versione PLUS ossia dotati di sistema di ionizzazione dell aria Tale sistema unico nel suo genere ha lo scopo di sanificare e deodorizzare l aria e le superfici della macchina delle canalizzazioni e degli ambienti confinati 1 1 INTRODUCTION RenoFresh DRH heat recovery units for home and commercial application are distinguished by very high heat recovery efficiency compactness and ...

Page 9: ...sione ed espulsione a girante libera in poliammide e fibra di vetro rinforzata direttamente accoppiati a motore elettrico Ec singolarmente regolabili in continuo dall elettronica di bordo di sposizione ottimizzata delle sezioni ventilanti per la riduzione del ru more trasmesso verso gli ambienti connessioni aerauliche circolari in materiale plastico dotate di guar nizione di tenuta supplementare c...

Page 10: ... ECODESIGN 3 ECODESIGN SPECIFIC DATA 3 Tipologia dichiarata Declared typology RVU BVU canalizzata ducted Tipo di azionamento installato o prescritto type of drive installed or intended to be installed 3 Multispeed 3 Multispeed Tipologia sistema di recupero hRS type of HRS Recuperative Recuperative Classe SEC clima temperato SEC class average climate A A consumo specifico di energia clima temperato...

Page 11: ...annello di chiusura inferiore amovibile oppure verticale a parete con scarico condensa nel lato fisso inferiore 1 6 POSSIBLE LAYOUTS two possible different installations are possible with the same unit ho rizontal for ceiling with drain tray outlet placed on the removable lower panel or vertical for wall with drain tray outlet placed on the lower fixed side 1 CARATTERISTICHE TECNICHE 1 TECHNICAL S...

Page 12: ...imensione Dimension A mm 874 874 A1 mm 972 972 B mm 240 300 C mm 655 655 C1 mm 360 360 D mm 125 125 D1 mm 16 16 Peso Weights kg 12 17 Dimensione imballo Package Dimension 150 280 A1 mm 1030 1030 B mm 330 330 C mm 690 690 Peso Weights kg 15 20 N max impilabili Max number of units piled n 5 5 1 CARATTERISTICHE TECNICHE 1 TECHNICAL SPECIFICATIONS DC MAN I 05 000 PRH 03_0421_Layout 1 11 05 2021 16 55 ...

Page 13: ... Model PR 150 PR 280 A mm 200 200 B mm 285 285 C mm 290 290 ØD mm 125 125 ØW inch 1 2 M 1 2 M ØS solo per Bhc only for Bhc inch 1 2 M 1 2 M Peso Weight kg 6 6 BW1 Potenza termica Heating capacity 1 W 300 480 BW2 BHC Potenza termica Heating capacity 2 W 370 580 BHC Potenza frigorifera cooling capacity 3 W 150 210 BHC Potenza frigorifera cooling capacity 4 W 320 440 PRE POST TRATTAMENTO ACQUA A CANA...

Page 14: ...ATOR v2O the 2 way valve V2O allows feeding the hydronic circuit in ON Off mode Direct drive from the 230VAc unit through interposition of a relay by the installer the kit is supplied dismounted and includes the following items 2 ways valve with ON Off actuator 230V power supply Preassembled hydraulic fittings KIT 3 WAY vALvE ACTUATOR v3M the V3M kit allows the adjustment of the BW2 or BHc hot wat...

Page 15: ...apacitivo e i LEd di segnalazione costituisce il pan nello di controllo dell unità ventilante Può coesistere con l interfaccia a 4 tasti Installazione a parete WALL MOUNT HUMIDITY SENSOR USW It is suitable for ventilation control according to ambient air humidity change the fan speed will increase up to the maximum value in case of too high humidity or sudden variation of the measured value the se...

Page 16: ...i CONTROL PANEL WITH DISPLAY WUI the visualisation display with user interface can be wall mounted It can be combined with the heat recovery unit and they can be con nected through Rf It can be an alternative of tS4 option but they could coexist the interface can control and change the conditions of use and it can reactivate the dirty filter indication set time band and permit to switch off the un...

Page 17: ...itta Costruttrice declina ogni responsabilità per danneggia menti dovuti a cattivo scarico o per mancata protezione dagli agenti atmosferici Smaltire i materiali impiegati per l imballaggio in modo ecologico 2 1 PACKAGING the heat recovery unit and their accessories lay on pallets and wrap ped with multilayer protective film which must remain integral until as sembly Units and their accessories ar...

Page 18: ...itare di toccare le parti mobili e di usare le stesse come punti di sollevamento movimentazione Verificare la perfetta integrità dei vari componenti dell unità e degli eventuali accessori a corredo 3 1 DEFINITIONS CUSTOMER the customer is the person the agency or the company who bought or rented the unit USER OPERATOR the operator or user is the physical person who uses the unit for the purpose fo...

Page 19: ...to rispetto degli spazi tecnici minimi può comportare l inaccessibilità ai componenti macchina rendendo vana od im possibile qualsiasi operazione di manutenzione Only for DRH units are supplied in the packaging n 2 drain closing plugs for not used predisposition n 1 drain joint to be fixed depending on the unit mounting horizontal or vertical n 1 electrical cable with connector JSt NVR 03 type for...

Page 20: ... lateral and lower gap space for servicing in case of false ceiling installation make suitable trapdoors to ensure acces sibility to the machine and its possible duct accessories fig 1 3 6 MONTAGGIO RENOFRESH DRH A PARETE Posizionare l unità su di una parete adeguata al peso della macchina interporre sempre opportuni sistemi flessibili e smorzanti tra unità e struttura di supporto Evitare le conne...

Page 21: ... del modello Per il passaggio del cavo utilizzare gli appositi passaggi sul lato quadro elettrico Connettere il cavo di segnale del riscaldatore nell apposito con nettore sulla scheda denominato x17 Potenza Max Amp 1 5 kW figura 4 5 3 7 CONNECTION TO AIR DUCTS Size air ducts depending on ventilation needing of each air plant sec tor and unit external static pressure including possible additional a...

Page 22: ...overy unit pag 22 fig 5 COLLEGAMENTO BER e V3M V2O BER and v3M v2O CONNECTION 3 INSTALLAZIONE E MESSA IN SERVIZIO 3 INSTALLATION AND START UP I collegamenti tratteggiati sono a cura del cliente The dotted connections are the responsibility of the customer DC MAN I 05 000 PRH 03_0421_Layout 1 11 05 2021 16 55 Pagina 22 ...

Page 23: ...co condensa deve avere sempre una pen denza verso l esterno Assicurarsi che il tubo per il deflusso della condensa non solleciti l at tacco di scarico dell unità 3 9 DRAIN WATER CONNECTIONS For each used outlet 19 mm external diameter the condensate pipeline shall be provided with a syphon both to win the possible air underpressure at outlet and to avoid the entry of bad smells for each drain conn...

Page 24: ...ei tubi a seguito del congelamento dell acqua in essi contenuta 3 10 WATER CONNECTIONS TO BW1 BW2 BHC DUCT WATER COIL the possible hot water coil duct section is fitted with G 1 2 male con nections The BHC module is equipped with a complete casing with a con densate drain which must be sifonated as shown in fig 6 Be sure that the section is well supported by the 4 hooks 1 shown in the pictures 7 a...

Page 25: ...erdite di carico apprezzabili tenere conto di una massima potenza elettrica assorbita pari a 20 W 3 11 SANIFICATION MODULE FOR RENOFRESH PLUS Ducted stainless steel section fig 9 It is switched on at fans running it s able to do an efficient antibacterial treatment ensuring a perfect healthiness of treated air theairpressuredropduetotheinstallationofthesectioncan tbetaken into account maximum powe...

Page 26: ...ella ionizzazione potrebbe alterarne nel tempo la co lorazione La distanza minima consigliata è di almeno 50 cm NOTA Nel caso si colleghi il MODULO PLUS tramite On Off remoto vedere lo schema Fig 18 a pag 33 3 12 SAFETY INSTRUCTIONS BEFORE INSTALLATION the devices must be installed strictly observing the instructions pro vided in this manual Before starting the device check that the various compon...

Page 27: ...ntatto pulito 1 2 free voltage contact 1 2 Realizzare connessione lunghezza necessaria Make connection with neccesary lenght N L ATTENZIONE minima velocità ventilatori deve essere diversa da zero ATTENTION min fans speed must be not equal to zero CONTROL BOARD Unit on relay X8 on board Relè unità X8 su scheda I collegamenti tratteggiati sono a cura del cliente The dotted connections are the respon...

Page 28: ...cessori elettrici deve essere in genere mantenuta separata da quella dell unità base Per le connessioni tra unità base ed accessori impiegare i pressacavi posti sul lato dell unità fig 11 4 1 GENERAL WARNINGS For each unit provide a proper power supply line with safety de vice equipped with differential magnetothermal switch according to current regulations electronically commutated devices inside...

Page 29: ...12 for basic unit power supply use 3 wire cable line neutral ground supply with the unit for the installation of the interface only if needed use a two module flush mounted wall box the interface is very thin and usually it is not necessary to install the box fix it to the wall by two appropriate fisher with screws through the eyelets in the rear socket fig 12 to operate use a battery type cR2032 ...

Page 30: ...Rf 4 3 INSTALLATION CO2 OR HUMIDITY SENSOR Open the sensor pushing the plastic bottom clamp fig 13 fix the sensor to the wall by two appropriate fisher with screws through the eyelets Only in case a cO2 sensor is present it is necessary to supply a 230Vac voltage to the sensor Only the RH sensor is powere by n 2 AA 1 5V batteries It is not necessary to connect any cable between sensor and unit the...

Page 31: ... the housing Pass the antenna wire through a blind hole opened by a little incision in the plastic material fig 14 onnect the antenna to the UfL PcB connection fig 15 Assembly all the removed parts fig 14 Il controllo elettronico dell unità consente la regolazione della ventila zione attraverso la gestione dei dispositivi ausiliari di riscaldamento e o della velocità di rotazione dei ventilatori I...

Page 32: ...n ponte realizzato da alcuni centimetri di filo elettrico Per utilizzare il contatto rimuovere il ponte tagliare a metà il filo e connettervi con l ausilio di morsetti ausiliari il contatto esterno da uti lizzare con contatto chiuso l unità si attiverà con contatto aperto l unità sarà spenta 4 5 REMOTE ON OFF CONTACT the unit is equipped with a clean contact for remote start stop fig 17 this is th...

Page 33: ...ry clean contact therefore two total clean contacts are required which must work in parallel fig 18 therefore it is necessary to realize what in the diagram 230V L linea line N neutro neutral PE terra protective earth PE N L 1 2 contatto pulito 1 2 free voltage contact 1 2 Realizzare connessione lunghezza necessaria Make connection with neccesary lenght N L ATTENZIONE minima velocità ventilatori d...

Page 34: ...e activation 1 2 contatto pulito 1 2 potential dry contact X13 X14 Alimentazione ventilatori Fans power supply 1 linea 2 terra 1 L switched 2 Neutral X17 Resistenza Preriscaldo Preheater 1 Linea 2 Terra 3 Neutro 1 Line 2 Ground 3 Neutral X28 Serranda di bypass 230 V By pass 230V motor 1 uscita 2 chiuso 2 uscita 1 aperto 3 linea 1 out 2 close 2 out 1 open 3 Line X20 nero black Sensore di temperatur...

Page 35: ... signal In this case it could be necessary initialize the keyboard or to in stall the additional antenna accessory ANT INITIALIzATION PROCEDURE Within the first 30 minutes when the machine is powered press and hold the two buttons up or down indifferent until the green LED lights up the are four botton AWAY it allows to select the speed when nobody is at home HOME it allows to select the medium sp...

Page 36: ...nsori I 4 LEd indicativi identificano la modalità corrente del sensore durante l installazione il pulsante capacitivo viene utilizzato per le gare la radiofrequenza con la scheda principale o un altro sensore Tramite il sensore l utente può anche impostare la modalità di ven tilazione Il pulsante può anche essere utilizzato per modificare i settaggi pre definiti come per la sonda cO2 si possono se...

Page 37: ...capacitivo Capacitive button Led di controllo stato macchina a 3 colori Three color status LED s Sonda CO2 CO2 Sensor Sonda umidità RH RH Humidity Sensor fig 22 fig 21 Manuale di Installazione e Manutenzione unità di recupero calore ad altissima efficienza Very high efficiency heat recovery unit pag 37 5 REGOLAZIONE ELETTRONICA 5 ELECTRONIC CONTROL CO2 RH DC MAN I 05 000 PRH 03_0421_Layout 1 11 05...

Page 38: ...nato Impostazione velocità Party massima velocità 1 Premere il tasto per vedere la prossima selezione 2 Per settare la minima velocità selezionare il LEd relativo alla icona orologio 3 Premere e tenere premuto il tasto fino a che il LEd di stato a sini stra inizia a lampeggiare 5 7 INITIALIzING CO2 SENSOR AND HUMIDITY SENSOR Power the unit wait 3 minutes necessary to reset the positioning of the b...

Page 39: ...H Valore a due cifre I Simbolo allarme combinato con altri simboli J Simbolo Menù parametri K Simbolo collegamento con unità 4 Release the button you will see the status led flashing with red and green blue colors while the other LED s will illuminate depending on whether the current minimum speed is 60 one led illuminate 70 two LED s illuminate 80 three LED s illuminate 90 four LED s illuminate o...

Page 40: ...o Modo ventilazione party Modo ventilazione AUTO Al passaggio da una opzione alla successive il relativo simbolo a display lampeggia è sufficiente rilasciare i tasti e e dopo circa un secondo la voce selezionata diverrà attiva ed il display rimarrà fisso senza lam peggiare 5 10 CONTROL PANEL WITH DISPLAY WUI Technical details Material Pc and ABS plastic Size WxHxD Unit 55x55x35mm 83x83x35mm includ...

Page 41: ...ine della procedura tornare alla schermata principale con il tasto BAcK Dirty filters alarm reset available only with dirty filters icon on to reset the dirty filter warning press the menu button for about 10 se conds until the menu symbols start to flash Press the menu button briefly several times until the dirty filters symbol D starts to flash Press the OK button A to reset the filter alarm Pre...

Page 42: ...one free heating free heating enable 1 0 disabilitato 1 Abilitato 0 Disable 1 Enable 17 Abilitazione free cooling free cooling enable 1 0 disabilitato 1 Abilitato 0 Disable 1 Enable 18 Posizione sonda mandata T2 Position t2 supply 0 Riservata Reserved 19 Posizione sonda defrost T3 Position t3 outlet 0 Riservata Reserved 20 Metodo rilevazione stagione Season metod detection 0 0 disabilitato 3 Stabi...

Page 43: ...unit the para meters that can be viewed are indicated in the following table Menù fasce orarie Il menù fasce orarie è suddiviso in tre sottomenù Attivazione disattivazione delle fasce orarie Tipo di programma orario scelto Modifica del programma orario scelto Time bands menu the time bands menu is divided into three submenus Activation deactivation of time bands type of time program chosen Modific...

Page 44: ... 4 nella parte bassa dello schermo Questo significa che è possibile definire quattro orari per i giorni da lunedì a venerdì e quattro orari per il sabato e la domenica Per ogni singolo programma si possono definire fino a max 6 possibili orari di cambio impostazioni nel caso della foto fig 29 si è scelto di impostarne sola mente 4 Per ogni orario oltre alla relativa ora di applicazione si può defi...

Page 45: ...lowing screen will appear fig 31 With the lower left number flashing Note how in the last line the numbers from 1 to 5 are outlined with a box indicating that the time program is being changed from Monday to friday the number 1 in the lower left is the same as the cur rent time slot namely 1 In the photo fig 31 it is set that every day from Mon day to friday at 9 am the unit will be active with th...

Page 46: ...e istruzioni contenute nella scatola Nella scatola sono inoltre presenti il cavo di alimentazione con trasfor matore 230V per alimentazione da rete ed un cavo ethernet per la con nessione al router 5 11 ETHERNET NETWORK RF BRIDGE BDG the connections available on the bridge fig 35 are as follows Rj45 10 100 Mbit Ethernet connector Micro USB power connector USBA not present in the model provided the...

Page 47: ...sia impostato su 1 il parametro 28 della tabella parametri sia impostato su 1 il parametro 29 della tabella parametri sia impostato su 1 post solo caldo oppure 2 post solo freddo oppure 3 post caldo freddo Attenzione per la modifica dei parametri è necessario l accessorio WUI 5 14 PRE HEATING OPERATION It is a mode of integration of the inlet air temperature by enabling con nector x17 of the prehe...

Page 48: ...779 sostituire direttamente il filtro quando intasato imbustarlo opportunamente e portarlo in appositi centri di raccolta per il successivo incenerimento Ricordarsi sempre di riposizionare i filtri prima del successivo riavviamento dell unità Azzerare la segnalazione di filtro sporco dalle interfacce utente come spiegato nei paragrafi specifici precedenti 6 1 PRELIMINARY INFORMATION Lack of mainte...

Page 49: ...switch on of unit fig 37 1 2 5 6 3 3 3 3 1 4 6 3 CONTROLLI CON CADENZA ALMENO ANNUALE VENTILATORI Prima di ispezionare i ventilatori agire nel seguente modo 1 Scollegare elettricamente l unità 2 Rimuovere entrambi i filtri 1 fig 37 3 disconnette il sifone di scarico condensa 2 fig 37 4 Togliere prima i tappi di copertura 3 fig 37 svitare le viti del pan nello frontale 4 fig 37 con l apposita chiav...

Page 50: ...na inumidito ATTENZIONE Non utilizzare detergenti liquidi o spray saponi o simili 7 Lavare la rete sotto un getto d acqua calda e asciugare accurata mente con un panno asciutto 8 controllare se il condensatore presenta incrinature o altri danneg giamenti nel caso sostituirlo PLUS MODULE the frequency of the operations to be performed in order to ensure pro per maintenance of the sanitizating modul...

Page 51: ... of the condenser under normal operating conditions is 16000 hours 9 Non appena si nota uno strato biancastro sulla griglia di metallo al l interno del condensatore significa che questo va sostituito In ge nerale la sostituzione del tubo deve avvenire al massimo entro 18 mesi La sostituzione del condensatore è suggerita tra le 8 000 14 000 ore di funzionamento continuativo e deve avvenire entro 18...

Page 52: ...g or missing What to do clean or replace air filter s check air plant project Open the dampers and ba lance the plant Increase setpoint by control panel Install the missing component while unit is off close the access panels Balance the air plant by dampers check plant project Reduce fan speed setpoint See failure 1 check connection between pre heater and controller Install well sized syphon 7 GES...

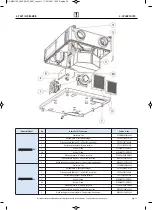
Page 53: ...ic controller cT0hVMd02RPS5400 7 Tappo copri vite coperchio Lock screw cover cap MR20d3128h140000 8 Sfaffa fissaggio con ammortizzatore fixing bracket with damper MR4AA51000100000 RENOFRESH DRH 280 1 Ventilatore fan VTcRBB1902E00860 2 Recuperatore Recovery exchanger PR160P220447A200 3 filtro a pannello ePM10 50 ePM10 50 panel filter cf0P402451700220 4 Servocomando bypass Bypass actuator cT0101047E...

Page 54: ...ale di Installazione e Manutenzione unità di recupero calore ad altissima efficienza Very high efficiency heat recovery unit pag 54 NOTE NOTES DC MAN I 05 000 PRH 03_0421_Layout 1 11 05 2021 16 55 Pagina 54 ...

Page 55: ...ale di Installazione e Manutenzione unità di recupero calore ad altissima efficienza Very high efficiency heat recovery unit pag 55 NOTE NOTES DC MAN I 05 000 PRH 03_0421_Layout 1 11 05 2021 16 55 Pagina 55 ...

Page 56: ...DC MAN I 05 000 PRH 03 0421 DC MAN I 05 000 PRH 03_0421_Layout 1 11 05 2021 16 55 Pagina 56 ...

Reviews: