


Important safety instructions
3
DX-24L200A12
Power source
Operate your TV only from the type of power source
indicated on the marking label. If you are not sure of the
type of power supplied to your home, consult an
electrician or your local power company.
Cautions
Damage requiring service
Unplug this TV from the power outlet and refer servicing
to qualified service personnel under the following
conditions:
• When the power supply cord or plug is damaged or
frayed.
• If liquid has been spilled or objects have fallen into
your TV.
• If your TV has been exposed to rain or water.
• If your TV does not operate normally by following
the operating instructions. Adjust only those
controls that are covered by the operating
instructions because incorrect adjustment of other
controls may result in damage and often require
extensive work by a qualified technician to restore
your TV to its normal operation.
• If your TV has been dropped or damaged in any way.
• When your TV exhibits a distinct change in
performance.
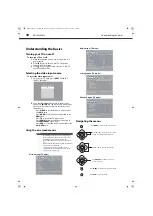
Outdoor antenna grounding
If an outside antenna or cable system is connected to your
TV, make sure that the antenna or cable system is
grounded to provide some protection against voltage
surges and built-up static charges. Article 810 of the
National Electrical Code, ANSI/NFPA No. 70, provides
information with respect to correct grounding of the mast
and supporting structure, grounding of the lead-in wire
to an antenna discharge unit, size of grounding
conductors, location of the antenna-discharge unit,
connection to grounding electrodes, and requirements
for the grounding electrode.
Note to CATV system installer
Article 820 of the National Electrical Code, ANSI/NFPA No.
40 provides guidance for correct grounding. Specifically, it
states that the cable ground must be connected to the
grounding system of the building as close to the point of
cable entry as practical.
Condensation
Moisture forms on the TV if the TV is brought from cool
surroundings into a warm room or if the temperature of
the room rises suddenly. When this happens, the TV's
performance may be impaired. To prevent this, let the TV
stand in its new surroundings for about an hour before
switching it on, or make sure that the room temperature
rises gradually.
Condensation may also form during the summer if the TV
is exposed to the breeze from an air conditioner. In such
cases, change the location of the TV.
Mobile telephone warning
To avoid interference with your TV picture and sound,
operating problems, or even damage, keep your cordless
and cellular telephones away from the TV.
End of life directives
Your TV contains tin-lead solder and a fluorescent lamp
containing a small amount of mercury. Disposal of these
materials may be regulated for environmental reasons.
Your TV also contains material that can be recycled and
reused.
Non-active pixels
The LCD panel contains almost 3 million thin film
transistors, which provide exceptionally sharp video
quality. Occasionally, a few non-active pixels may appear
on the screen as a fixed blue, green, or red point. These
non-active pixels do not adversely affect the performance
of your TV, and are not considered defects.
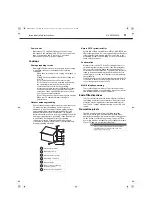
Antenna lead-in wire
Grounding clamp
Antenna discharge unit
Grounding conductors
Ground clamps
Power service grounding
electrode system
Electric service equipment
2
1
3
4
5
6
7
1
2
3
4
5
6
7
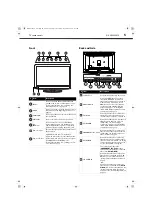
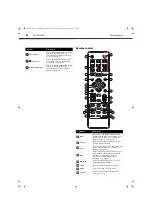
Note
The appearance of the product in this User Guide
may differ from your actual product, and is for
explanatory purposes only.
DX-24L200A12_11-0584_MAN_ENG_V1.book Page 3 Wednesday, September 14, 2011 12:59 PM


