background image


Connect your camera and your PC with the supplied USB cable. 

Click 

Start

? Select 

Programs

?

ArcSoft PhotoImpression 3.0


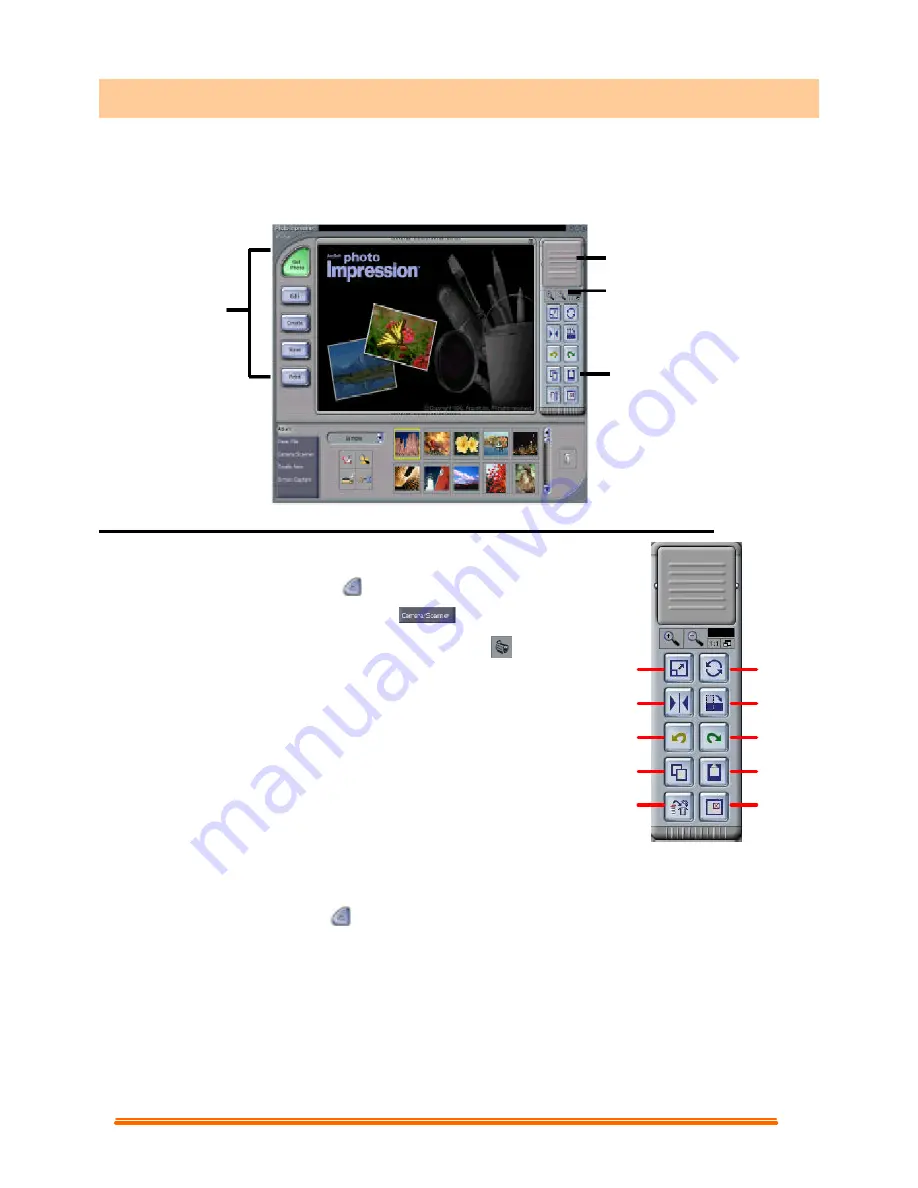
The PhotoImpression Main Screen will appear on your desktop. 


5.1 Viewing Camera Images through PhotoImpression 3.0 

5.1.1 Viewing Camera Images through


 PhotoImpression:


Click the

 [Get Photo

button. 

Click the 

[Camera/Scanner 

]

 button 

View live video from the 

[Video Camera 

]

 button 

and you can get photos from the camera to the 

PhotoImpression main screen. 

5.1.2 Editing an Image:  

The toolbar along the right side of the main screen contains a 

number of editing tools, such as resize, mirror, rotation, etc. 

5.1.3 Working with “Albums”:  

Use the feature to organize photo files into groups and select them by clicking on a thumbnail 

photo rather than  remembering a file name.  

Click the

 [Get Photo

]

 button and  

[Select Album


]

 to view the album options. 

5.1.4 Getting Help:  

PhotoImpression provides extensive online help. If you need more information or     instructions 

on how to use a specific feature or tool, click the 

[Help (?)]

 button in the upper right-hand corner 

of the screen.  

5. Getting Started With PhotoImpression 3.0 

Command 

Buttons 

Navigation Window 

Magnification  
Controls 

Tool Bars 

Main Screen


Delete Icon 

Copy Icon 

Cancel Icon 

Mirror Icon 

Crop/

Resize Icon 

Free Rotation 
Icon  


90

°

 Rotation 

Icon  


Reverse Icon  

Paste Icon  

Close Icon  


Summary of Contents for DX-WC100

Page 1: ...Install PC Camera and PC Camera driver 03 1 2 2 Restart Your Computer 04 2 How To Install MicroSoft NetMeeting For Windows 98 Me 2000 2 1 How To Install Microsoft NetMeeting 05 2 2 How To Start With P...

Page 2: ...Run and execute the file launch exe on the CD to start the installer program 1 1 2 Install Application Software Check the box in front of the Software you would like to install then click the Install...

Page 3: ...n the screen asking you to search a new device 1 2 1 3 In this dialog box you will be asked to select a method to search for driver for your PC Camera Choose Install from the software automatically Re...

Page 4: ...and driver location Then displays the detected device and the driver location 1 2 1 6 Click Next from the following screen Windows will copy Driver files into your system 1 2 1 7 When Windows has fini...

Page 5: ...ect the appropriate location for the shortcuts 2 1 5 Click Next follow the instructions in the Audio Tuning Wizard and then click Finish After you run NetMeeting for the first time you can modify the...

Page 6: ...end instant messages 3 2 How To Start With PC Camera 3 2 1 Plug the PC camera into your PC first 3 2 2 Click the Messenger to go to the main screen 3 2 3 Click the Webcam icon during a conversation or...

Page 7: ...ession To capture a video from the camera to the VideoImpression main screen u Click the New button u Click the Capture button 4 1 2 Working with Albums Use the options on the Album Screen to modify y...

Page 8: ...humbnail and clicking on the Edit Movie icon This will take you to the editing screen 4 1 4 Getting Help VideoImpression provides an extensive online Help If you need more information or instructions...

Page 9: ...er of editing tools such as resize mirror rotation etc 5 1 3 Working with Albums Use the feature to organize photo files into groups and select them by clicking on a thumbnail photo rather than rememb...

Reviews: