background image

J7886 D180 v1.1 


Page 7 of 20 

return to your original screen, leaving the alarm indications active, or press ACK to remove the alarm 
and return to your original screen. 

3.8.3 ALARM SILENCING 

As this aircraft is not fitted with an audible alarm, pressing the SILNCE button has no function. 

3.8.4 ALARM ACKNOWLEDGE 

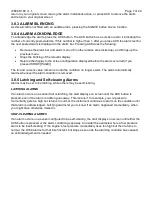
To acknowledge the alarm, press the ACK button. The ACK button has a number next to it indicating the 
number of currently posted alarms. If this number is higher than 1, after you press ACK the alarm text for 
the next posted alarm is displayed in the alarm bar. Pressing ACK does the following: 

  Removes the alarm bar and alarm menu (if no other alarms are stacked up), and brings up the 

previous menu. 

  Stops the blinking of the relevant display 

  Returns the display to the screen configuration displayed before the alarm occurred (if you 

pressed SHOW [PAGE]) 

The tic and numeric value remain red until the condition no longer exists. The alarm automatically 
rearms whenever the alarm condition is removed. 

3.8.5 Latching and Self-clearing Alarms 

Alarms may be set to be latching, while others may be self-clearing. 

LATCHING ALARMS 

If an alarm occurs on a sensor that is latching, the alert displays on screen until the ACK button is 
pressed, 

even if the alarm condition goes away

. This means if, for example, your oil pressure 

momentarily gets too high but returns to normal, the instrument continues to alarm on the condition until 
that alarm is acknowledged. Latching alarms let you to know if an alarm happened momentarily, when 
you might have otherwise missed it. 

SELF-CLEARING ALARMS 

If an alarm occurs on a sensor configured to be self-clearing, the alert displays on screen until either the 
ACK button is pressed 

or

 the alarm condition goes away. Consider the example where a fuel pressure 

alarm to be isself-clearing. If the engine’s fuel pressure momentarily rises too high but then returns to 
normal, the D180 alarms for that brief instant, but stops as soon as the alarming condition has ceased; 
no acknowledgement is needed. 


Summary of Contents for D180 FlightDEK

Page 1: ...J7886 D180 v1 1 Page 1 of 20 Dynon D180 FlightDEK Reference Manual This manual contains information for the use of the Dynon D180 FlightDEK as configured for Jabiru 24 7886...

Page 2: ...clearing Alarms 7 4 Screens 8 4 1 EFIS Main Page 8 4 1 1 BARO Changing Altimeter Setting 9 4 2 AUX Page 10 4 3 EMS Page 10 4 4 TIMES Page 11 4 5 EMS FUEL Computer Page 11 4 6 HSI Page 12 5 Autopilot...

Page 3: ...ill possible for a user to actively or inadvertently alter many of the settings Care must be taken to avoid this At best another pilot may not be able to access key information and at worst may result...

Page 4: ...D180 on during engine crank Power On Press button 1 Power Off Press and hold button 1 until the display turns off 3 2 Front Panel Layout The display is set up to provide all necessary flight informat...

Page 5: ...below the right 1 3 of the screen displays the main menu for the right page 3 6 Menu Functionality A menu consists of two rows of gray boxes containing text The upper row contains one tab that denote...

Page 6: ...d EXIT Pressing MORE on this menu simply returns you to the first part of the EFIS menu 3 8 Alerts 3 8 1 Alarm Indicators Any time a built in or preconfigured alarm set point is exceeded you are alert...

Page 7: ...ion no longer exists The alarm automatically rearms whenever the alarm condition is removed 3 8 5 Latching and Self clearing Alarms Alarms may be set to be latching while others may be self clearing L...

Page 8: ...igital readout and turn rate indicator top Altitude tape digital readout and VSI right Airspeed tape digital readout and trend left Bugs Slip skid ball Clock Z indicates Zulu time Autopilot Status Ind...

Page 9: ...the EFIS BARO option When the BARO menu is displayed the value setting box shows the current altimeter setting The DEC and INC buttons change the altimeter setting by 1 mbar Press BACK and then EXIT...

Page 10: ...of 20 4 2 AUX Page This page displays Voltmeter Fuel flow Outside air temperature OAT Timers Fuel remaining 4 3 EMS Page This page displays RPM oil temperature oil pressure cylinder head temperature C...

Page 11: ...a variety of functions including a tank timer The Tach Timer keeps track of engine time normalized to cruise RPM The Hobbs Timer records the duration of time engine oil pressure is at 15 PSI or higher...

Page 12: ...J7886 D180 v1 1 Page 12 of 20 4 6 HSI Page This page displays the GPS local magnetic heading...

Page 13: ...S page The left indicator displays the state of the roll servo and the right indicator displays the state of the pitch servo The AP menu is available on the EFIS main menu The BUGS menu is available u...

Page 14: ...ld modes NAV GPS NAVIGATION MODE ROLL SERVO To use the GPS based NAV mode the GPS must have an active waypoint When engaged the AP takes instruction from the GPS unit s horizontal navigation informati...

Page 15: ...e pitch servo ON and OFF NOTE When the AP is engaged in ALT mode the ALT bug is synchronized to the current altitude The altitude bug is then adjusted while the AP is engaged 5 3 4 180 This button set...

Page 16: ...ter the setting Airspeed NOTE A bug may be set for the airspeed but can not be controlled through the autopilot Altitude TOGGLE Turns the altitude bug on and off on the altitude tape SYNC Synchronises...

Page 17: ...last used modes armed If you push and hold the AP button for 2 seconds the AP engages in 180 Mode NOTE The HDG TRK and ALT bugs are synchronized to the heading track and altitude values each time the...

Page 18: ...roll servo in Navigation Mode and turns on the indicator When its indicator is on pressing the button disarms deactivates the roll servo and turns off the button s indicator ALT Button When its indica...

Page 19: ...hat you are in each dot indicates 0 06 n m Approach 0 2 n m Terminal or 1 0 n m Enroute When on course the course indicator and the CDI make a solid line making it easy to see when there is little err...

Page 20: ...lower right of the screen Flight Log Time Change the screen to show the TIMES page Record HOBBS timer reading AP Quick Reference Ground Track eg using Oz Runways Arm the TRK and ALT on the AP74 Engag...

Reviews: