background image

TABLE OF CONTENTS

7

TABLE OF CONTENTS

SAFETY INFORMATION

. . . . . . . . . . . . . . . . . . . . . . . . . . . . . . . . . . . . . 4

QUICK REFERENCE GUIDE

. . . . . . . . . . . . . . . . . . . . . . . . . . . . . . . . . 9

FEATURES

 . . . . . . . . . . . . . . . . . . . . . . . . . . . . . . . . . . . . . . . . . . . . . . . 10

General Features. . . . . . . . . . . . . . . . . . . . . . . . . . . . . . . . . . . . . . . . . . 10
LTR-Net Features. . . . . . . . . . . . . . . . . . . . . . . . . . . . . . . . . . . . . . . . . 10
LTR Features  . . . . . . . . . . . . . . . . . . . . . . . . . . . . . . . . . . . . . . . . . . . . 10
Conventional Features  . . . . . . . . . . . . . . . . . . . . . . . . . . . . . . . . . . . . . 10

CONTROLS AND DISPLAY

. . . . . . . . . . . . . . . . . . . . . . . . . . . . . . . . . 11

Front Panel Controls. . . . . . . . . . . . . . . . . . . . . . . . . . . . . . . . . . . . . . . 11
Rear Panel Jacks and Connectors . . . . . . . . . . . . . . . . . . . . . . . . . . . . . 13

Display Description . . . . . . . . . . . . . . . . . . . . . . . . . . . . . 14

GENERAL OPERATION

. . . . . . . . . . . . . . . . . . . . . . . . . . . . . . . . . . . . 15

Power-Up Sequence . . . . . . . . . . . . . . . . . . . . . . . . . . . . . . . . . . . . . . . 15
Determining Volume Level . . . . . . . . . . . . . . . . . . . . . . . . . . . . . . . . . 15
Backlight Operation . . . . . . . . . . . . . . . . . . . . . . . . . . . . . . . . . . . . . . . 16
System/Group Display Modes . . . . . . . . . . . . . . . . . . . . . . . . . . . . . . . 16
Selecting the System and Group  . . . . . . . . . . . . . . . . . . . . . . . . . . . . . 17
Setting Squelch Control . . . . . . . . . . . . . . . . . . . . . . . . . . . . . . . . . . . . 18
Microphone Off-Hook Detect  . . . . . . . . . . . . . . . . . . . . . . . . . . . . . . . 18
LTR-Net, LTR, and Conventional Operation  . . . . . . . . . . . . . . . . . . . 19

GENERAL FEATURES

 . . . . . . . . . . . . . . . . . . . . . . . . . . . . . . . . . . . . . 20

Bank Select. . . . . . . . . . . . . . . . . . . . . . . . . . . . . . . . . . . . . . . . . . . . . . 20
Call Indicator  . . . . . . . . . . . . . . . . . . . . . . . . . . . . . . . . . . . . . . . . . . . . 21
Emergency Switch . . . . . . . . . . . . . . . . . . . . . . . . . . . . . . . . . . . . . . . . 21
Encryption  . . . . . . . . . . . . . . . . . . . . . . . . . . . . . . . . . . . . . . . . . . . . . . 21
Function (FCN) Switch  . . . . . . . . . . . . . . . . . . . . . . . . . . . . . . . . . . . . 22
Home System/Group Select . . . . . . . . . . . . . . . . . . . . . . . . . . . . . . . . . 22
Horn Alert. . . . . . . . . . . . . . . . . . . . . . . . . . . . . . . . . . . . . . . . . . . . . . . 23
Option Select  . . . . . . . . . . . . . . . . . . . . . . . . . . . . . . . . . . . . . . . . . . . . 24
Power Turn-Off Delay . . . . . . . . . . . . . . . . . . . . . . . . . . . . . . . . . . . . . 24
Proceed (Clear-To-Talk) Tone . . . . . . . . . . . . . . . . . . . . . . . . . . . . . . . 25
Receive-Only Groups . . . . . . . . . . . . . . . . . . . . . . . . . . . . . . . . . . . . . . 25
Stealth Mode. . . . . . . . . . . . . . . . . . . . . . . . . . . . . . . . . . . . . . . . . . . . . 26
Time-Out Timer . . . . . . . . . . . . . . . . . . . . . . . . . . . . . . . . . . . . . . . . . . 26
Tone Select . . . . . . . . . . . . . . . . . . . . . . . . . . . . . . . . . . . . . . . . . . . . . . 26
Transmitter Thermal Foldback . . . . . . . . . . . . . . . . . . . . . . . . . . . . . . . 27

STANDARD GROUP CALLS

. . . . . . . . . . . . . . . . . . . . . . . . . . . . . . . . 27

General . . . . . . . . . . . . . . . . . . . . . . . . . . . . . . . . . . . . . . . . . . . . . . . . . 27
Placing a Standard Group Call . . . . . . . . . . . . . . . . . . . . . . . . . . . . . . . 27
Receiving a Standard Group Call . . . . . . . . . . . . . . . . . . . . . . . . . . . . . 29

TELEPHONE CALLS

. . . . . . . . . . . . . . . . . . . . . . . . . . . . . . . . . . . . . . . 29

General . . . . . . . . . . . . . . . . . . . . . . . . . . . . . . . . . . . . . . . . . . . . . . . . . 29

Summary of Contents for LTR-Net 002-9803-601

Page 1: ...LTR Net OPERATING MANUAL 9800 Series Trunked Mobile Radio 98x3 98x6 LTR NET Mobile ...

Page 2: ......

Page 3: ...n 1923 designs manu factures and markets radio communication products systems and services worldwide E F Johnson produces equipment for land mobile radio and mobiletelephone services which include business industrial government public safety and personal users Viking Head EFJohnson logo LTR Net LTR and Call Guard are trademarks of the E F Johnson Company All other company and or product names used...

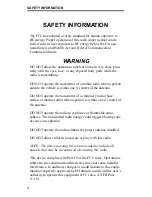
Page 4: ...r of a stationary radio base station or marine radio when a person is within one 1 meter of the antenna DO NOT operate the radio in explosive or flammable atmo spheres The transmitted radio energy could trigger blasting caps or cause an explosion DO NOT operate the radio without the proper antenna installed DO NOT allow children to operate or play with this radio NOTE The above warning list is not...

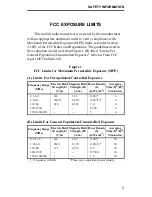
Page 5: ...e Exposure MPE A Limits For Occupational Controlled Exposure Frequency Range MHz Electric Field Strength E V m MagneticField Strength H A m Power Density S mW cm22 Averaging Time E 2 H 2 S minutes 0 3 3 0 614 1 63 100 6 3 0 30 1842 f 4 89 f 900 f2 6 30 300 61 4 0 163 1 0 6 300 1500 f 300 6 1500 100 000 5 6 B Limits For General Population Uncontrolled Exposure Frequency Range MHz Electric Field Str...

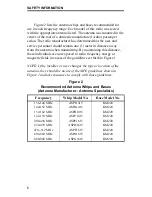
Page 6: ...ividuals are not exposed to radio frequency energy or magnetic fields in excess of the guidelines set forth in Figure 1 NOTE If the installer or user changes the type or location of the antenna they should be aware of the MPE guidelines shown in Figure 1 and take measures to comply with those guidelines Figure 2 Recommended Antenna Whips and Bases Antenna Manufacturer Antenna Specialists Frequency...

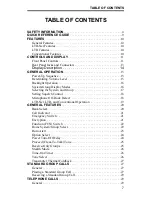
Page 7: ...des 16 Selecting the System and Group 17 Setting Squelch Control 18 Microphone Off Hook Detect 18 LTR Net LTR and Conventional Operation 19 GENERAL FEATURES 20 Bank Select 20 Call Indicator 21 Emergency Switch 21 Encryption 21 Function FCN Switch 22 Home System Group Select 22 Horn Alert 23 Option Select 24 Power Turn Off Delay 24 Proceed Clear To Talk Tone 25 Receive Only Groups 25 Stealth Mode 2...

Page 8: ...D LTR FEATURES 40 Transmit Inhibit 40 Calls on Priority ID Codes 41 Telephone Group Select 41 LTR NET FEATURES 42 LTR Net Standard and Special Calls 42 Busy Queuing 42 Roaming 43 LTR FEATURES 44 Standard Group Calls 44 Telephone Calls 44 CONVENTIONAL FEATURES 44 Monitoring Before Transmitting 44 Transmit Disable On Busy 46 Talk Around 46 Call Guard Squelch 47 MISCELLANEOUS 47 Supervisory Tones 47 ...

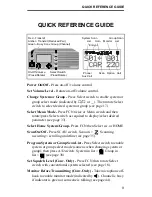
Page 9: ...an on Scanning occurring scrolling underline see page 35 Program System or Group Scan List Press Select switch to enable system or group select mode same as when changing system or group then press A D switch System in list Group in list see page 38 Set Squelch Level Conv Only Press FCN then rotate Select switch with conventional system selected see page 18 Monitor Before Transmitting Conv Only Ta...

Page 10: ... quick select switch Companding optional Encryption optional Receive only groups LTR Net Features Roaming automatic locality search Standard mobile to mobile calls Special calls including telephone unique ID and directed group Busy queuing of special calls by radio system Transmit inhibit Receive priority calls LTR Features Standard and telephone calls Transmit inhibit Receive priority calls Conve...

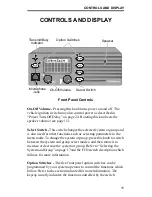
Page 11: ... To change the system or group press this knob to switch between the system and group select modes and then rotate it to increase or decrease the system or group Refer to Selecting the System and Group on page 17 and the FCN switch description which follows for more information Option Switches The five front panel option switches can be programmed by your system operator to control the functions w...

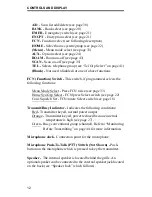
Page 12: ...ess FCN twice see page 33 Home Sys Grp Select FCN press Select switch see page 22 Conv Squelch Set FCN rotate Select switch see page 18 Transmit Busy Indicator Indicates the following conditions Red Transmitter keyed normal power output Orange Transmitter keyed power reduced because internal temperature is high see page 27 Green Busy conventional group channel Refer to Monitoring Before Transmitti...

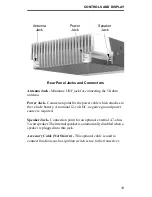
Page 13: ...le battery A nominal 12 volt DC negative ground power source is required Speaker Jack Connection point for an optional external 4 7 ohm 5 watt speaker The internal speaker is automatically disabled when a speaker is plugged into this jack Accessory Cable Not Shown This optional cable is used to connect functions such as ignition switch sense to the transceiver Antenna Jack Speaker Jack Power Jack ...

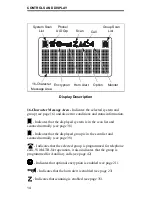
Page 14: ... in the scan list and scanned normally see page 38 Indicates that the selected group is programmed for telephone calls With LTR Net operation it also indicates that the group is programmed for Auxiliary calls see page 42 Indicates that optional encryption is enabled see page 21 Indicates that the horn alert is enabled see page 23 Indicates that scanning is enabled see page 35 System Scan List Phon...

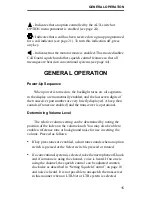
Page 15: ...ry briefly displayed A beep then sounds if tones are enabled and the transceiver is operational Determining Volume Level The relative volume setting can be determined by noting the position of the index on the volume knob You may also be able to enable a reference tone or background noise for use in setting the volume Proceed as follows If key press tones are enabled a short tone sounds when an op...

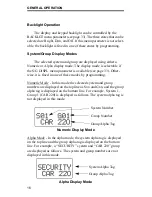
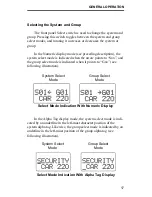
Page 16: ...se it is fixed in one of these modes by programming Numeric Mode In this mode the selected system and group numbers are displayed on the top line as Sxx and Gxx and the group alpha tag is displayed on the bottom line For example System 1 Group 1 CAR 220 is displayed as follows The system alpha tag is not displayed in this mode Numeric Display Mode Alpha Mode In the alpha mode the system alpha tag ...

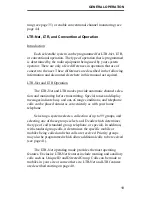
Page 17: ... arrow points to Sxx and the group select mode is indicated when it points to Gxx see following illustration Select Mode Indication With Numeric Display In the Alpha Tag display mode the system select mode is indi cated by an underline in the left most character position of the system alpha tag Likewise the group select mode is indicated by an underline in the left most position of the group alpha...

Page 18: ... switch as you would a normal squelch control Rotate it counterclockwise until receiver noise is heard and then clockwise slightly past the point where the noise mutes The squelch adjust mode is indicated by SQUELCH on the upper line of the display and the relative squelch level is indicated by a bar graph on the bottom line 3 To select the current level and exit this mode press the Select switch ...

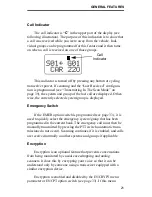
Page 19: ...ting Special tones and display messages indicate busy and out of range conditions and telephone calls can be placed almost as conveniently as with your home telephone Selecting a system selects a collection of up to 99 groups and selecting one of these groups selects an ID code which determines the type of call standard group telephone or special In addition with standard group calls it determines...

Page 20: ... tones or display messages Refer to Operation At Extended Range on page 54 for information on how to determine if an out of range condition may exist GENERAL FEATURES Bank Select A bank is a collection of selectable systems that have been set up for a specific application For example one bank could be programmed for operation in Minneapolis and another for operation in Milwaukee Each bank is ident...

Page 21: ... group is displayed Emergency Switch If the EMER option switch is programmed see page 33 it is used to quickly select the emergency system group that has been programmed in the current bank The emergency call must then be manually transmitted by pressing the PTT switch automatic trans missions do not occur Scanning continues if it is enabled and calls are received normally on other systems and gro...

Page 22: ...ansmitted two beeps instead of one sound and the tone is automatically delayed for the required time Function FCN Switch If an option switch is programmed for FCN function it selects the following features When the function select mode is active FCN is displayed on the lower line of the display This mode is automatically exited 2 seconds after a change is made or 8 seconds after no activity Menu M...

Page 23: ... enabled is displayed as shown in the following illustration When enabled the horn alert pulses on and off for 1 8 cycles and then goes back to the disabled state To change the currently selected horn alert mode the HRN ALRT menu parameter can be used if available see page 33 The horn alert is programmed to operate in the manual or auto matic mode see descriptions which follow If the ignition swit...

Page 24: ...er may have been installed so that the vehicle ignition switch as well as the front panel power switch control trans ceiver power If this is the case both the ignition switch and the front panel power switch must be on for transceiver power to turn on When the ignition switch controls power turn off delays of Immediate 10 20 30 40 or 50 minutes 1 2 4 8 10 12 or 16 hours or Forever can be programme...

Page 25: ... ACCES is indicated in the display When the NO ACCES condition the PTT switch must be released to make another call attempt Refer to page 47 for more information on the busy and intercept tones On conventional systems the Transmit Disable On Busy feature can be used to automatically perform monitoring see page 46 The proceed tone then does not sound if the channel is busy Otherwise the proceed ton...

Page 26: ...if it is keyed contin uously for longer than the programmed time It can be programmed for 0 5 5 0 minutes or disabled entirely If the transmitter is keyed continuously for longer than the programmed time the transmitter is disabled TIMEOUT is indicated on the lower line of the display and the intercept tone sounds The timer and tone are reset by releasing the PTT switch One use of the time out tim...

Page 27: ...n could occur is if you transmit for an extended period STANDARD GROUP CALLS General Most calls you make are probably the standard group type described in this section These calls are between you and another mobile or control station The main difference between these calls and the other types that can be placed is that no number is dialed using a keypad The following procedure applies to all three...

Page 28: ...not be accessed because of an out of range condition or some other reason the intercept tone sounds see page 48 and NO ACCES is indicated on the lower line of the display The PTT switch must then be released and pressed again to make another access attempt When responding busy or no access conditions may also occur the same as when placing a call because the system is re accessed for each transmis...

Page 29: ...information TELEPHONE CALLS General NOTE Telephone calls can be placed and received only if that service is available to you and your transceiver has been programmed appropriately In addition a microphone equipped with a telephone keypad is required to dial the telephone number The telephone calling feature allows you to place and receive telephone calls using your transceiver The following inform...

Page 30: ...e elapses between digits the call is terminated 4 After the number is dialed release the PTT switch if it was pressed With LTR Net operation a short tone then sounds to indicate that the number was accepted by the system Landside ringing or a landside busy condition should then be heard 5 When the other party answers press the PTT switch and respond The PTT switch must be pressed to talk and relea...

Page 31: ...is dialed using a tone type telephone The mobile user hears ringing when the call is received Contact your system operator for the number to dial and more information on how to place these calls LTR NET AUXILIARY CALLS General The LTR Net Auxiliary calls include Unique ID and Directed Group calls see page 42 Unique ID calls are to specific mobiles and Directed Group calls are to specific talk grou...

Page 32: ... that the call was accepted by the system If this tone does not sound an unauthorized or incorrect number may have been dialed The call then proceeds as follows If all system resources are busy the call is placed in a queue as described in Busy Queuing on page 42 Unique ID Call Ringing is heard to indicate that the other trans ceiver is being rung If there is no answer ringing automatically stops ...

Page 33: ... AND MENU MODE Option Switches All five option switches on the front panel are programmable by your system operator The available option switch functions are indicated by an entry in the Option Switch column of the table on the next page More information on each function can be found on the page indicated in this table Some functions may be controlled by both the menu mode and an option switch The...

Page 34: ... mode select SG DISPL 16 Emergency sys grp select EMER 21 Encryption on off ENCRYPT ENCPT 21 Function select FCN 22 Home system group select HOME 22 FCN then press Sel Sw Horn Alert on off HRN ALRT 23 Menu mode select MENU 33 FCN twice Option select OPTION AUX 24 Roaming on off 1 ROAMING ROAM 43 Scan on off SCAN 35 Scan type select SCN TYPE 35 Scan continue on off SCN CONT 39 Scan list save mode S...

Page 35: ...tom line 3 To change the selected status press the Select switch The selec tions displayed for each menu function are shown on page 52 4 The selected status conditions for the various functions are saved when the menu mode is exited in one of the following ways Pressing the FCN switch again Pressing the PTT switch Automatically when time out occurs 2 seconds after a change is made or 8 seconds aft...

Page 36: ...st When group scanning is not used calls are detected on only the currently selected group or if system scanning on the last selected group of each system Scan On Off System and or group scanning are turned on and off by the SCAN option switch When system and or group scanning is enabled by this switch is indicated in the display see following illustration Then when system or group scanning is act...

Page 37: ...f the call Programming determines if this change is temporary or permanent and if a response occurs on the system group of the call or the selected system group Refer to Transmitting In The Scan Mode on page 39 for more information LTR Net Mode Scanning When system scanning with an LTR Net system selected and roaming disabled only the LTR Net systems in the scan list that access the site of the se...

Page 38: ...g on whether the system or group select mode is active This is the same select mode used for system and group selection as described on page 17 For example to change the scan list status of the displayed system press the Select switch if necessary so that the system select mode is indi cated and then press the A D switch The displayed system is in the scan list and scanned normally when is display...

Page 39: ... after transmitting a call ensures that you hear a response to your call instead of another message occurring on some other system or group Scanning does not resume if it has been disabled such as by taking the microphone off hook There is also a scan continue timer that may be programmed This timer controls the maximum time that a call is received before scanning resumes Times up to 60 seconds ca...

Page 40: ...without having to manually change the system group To return to the previ ously selected system group it must be manually selected using the Select switch Temporary Last Received The system group changes to the system group of a call for only the duration of the scan delay period see page 39 Then when the delay expires and scanning resumes if it is not disabled the selected system group is again d...

Page 41: ...t interruptible so that calls on those groups are not interrupted by other calls The system group of the higher priority call is displayed while it is received The programming of the Last Selected Last Received Temporary parameter described on page 39 determines if the change is temporary or permanent and if a response occurs on the displayed or last selected system group Telephone Group Select If...

Page 42: ...alls As shown in the preceding illustration Auxiliary calls include Unique ID and Directed Group calls Unique ID calls allow calls to be placed to specific mobiles and Directed Group calls allow calls to be placed to specific talk groups Auxiliary calls are described starting on page 31 Busy Queuing Queuing may be provided by the radio system when placing the special calls described in the precedi...

Page 43: ... disabled by the option switch ROAM ON and ROAM OFF are momentarily displayed If neither the menu parameter nor option switch is available roaming is fixed in the on or off mode by programming 3 Scanning does not need to be enabled If it is an LTR Net system must be selected When roaming is enabled as just described and the signal from the current locality becomes weak the transceiver automaticall...

Page 44: ... your transceiver LTR and LTR Net telephone calls are described starting on page 29 CONVENTIONAL FEATURES Monitoring Before Transmitting General Regulations require that conventional groups channels be monitored before transmitting to make sure that they are not being used by someone else If you were to transmit when someone else is talking you would probably disrupt their conversation In the LTR ...

Page 45: ...d using the monitor mode This mode is enabled by taking the microphone off hook and is indicated by in the display as shown in the following illustration The monitor mode temporarily disables Call Guard squelch see page 47 and other squelch control techniques and also scanning so that all messages on the group are heard The transceiver may be programmed so that the microphone off hook condition is...

Page 46: ...cted even though no one is talking To key the transmitter in this case release the PTT switch and then immediately press it again There is also a programmable option with this feature to allow transmitting with a busy channel if the correct Call Guard signal is detected The Transmit Disable On Busy feature is enabled or disabled on each conventional group by dealer programming If this feature is d...

Page 47: ...ard because it is in the subaudible range and attenuated by a filter Call Guard squelch can be programmed on each conventional group LTR Net and LTR opera tion uses ID codes to perform a similar function MISCELLANEOUS Supervisory Tones The following tones are heard at various times when operating this transceiver Some or all of these tones can be disabled by the TONES menu parameter or programming...

Page 48: ...OUT is displayed the transmitter has been disabled by the Time Out Timer feature see page 26 Transmit Inhibit If this tone sounds as soon as the PTT switch is pressed with an LTR Net or LTR system selected and TX INHIB is displayed the transmitter has been disabled by the Transmit Inhibit feature see page 40 Receive Only Group If this tone sounds as soon as the push to talk switch is pressed and T...

Page 49: ...one Three beeps which indicate that the end of the call has been detected by the system Proceed Dialing Tone When placing a landside to mobile tele phone call see page 31 the landside caller may enter a special number which specifies the mobile being called This tone indicates when that number should be dialed LTR Telephone Call Tones The following tones are generated by LTR interconnect equip men...

Page 50: ...tone type telephone must be used Display Messages The following messages appear in the display to indicate various operating modes and error conditions BUSY Indicates that the LTR Net or LTR radio system is currently busy see Busy Tone on page 47 CALL SVC Indicates that the transceiver is inoperative Contact your system operator for service DSBL BSY Indicates that the transmitter is disabled by th...

Page 51: ...smitter to cool If the problem persists contact your system operator for service NOT AUTH Indicates that an attempt was made to register on a site where service was not authorized see page 43 NOT CONV Indicates that an attempt was made to enable a conventional mode feature on an LTR Net or LTR system NOT LNET Indicates that an attempt was made to enable an LTR Net mode feature on an LTR or convent...

Page 52: ...mit Inhibit feature see page 40 Menu Mode Messages The following messages are displayed in the menu mode that is described starting on page 33 The enabled or yes condition is indicated by ON and the disabled or no condition by OFF BACKLGT Backlight control BRIGHT DIM OFF BANK SEL Bank select Bank alpha tag ENCRYPT Encryption select ON or OFF HRN ALRT Horn alert select ON or OFF OPTION Option on of...

Page 53: ...ual programming determines the availability and specific operation of many features This refers to the programming performed by your system operator when the radio was set up not to any programming that you can perform If a feature is not controlled by a front panel option switch it is fixed in the mode set by programming or not available If you require addi tional information on the operation of ...

Page 54: ...ects such as tall buildings or hills Preventing Battery Discharge In the standby mode power on not transmitting transceiver power consumption is relatively low Therefore you can probably leave the transceiver on for one or two days without operating the vehicle and the battery should not become seriously discharged However if the outdoor temperature is low enough to significantly decrease battery ...

Page 55: ...em operator for service The SLEEPING message indicates the transceiver is tempo rarily disabled as described on page 51 and when the CALL SVC message is displayed the transceiver must always be returned to your system operator for service Another indication that could be displayed is NO POWER This indicates that transmitter temperature or supply voltage is excessive Release the PTT switch and allo...

Page 56: ...MISCELLANEOUS 56 Part No 002 9803 601 11 99hph Printed in U S A ...

Reviews: