background image

37

Another common misnomer is that the ailerons do 

not work while hovering. This could not be further 

from the truth. If you do not use the ailerons during 

hovering, you will be at the mercy of the motor’s 

torque and the airplane will continually roll to the 

left. Two very effective techniques to employ to 

reduce or stop this rotation is first to counter the left 

rolling moment with right aileron and also to lean 

the airplane 5–10 degrees either slightly to the 

gear or away from it. Leaning the airplane makes it 

more difficult for the torque of the motor to roll the 

airplane because the weight and thrust vectors are 

misaligned. You can also use this mode of flight to 

move the airplane closer or further away from you. 

When you start doing this, you will quickly realize 

that you are starting to perform a very high angle of 

attack harrier.

With this in mind lets tackle the “Elevator” and 

“Harrier,” which is the second most popular 3D 

maneuver. A common misconception is that you 

always fly around with the elevator fully deflected. 

What you will find is you must continually modulate 

the elevator to maintain the same angle of attack. 

This is done by watching the flight path and body 

angle of the airplane and adjusting the elevator and 

throttle accordingly. Also you must work to keep the 

wings level with the ailerons. Many times we hear 

people say that certain airplanes do not lock into 

the harrier well. While this may be true, what you 

will find is most every airplane has a magic angle of 

attack that minimizes wing-rock, and the pilots whose 

airplanes appear to be locked into these maneuvers 

know how to keep their airplane in this sweet spot.

36

Is the simulator realistic? Probably not, but regardless 

of its accuracy it will get your eyes and hands 

accustomed to the proper movements required to 

perform the maneuver. The simulator will help you 

get over the “mechanics” of the maneuver so you will 

not have to think about which direction to move the 

sticks when faced with the real thing.
How much should you have to practice? If you are 

serious about learning how to hover or toque roll, 

work on the simulator 30 minutes to an hour each 

night for a month. Evaluate your progress after this 

amount of time. Chances are you will have become 

bored with the simulator and are ready to really 

tackle the real airplane with confidence, but do 

not be surprised or discouraged if it takes three 

months of dedicated practice. Remember that there 

is nothing super-human about hovering. Anyone who 

is willing to put in the practice time can learn to do 

this maneuver. Of course you can be a purest and 

learn to hover solely with the real airplane, but it 

will take longer because you physically can not get 

the practice time with a model that you can on the 

simulator. Keep in mind that your simulator practice 

must be supplemented with actual flying because you 

need to learn how to react when the consequence 

of a mistake is a crash. The good thing about the 

Tribute and Ultimate is you can typically pick them 

up after a mishap and fly again immediately. Nerves 

can play a big part in hovering success, but you 

will find the better you get at the simulator the more 

confidence you will have with the real airplane 

and the nerves will eventually subside, thus freeing 

your mind to concentrate on flying the model. It 

often helps to have someone show you that your 

airplane can hover. For some reason this is a huge 

psychological boost that makes you realize it is not 

the airplane limiting you. One common mistake 

people make is hovering too far away from them. 

The closer you are to the airplane, the better you 

will be able to control it because you can see it so 

much better. This is of course a double-edged sword 

because you will also be closer to the ground. Once 

again the Tribute and Ultimate can handle the abuse 

thus making it better for training. Eventually you will 

find that the closer the airplane is to the ground, the 

less chance it has of getting damaged in a crash 

because it has less potential energy. This is especially 

useful if for some reason you have a battery die or 

the BEC cuts off.

Summary of Contents for Tribute EP 3D Profile

Page 1: ...Ultimate EP 3D Profile and Tribute EP 3D Profile Instruction Manual...

Page 2: ...nkages 15 Wing Installation 19 Top Wing Installation Ultimate 21 Aileron Servo Installation 22 Ultimate Aileron Connection Linkage 25 Gearbox Installation 28 Final Assembly 30 Control Throws 31 Longit...

Page 3: ...micro servo 4 Receiver JR R610M 6 channel micro FM Rx Battery and Speed Control Requirements Li Po Battery 7 4V 860 2100 2 Cell stock motor 11 1V 860 2100 3 Cell brushless motor Speed Control 20 Amp E...

Page 4: ...EFL2027 Wing Set w Struts EFL2026 Horizontal Tail Assembly EFL2028 Wheel Pants EFL2029 Decals Ultimate EFL2031 Tribute Replacement Parts Wing EFL2001 Fuselage w rudder EFL2002 Horizontal Tail Assembly...

Page 5: ...Micro Pushrod Keepers EFLA201 Tailskid EFLA202 Micro Control Connectors EFLA203 Micro Rubber Spinner EFL204 Micro Park Wheels EFL205 370 Motor w gearbox EFLM205 Decals Tribute EFL2008 Decals Ultimate...

Page 6: ...Inc 4105 Fieldstone Road Champaign Illinois 61822 877 504 0233 www horizonhobby com Warranty Information Horizon Hobby Inc guarantees this kit to be free from defects in both material and workmanship...

Page 7: ...pments in small 3D Aerobatic Electric design These designs are meant to serve as both an advanced trainer for those interested in learning 3D aerobatics while also being a tool to keep the proficient...

Page 8: ...he motor while it is running Although it takes only a short amount of time a few seconds vs a few minutes as stated earlier there is a higher risk of damage to the motor To perform a water break in si...

Page 9: ...ing Elevator stabilizer Decals 1 Apply the decals as shown in the illustration and on the box It may be helpful to spray a mixture of water mixed with 1 2 drops of detergent onto the airframe so the d...

Page 10: ...ls and Adhesives Square Foam safe CA 1 Locate the stabilizer and remove the elevator that is not hinged to the stabilizer Measure and draw a centerline on the stabilizer 2 Slide the stabilizer into th...

Page 11: ...CA to glue the stabilizer into the fuselage 4 Use foam safe CA to glue the elevator to the balsa elevator joiner Use the included clear tape on the top and bottom of the hinge line to complete the ele...

Page 12: ...s Landing gear wire right and left Required Tools and Adhesives Foam safe CA 1 16 Drill bit Sewing needle Silicon glue 1 Make 5 6 1 16 1 5mm holes above the fuselage brace above and below the landing...

Page 13: ...h sides of the fuselage Note It is helpful to use a needle to thread the retaining thread through the holes 4 Slide the wheels onto the landing gear Slide the wheel pants onto the landing gear and glu...

Page 14: ...14 5 Press the tail skid into position on the bottom of the fuselage Remove the skid and apply 2 3 drops of foam safe CA onto the skid and press it into the holes...

Page 15: ...de 12 Pushrod wire 2 Control horn backplate 2 Double sided tape 2 Micro pushrod keepers 2 Micro control connectors 2 Required Tools and Adhesives Square Hobby knife Ruler Foam safe CA Pliers Servo 2 1...

Page 16: ...stall long servo arms at this time Center the output of the servo in the slots and use double sided tape to attach the servos to the fuselage 3 Install the micro control connectors onto the rudder ser...

Page 17: ...e horn to secure it in place 6 Attach the L bend to the control horn using a micro pushrod keeper The control horn is not on control surface for more detail 7 Roughen 4 6 pushrod guides using medium g...

Page 18: ...etween the rudder and servo Use foam safe CA to glue the guides to the fuselage 9 Center the rudder and tighten the screw in the connector to secure the pushrod Trim off any excess wire 10 Repeat Step...

Page 19: ...ing for the Ultimate follow the exact same procedure Installation of the top wing for the Ultimate is covered in Top Wing Installation Ultimate If you are building the Tribute you can skip to Aileron...

Page 20: ...tween the ailerons 3 Use a square to align the main spar in the wing to the fuselage 4 Check and adjust the wing so it is parallel to the stabilizer 5 Double check the alignment of the wing made in St...

Page 21: ...nd Adhesives Square Foam safe CA 1 Locate the two wing struts Note the top and bottom of each strut as shown 2 Check the fit of one of the struts to the top wing The strut will angle back toward the t...

Page 22: ...ce satisfied with the fit Aileron Servo Installation Required Parts Airplane assembly Pushrod wire Micro control connector 2 Control horn 2 Control horn backplate 2 Servo tape 2 Micro pushrod keepers...

Page 23: ...ng a micro pushrod keeper 3 Center one aileron servo and install a long arm onto the servo Attach a pushrod connector to the outer hole of the servo arm 4 Use servo tape to secure the servo to the win...

Page 24: ...24 5 Center the aileron servo and aileron Tighten the screw on the connector to secure the pushrod wire 6 Repeat Steps 1 through 5 for the remaining aileron servo...

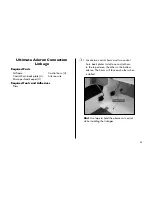
Page 25: ...Micro pushrod keeper 4 Required Tools and Adhesives Pliers 1 Locate two control horns and two control horn back plates Install one control horn in the top aileron the other in the bottom aileron The h...

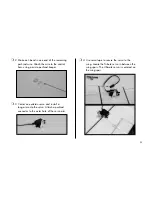
Page 26: ...L bend in one end of a pushrod wire Attach the wire to the bottom control horn using a micro pushrod keeper 3 Mark the pushrod where it crosses the hole in the upper control horn Make a 90 degree bend...

Page 27: ...27 4 Secure the pushrod to the control horn using a micro pushrod keeper Trim the excess wire 5 Repeat Steps 1 through 4 for the opposite ailerons...

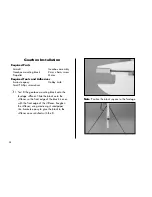
Page 28: ...ll Phillips screwdriver 1 Test fit the gearbox mounting block onto the fuselage stiffener Slide the block onto the stiffener so the front edge of the block is even with the front edge of the stiffener...

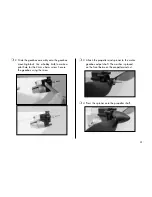
Page 29: ...hobby knife to make a pilot hole for the 2mm x 6mm screw Secure the gearbox using the screw 3 Attach the propeller and spinner to the motor gearbox output shaft The washer is placed on the front betwe...

Page 30: ...n servo lead through Plug the servos into the receiver Cut a piece of hook and loop material in half Attach the receiver to the fuselage using the cut piece of hook and loop material Route the antenna...

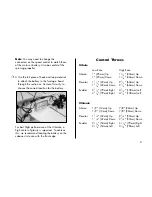
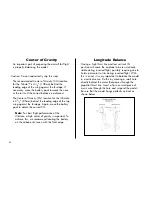
Page 31: ...high center of gravity is important To achieve this we recommend locating the battery on the cabane strut even with the front edge Control Throws Tribute Low Rate High Rate Aileron 1 25mm Up 11 4 32m...

Page 32: ...the correct CG Note For best flight performance of the Ultimate a high center of gravity is important To achieve this we recommend locating the battery on the cabane strut even with the front edge Lon...

Page 33: ...dvance the throttle to full power The thrust should be enough to make the airplane accelerate vertically from a standstill Many people also consider the proverbial aft center of gravity CG to be cruci...

Page 34: ...tial for the 3D rate is to find a low rate setting that feels comfortable in normal flight Once you ve done this for the aileron elevator and rudder dial in enough exponential to make the low rate set...

Page 35: ...olling moment with some opposite aileron With a little practice this will become very natural and you can use the rudder literally like the steering wheel of a car Rolling maneuvers are done with rela...

Page 36: ...that your simulator practice must be supplemented with actual flying because you need to learn how to react when the consequence of a mistake is a crash The good thing about the Tribute and Ultimate...

Page 37: ...hen you start doing this you will quickly realize that you are starting to perform a very high angle of attack harrier With this in mind lets tackle the Elevator and Harrier which is the second most p...

Page 38: ...llfully and deliberately fly my models in a careless reckless and or dangerous manner 4 The maximum takeoff weight of a model is 55 pounds except models flown under Experimental Aircraft rules 5 I wil...

Page 39: ...erence exists Allocation plans or interference test reports shall be signed by the parties involved and provided to AMA Headquarters Documents of agreement and reports may exist between 1 two or more...

Page 40: ...2004 Horizon Hobby Inc 4105 Fieldstone Road Champaign Illinois 61822 877 504 0233 www horizonhobby com...

Reviews: