21
Height adjustment
The height can be adjusted individually as needed by pressing the adjustment key (6).
Adjusting the Auxiliary Handle
Place the lawn trimmer on the ground. Pull the red lever (5) in the direction of the arrow
and set the desired angle.
Trimmer Head Angle
The trimmer head angle can be adjusted into three positions.
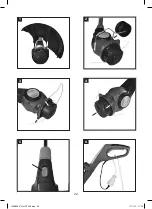
First press the angle adjustment safety catch (11). Now you can adjust the arbor to the
desired angle of inclination (Fig. 5). Release the angle adjustment lock and lock the arbor
into place in order to set the angle of inclination.
Electrical Cord Hanger
In order to better secure the power plug on the electrical cord, make a loop with the
electrical cord (extension cord) and hang this on the electrical cord hanger. After making
this safeguard, connect the electrical cord with the power plug (Fig. 6).
Lawn Trimmer as Edging Shears
In order to cut the edges of lawns and beds, the lawn trimmer can be converted in the
following manner:
• Pull the power plug out of the electrical outlet.
• Press the safety catch (11) and turn the motor head (12) by 90° until it locks in.
• You now have the option of using the lawn trimmer as edging shears.
Maintenance and Care
The lawn trimmer is largely maintenance-free. However, we recommend regular
inspections and care in order to ensure a long service life.
Please note! Before performing any maintenance the lawn trimmer should be
disconnected from the electrical power supply. For this purpose, pull the power
plug out of the electrical outlet.
• Dirt should be removed regularly from the protective cover. Cleaning is best performed
with a fine brush or cloth.
• Do not use any corrosive agents for cleaning plastics.
• Never spray off the lawn trimmer with water. Always prevent water from getting into
the machine.
1226836 E-Flor RT 520.indd 21
17.11.15 11:54
Summary of Contents for RT 520
Page 10: ...9 1 3 5 2 4 6 1226836 E Flor RT 520 indd 9 17 11 15 11 54...
Page 23: ...22 1 3 5 2 4 6 1226836 E Flor RT 520 indd 22 17 11 15 11 54...
Page 36: ...35 1 3 5 2 4 6 1226836 E Flor RT 520 indd 35 17 11 15 11 54...
Page 43: ...42 1 a b c d 2 a b c d e f 1226836 E Flor RT 520 indd 42 17 11 15 11 54...
Page 44: ...43 3 a b c d e f g h i j k 4 a 1226836 E Flor RT 520 indd 43 17 11 15 11 54...
Page 45: ...44 b c d e f g h 5 a b Y c 6 1226836 E Flor RT 520 indd 44 17 11 15 11 54...
Page 46: ...45 RCD 30 mA 15 1226836 E Flor RT 520 indd 45 17 11 15 11 54...
Page 48: ...47 6 5 11 5 6 11 12 90 1226836 E Flor RT 520 indd 47 17 11 15 11 54...
Page 49: ...48 1 3 5 2 4 6 1226836 E Flor RT 520 indd 48 17 11 15 11 54...
Page 50: ...49 230 50 Hz 1226836 E Flor RT 520 indd 49 17 11 15 11 54...
Page 51: ...50 1226836 E Flor RT 520 indd 50 17 11 15 11 54...
Page 52: ...51 50 C MAX 50 C 1 E Flor 24 6 2 E Flor 3 4 5 6 7 1226836 E Flor RT 520 indd 51 17 11 15 11 54...
Page 62: ...61 1 3 5 2 4 6 1226836 E Flor RT 520 indd 61 17 11 15 11 54...
Page 75: ...74 1 3 5 2 4 6 1226836 E Flor RT 520 indd 74 17 11 15 11 54...
Page 88: ...87 1 3 5 2 4 6 1226836 E Flor RT 520 indd 87 17 11 15 11 54...
Page 95: ...94 l 1 a b c d 2 a b c d e f 1226836 E Flor RT 520 indd 94 17 11 15 11 54...
Page 96: ...95 3 a b c d e f g h i j k 4 a 1226836 E Flor RT 520 indd 95 17 11 15 11 54...
Page 97: ...96 b c d e f g h 5 a b Y c 6 1226836 E Flor RT 520 indd 96 17 11 15 11 54...
Page 98: ...97 RCD 30 mA 15 1226836 E Flor RT 520 indd 97 17 11 15 11 54...
Page 100: ...99 6 5 11 5 6 11 12 90 1226836 E Flor RT 520 indd 99 17 11 15 11 54...
Page 101: ...100 1 3 5 2 4 6 1226836 E Flor RT 520 indd 100 17 11 15 11 55...
Page 102: ...101 230 V 50 Hz 1226836 E Flor RT 520 indd 101 17 11 15 11 55...
Page 103: ...102 c 1226836 E Flor RT 520 indd 102 17 11 15 11 55...
Page 114: ...113 1 3 5 2 4 6 1226836 E Flor RT 520 indd 113 17 11 15 11 55...
Page 127: ...126 1 3 5 2 4 6 1226836 E Flor RT 520 indd 126 17 11 15 11 55...
Page 140: ...139 1 3 5 2 4 6 1226836 E Flor RT 520 indd 139 17 11 15 11 55...
Page 153: ...152 1 3 5 2 4 6 1226836 E Flor RT 520 indd 152 17 11 15 11 55...

