


BackPack User Guide | 3
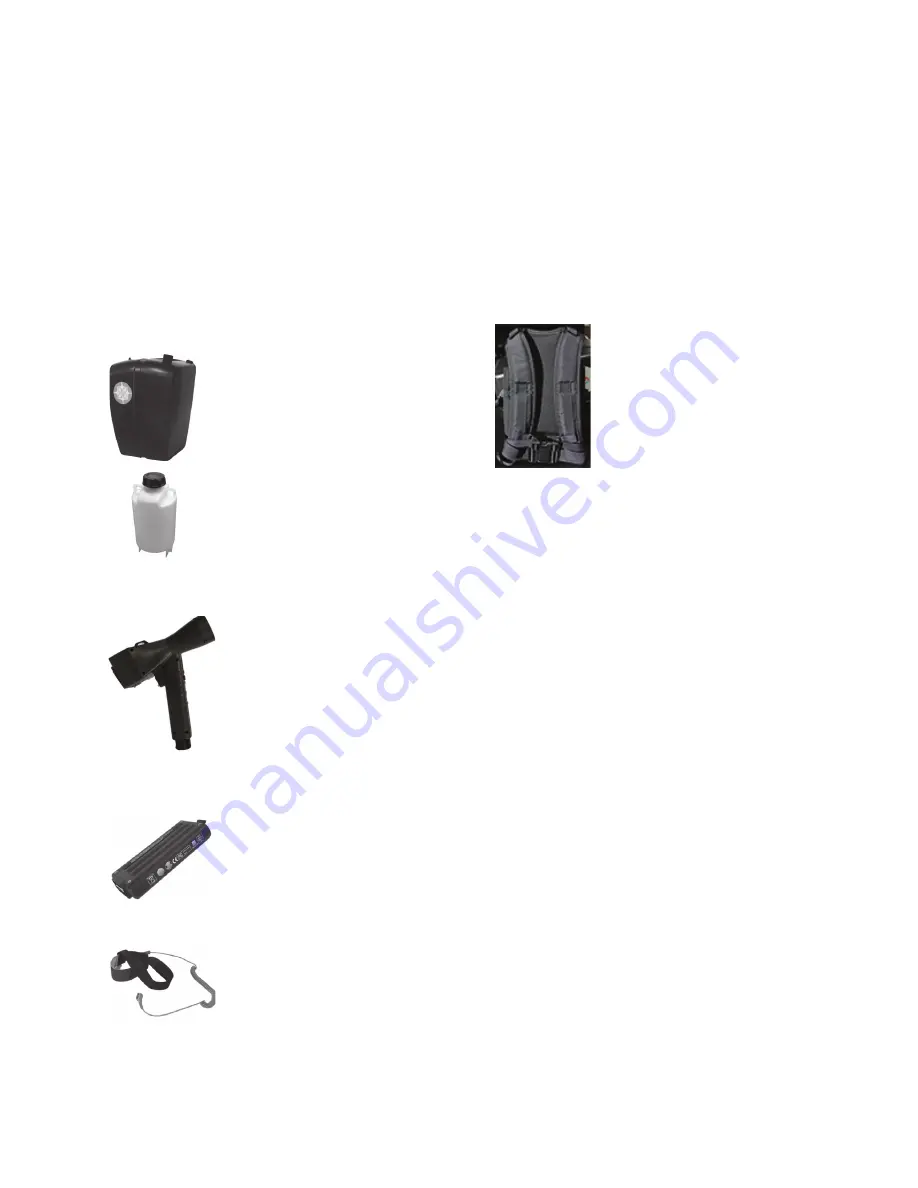
E-Mist BackPack System Components
1. BackPack (blue or black cases are
functionally identical) may be used
with hand grip/carry configuration or
with the BackPack harness.
2. Interchangeable one-gallon liquid
tank – Includes strainer and cap and
is inserted with light downward pres-
sure then rotated 1/4 turn to lock in
place.
3. Snap Cable – A universal connector/
end is attached to the Application
Wand and the housing to provide
power and liquid connectivity.
4. Application Wand – is hard-wired into
the BackPack housing. This hand-held
device is trigger activated for the
charging and applying of your liquids.
5. Rechargeable Battery (Optional 2nd
Battery) – The system can accommo-
date two batteries for extended use
but only one is required for operation.
The battery will stop working once it
reaches 20% capacity (or one “1” in-
dicator bar) to ensure no damage oc-
curs.
6. Toe Strap – This snaps to the bottom
of the BackPack and is an extra layer
of safety in the event static charge ac-
cumulates with extended use of the
BackPack System. A simple loop slips
over the toe of the shoe and heel.
*Note: The toe strap must be worn
by the user. if the toe strap is not
utilized the system will shut down
and not work.
7. BackPack Harness – This commercial
harness is designed for comfort and
safety. Adjustable to the user from
small frames to large frame individuals.
8. Not Shown - Battery Charger Kit.
Also not shown: personal protective
equipment (PPE) as may be required
by the chemical manufacturer of the
liquid agent you plan to apply.
Inspection
After unpacking, inspect components for any damage:
1. BackPack
2. Liquid Tank
3. Application Wand
4. Rechargeable Battery
5. Toe Strap
6. BackPack Harness
7. Charger (AC Adapter, Smart Battery Charger and cord).
Initial Set Up (U.S. Only)
Charge Battery
a. Plug cord into AC Adapter.
b. Plug AC Adapter Cord into Smart Battery Charger.
c. Plug AC Adapter into 120V wall outlet.
d. Install battery into the smart charger.
e. Reference power indicator (5 bars = full charge).
2
Initial Inspection & Set Up


