background image

27

27

General Information

USING YOUR TV WITH A SKY DIGITAL SET TOP BOX

Option 1) Connecting your TV to your Sky box (when both the TV and Sky Box are located 
in the same room) 

Depending on your Sky Box & TV model, connect either by SCART or HDMI cables 
(available separately) .

If connecting by SCART, select the ‘Input source’ on the TV as SCART. If your TV does 
not have SCART, please refer to ‘Connections’ pages in this user guide for alternative 
ways to connect.

If connecting by HDMI, select the ‘Input source’ on the TV as HDMI (if the TV has more 
than 1 HDMI port, ensure you select the input source to match the HDMI numbered port 
on the rear of the TV). 

If you wish to use your Sky remote to operate the TV’s functions, you will need a Sky 
remote control (Revision 9 or later) and you will need to program a 4 digit code into it.  
See bottom of this page. 

Option 2) Connecting your TV 
to your Sky box (when your 
Sky box is located in a different 
room to the TV) 

Please note, if you are adding a ‘Magic 
Eye/TV Link’ to your system so that 
you can use your Sky remote control 
to change the Sky channel in the room 
where the 2nd TV is located, please 
refer to the instructions included 
with the TV link/magic eye in order to 
ensure the RF or RF2 output on your 
Sky box is powered on. (The red LED 
light on the TV link/magic eye will light 
up if the RF / RF2 output is correctly set 
up)  If you do not have the instructions that came with the TV link/magic eye, instructions on how to do it can be 
found on our web site. 

1) To tune the TV to the Sky box, on the 2nd TV, select the ‘Analogue’ input source. 
2) Select the channel that you wish to store the Sky box/channel on. (If you do not use channels 1-5 because you 
no longer have analogue terrestrial channels after digital switchover, you may choose to select channel 1 to store 
the Sky box/channel, if you still have and use analogue channels 1-5, you may for example decide that channel 6 is 
the best option for you)  
3) Press the corresponding number on the remote control to select the desired analogue channel chosen as per 
point 2 above. 
4) On the TV remote control, press Menu. Now navigate through the menus to select Manual Tuning or Analogue 
Manual tuning (refer to the Tuning/Channel menu section of this user guide if necessary) 
5) Manually tune in the channel (usually, the Sky box is at a frequency between 800Mhz and 850Mhz) once the 
Sky box/channel is found, press ‘OK’ to store it. 

If you wish to use your Sky remote to operate the TV’s functions, you will need a Sky remote control (Revision 9 or 
later) and you will need to programme a 4 digit code into it.  See below. 

Sky Box

SCART adapter  
or HDMI cable

RF/COAX cable from 
Sky Box to 2nd TV

Connect to RF 
or RF2 output 
on the Sky box

Connect to the 
Aerial/RF input 
on the 2nd TV

TV Link/Magic Eye 
(optional)

2nd TV in 
another room

Sky Box

HDMI cable or
SCART adapter 


Using a Sky remote or a universal remote to operate your TV 

Sky remote control

 - If you wish to use your Sky remote to operate the basic functions of your TV, you need to 

program a 4 digit code into it. Please note - you will need a Sky Revision 9 remote control (or later).

 The code 

required for this television is 2134.

 If you wish to upgrade/replace your existing Sky remote control to the latest 

version, you can do so on our website.  

Universal remote control

 - If you wish to use a Universal remote control to operate your TV, please refer to the 

website for a full list of codes.  (Please note we only have codes for One for All branded remote controls, if you 
have an alternative brand of Universal remote, please refer to the manufacturer for the code.)

User Guide - EMO-MAN-0029 - 40-148Z-GB-5B2-FGKU-UK.indd   Sec1:27

User Guide - EMO-MAN-0029 - 40-148Z-GB-5B2-FGKU-UK.indd   Sec1:27

24/06/2015   11:29:26

24/06/2015   11:29:26

Summary of Contents for 40/148Z-GB-5B2-FGKU

Page 1: ...Full HD LED TV with Freeview USB media player Model No User Guide 40 148Z GB 5B2 FGKU ...

Page 2: ...d approved with the BSI mark Never try and replace the mains plug unless you have adequate qualifications and are legally authorised to do so In the event that a replacement mains cable is required contact the manufacturer for a suitable replacement Never use the television if it is damaged in any way Always place the television on a flat level surface avoiding anywhere which may be subject to stron...

Page 3: ...urs it will never disappear and is not repairable under warranty How do I dispose of this product UK Waste electrical products should not be disposed of with household waste Please dispose of the product at a designated collection point for recycling of WEEE For your nearest facilities please see www recycle more co uk or in store for details ROI Waste electrical products should not be disposed of...

Page 4: ...e Control 11 TV Buttons and Input Source Menu 12 Connections 13 15 TV Menu Operation 17 26 Channel Menu 17 Picture Menu 18 19 Sound Menu 20 Time Menu 21 Setup Menu 22 Lock Menu 23 Network Configuration 24 7 Day TV Guide and Channel List 25 USB Mode Media Player 26 General Information 27 30 Using your TV with a Sky digital set top box 27 Frequently Asked Questions 28 Technical Specifications 29 30 ...

Page 5: ... correctly The safest way to package your item in the event of warranty service repair is in it s original box packaging WHAT IS INCLUDED IN THE BOX 1 x User Guide 1 x Quick Start Guide 2 x AAA Batteries 1 x TV 1 x Remote Control User Guide Quick Start Guide 1 x RF Cable Accessories Included with this TV are the following accessories 1 x Stand plus screws 1 x Mini Component YPbPr 1 x Mini AV Compo...

Page 6: ...n the plastic of the stand neck in order to support a TV of this size a Ensure the cross head screw driver tip fits correctly into the head of the screw and that it is not too big or small b Screw in all screws individually and partially before tightening all of the screws fully c If they become very tight try loosening them slightly and then re tightening them once again as this will continue the ...

Page 7: ...ll For maximum security in the home when using a TV with its stand anti tip straps should be fitted These are available from supermarket websites and other websites and are an easy inexpensive and effective way of ensuring your TV stays safely upright Straps are designed to be attached to the rear of the TV and then tethered to the wall or the furniture the TV is stood on these are fitted as follows...

Page 8: ...e screen between the different picture formats SLEEP Press repeatedly to cycle through the sleep options AUDIO To change the audio language if available SUBTITLE To switch the dialogue at the bottom of the screen on off TEXT To enter exit Teletext Analogue TV TEXT HOLD Teletext mode Holds current page which is displayed Analogue TV DISPLAY To switch off the screen when listening to radio TEXT DVD ...

Page 9: ...put you require 3 Press OK B Using the buttons on the Television 1 Press SOURCE 2 Scroll up down using CH CH buttons to the input source you require 3 Press Vol to change input source to the one selected Standby Power On Off Displays the input source menu Displays Menu OSD Programme Channel down and menu down Programme Channel up and menu up Volume down and menu left Volume up and menu right 1 2 3...

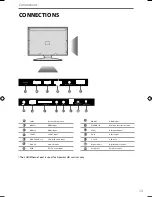
Page 10: ...C input RF IN RF TV Aerial Input HDMI 3 HDMI input CI CARD IN Common Interface module YPbPr HD input Ypbpr AV in Video Input 2 x USB USB port Digital Audio Digital Audio output Earphones Earphone Input A I L B J M N C D E F G H K VG A P C Audio in VG A P C IN E AR P HONE AV IN US B C I C AR D IN Y Pb Pr Digital Audio Output The LAN Ethernet port is used for Freeview HD services only ...

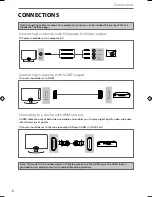
Page 11: ... video and audio with minimal loss of quality TV Source should be set to the corresponding HDMI port HDMI 1 HDMI 2 etc Connecting to a device with SCART output TV source should be set to SCART Note Connecting cables are shown for example only and may not be included Please check What Is Included In The Box page Scart Scart Note This model TV can not be used as a PC laptop monitor via the HDMI inpu...

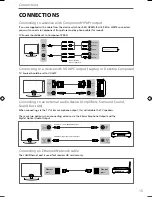
Page 12: ...Sound Bars etc When connecting via the TV s 3 5mm Earphone output this will disable the TV speakers There are two options when connecting a device via the 3 5mm Earphone Output and the Digital Optical Audio Output 3 5mm earphone OPTION 1 for 3 5mm EARPHONE Output OPTION 2 for Digital Optical Audio Output Digital audio out optical 3 5mm audio in Digital audio in optical Connecting to a device with ...

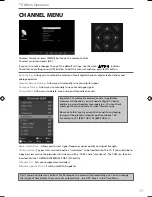
Page 13: ...se note that any Freeview HD channels found during tuning will be placed in channel positions above 100 For example 101 BBC1 HD 102 BBC2 HD etc Auto Tuning Allows you to retune the television for all digital channels digital radio stations and analogue devices Freeview Manual Tuning Allows you to manually tune your digital signal Analogue Tuning Allows you to manually tune your analogue signal Cha...

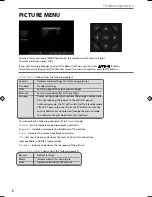
Page 14: ...e the following adjustments in Personal mode Contrast Switch the balance between black and white Brightness Increase or decrease the brightness of the picture Colour Increases the colour from black and white Tint Lets you increase or decrease the level of tint within the picture only available in VGA PC source mode Sharpness Increase or decrease the sharpness of the picture Colour Temperature Choo...

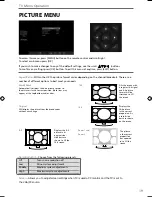
Page 15: ... PICTURE MENU Point2Point Automatically displays the best picture format so the picture is in the correct position Black lines may appear at the top bottom and or sides Zoom1 and Zoom2 Original 16 9 The picture is the correct proportion but zoomed in to fill the screen Will display the picture from the broadcaster without any change 14 9 4 3 Displays the 14 9 picture in the correct proportion As a ...

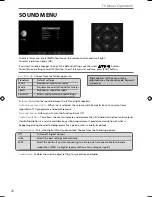
Page 16: ...omatically PCM Select this option if you are connecting to a Stereo Hi fi via coax cable Pulse code modulation PCM is a digital representation of an analogue signal Audio Description This allows the user to increase and decrease the AD Audio Description volume level Audio Description is a service available on certain programmes It provides a description of what is happening during the selected prog...

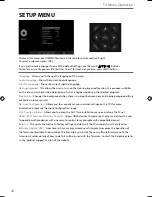
Page 17: ...djust the amount of time the On Screen Menu stays on the screen before disappearing Auto standby Set Auto standby between 3 hours 4 hours and 5 hours to turn off this function you must exit Home Mode in the Picture Menu To access this menu press MENU button on the remote control and scroll right To select a sub menu press OK If you wish to make changes to any of the default settings use the scroll...

Page 18: ... retune the TV set HDMI CEC Consumer Electronic Control Allows HDMI devices to control each other and allows the user to operate multiple devices with one remote control only available with compatible devices Reset TV This resets the menus to factory settings and clears all the TV channels from the television Software Update USB From time to time we may release new firmware to improve the operation...

Page 19: ...sword is 0000 Change Password Allows you to change the password Channel Lock Allows you to lock certain channels manually Parental Guidance Allows you to set the rating to block certain content based on age information TV Button Lock Allows you to lock the buttons on the side of the TV set Default Source Allows the user to set the default source The default source is the source the TV starts on wh...

Page 20: ...nnect the TV to your home network this is the default setting and is highly recommended Static is an advanced option and allows you to manually change the IP Netmask Gateway and DNS information 5 If the static option is chosen you will able to scroll down and manually change the IP Netmask Gateway and DNS information 6 When the connection process is completed with either DHCP or Static option the ...

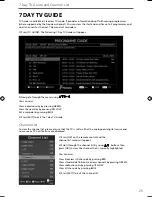
Page 21: ...LUE 3 Press EXIT to exit the 7 day TV Guide Channel List To view the channel list please ensure that the TV is set to either the analogue or digital source and no menus or TV notifications are displayed 1 Press OK on the remote control and the channel list menu will appear 2 Scroll through the channel list by using buttons then press OK to view the channel that is currently highlighted You can also...

Page 22: ...r The content will be divided into Photo Music Movie and Text based on file type USB MODE MEDIA PLAYER 3 You can now access the item Press OK to view 4 While viewing you can control the item by using the remote control buttons below or by pressing i and using and OK Tip If you experience a playback issue please ensure the files being used are the correct format example the picture plays but no sound...

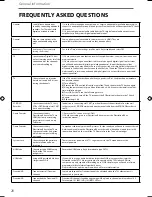
Page 23: ...er have analogue terrestrial channels after digital switchover you may choose to select channel 1 to store the Sky box channel if you still have and use analogue channels 1 5 you may for example decide that channel 6 is the best option for you 3 Press the corresponding number on the remote control to select the desired analogue channel chosen as per point 2 above 4 On the TV remote control press M...

Page 24: ...rocess 5 Once completed turn off the TV reconnect the RF Aerial cable then turn the TV back on again 6 Repeat steps 3 4 VCR DVD Recorder I have connected the TV to my VCR or DVD Recorder via SCART but it is not recording In addition to connecting via SCART you should connect the aerial cable from the wall socket to your VCR DVD Recorder and another aerial cable from the VCR DVD Recorder to the TV ...

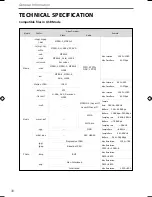
Page 25: ...4 hours per day for 365 days The actual energy consumption will depend on how the television is used 2 When the TV is turned off with the remote control standby button and no function is active RF 75 ohm Antenna Analog DVB Inputs 3 x HDMI 2 x USB 1 x SCART 1 x VGA PC 1 x Mini Component YPbPr 1 x Mini Composite Video L R Audio shared for Composite Video Component YPbPr 1 x 3 5mm jack for PC audio i...

Page 26: ...0 Max Data Rate 10 Mbps asf wmv VC1 Max Solution 1920 1080 Max Data Rate 40 Mbps flv swf H 264 AVC Sorenson H 263 Music mp3 MPEG1 2 Layer1 Layer2 Layer3 Sample Rate 16KHz 48KHz BitRate 32K 448Kbps wma asf WMA BitRate 128Kbps 320Kbps Sampling rate 8KHz 48KHz WMA pro BitRate 768Kbps Sampling rate 96KHz ogg OGG Sample Rate 48KHz m4a aac AAC HEAAC Sample Rate 8K 48KHz Bit Rate 24K 384Kbps Photo jpg jp...

Page 27: ...EMO MAN 0029 ...

Reviews: