background image

30 

  E-mu Systems

Basic Operations

Multitimbral Operation

Multitimbral 
Operation

Multitimbral operation means that Proteus 2000 can play more than one 
sound at the same time. Follow these instructions to access multiple presets 
on different MIDI channels simultaneously.

þ  

To Set Up Proteus 2000 for Multitimbral Operation

1.

Set the MIDI mode to “multi mode,” using the MIDI mode function in 
the Master menu.

2.

Decide which MIDI channels you want the Proteus 2000 to receive (32 
channels can be used simultaneously). If you are using 16 MIDI 
channels or less, just use the “A” MIDI port. Use both MIDI ports if you  
need more than 16 MIDI channels. You can turn any unused channels 
OFF using the MIDI Enable function in the Master menu.

3.

Select the desired preset for each of the MIDI channels you want the 
Proteus 2000 to receive using the MIDI Channel/Preset selection screen 
(see previous instructions).

O

O

O

O

Save the Multisetup 

using the instruction provided in 
Chapter 3:Multisetup. 

4.

Proteus 2000 now responds multitimbrally on each of the MIDI 
channels you have specified. The volume and pan position parameters 
can be adjusted over MIDI (for each MIDI channel) or using the Cursor 
and Data Entry Control in the Preset Select screen.

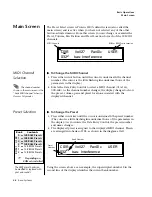
Proteus 2000 has two MIDI inputs with 16 MIDI channels each.  Each of the 32 MIDI 
channels can be assigned to play a specific preset with unique volume and pan settings.

S C O T T S   V A L L E Y   C A .   U . S . A .

B

THRU

A

~

“A” MIDI

channels 1-16

“B” MIDI

channels 1-16

IN

IN

Volume

Pan

Channel 01

A

Volume

Pan

Preset

Channel 02

A

Volume

Pan

Preset

Channel 03

A

Volume

Pan

Preset

Channel 16

A

Preset

Volume

Pan

Preset

Channel 01

B

Volume

Pan

Preset

Channel 02

B

Volume

Pan

Preset

Channel 03

B

Volume

Pan

Preset

Channel 16

B

Summary of Contents for proteus 2000

Page 1: ...Real time Controller information beginning page 23 There are several power user features in the interface which make programming even easier and we wouldn t want you to miss them Volume Control This c...

Page 2: ...the button is held continuously The cursor can be moved bidirectionally using the Data Entry Control while either cursor select button is held down for example press and hold the right cursor button a...

Page 3: ...ed and the programming of the preset Front Panel Controller Modes The Real time Controller Knobs serve three purposes 1 Real time control of synthesizer parameters 2 Quick Editing the initial settings...

Page 4: ...ode is only active when on the Preset Select screen and when Quick Edit is enabled in the Master menu see Knob Preset Quick Edit on page 48 Initial controller values can be stored in every preset When...

Page 5: ...the Master menu When you enter any of the Edit menus 1 The four Controller Knobs are used for editing 2 All the Controller LEDs are off 3 All the Control Row LEDS are off When you turn a knob the fiel...

Page 6: ...pan and preset location associated with the displayed channel Preset Selection To Change the Preset 1 Press either cursor key until the cursor is underneath the preset number The cursor is a little fl...

Page 7: ...e same parameter as MIDI volume control 7 and changes made over MIDI are shown in the display To Change the Channel Volume 1 Press either cursor key until the cursor is underneath the volume value 2 R...

Page 8: ...preset ADD algebraically with the Channel Pan setting Therefore if the pan setting in the preset were set to 63R moving the Channel Pan setting full left would return the sound to the center position...

Page 9: ...Field will change to show the first preset in each category To Change the Preset Category 1 Press either cursor key repeatedly until the cursor is underneath the preset category field 2 Rotate the Da...

Page 10: ...MIDI channels you want the Proteus 2000 to receive using the MIDI Channel Preset selection screen see previous instructions O O O O Save the Multisetup using the instruction provided in Chapter 3 Mult...

Reviews: