


22
E-mu Systems
Basic Operations
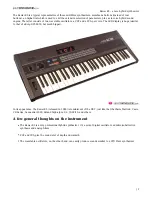
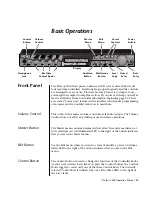
Front Panel
Audition Button
The Audition button allows you to hear any preset without hooking up a
MIDI keyboard. When the Audition button is pressed, the LED next to the
button will illuminate and a short “Riff” (programmed as part of the preset)
will play. The Riff is latched on and plays continuously until the button is
pressed again. Presets can be changed while Audition is latched on.
O
O
O
O
See “Bank Select
Commands“ on page 80 for
more information on selecting
banks via MIDI.
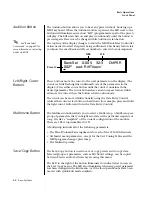
The top line of the display changes to show the MIDI Bank Select controller
values needed to select the preset being auditioned. This handy feature lets
you know the exact Bank and Preset number to enter into your sequencer.
Left/Right Cursor
Buttons
These buttons move the cursor to the next parameter on the display. (The
cursor is a little flashing line underneath one of the parameters in the
display.) Press either cursor button until the cursor is underneath the
desired parameter. The cursor buttons have an auto-repeat feature which
advances the cursor when the button is held continuously.
The cursor can be moved bidirectionally using the Data Entry Control
while either cursor select button is held down (for example, press and hold
the right cursor button and turn the Data Entry Control).
Multimenu Button
The Multimenu button allows you to select a Multi-setup. A Multi-setup is a
group of parameters that you might associate with a particular sequence or
song. It is like a “snapshot” of the current configuration of the module.
There are 128 setups numbered 0-127.
A Multisetup includes all of the following parameters:
•
The Preset/Volume/Pan assignments for each of the 32 MIDI channels.
•
All Master menu parameters, except for the User Tuning Tables and the
MIDI program change->preset map.
•
The Multisetup name.
Save/Copy Button
The Save/Copy button is used to save or copy presets and to copy data.
Selected groups of parameters, such as PatchCord settings, can be copied
between Presets and/or between Layers using this menu.
The LED to the right of the button illuminates to indicate that you are in
the Save/Copy menu. The LED also illuminates when any preset parameter
has been changed in the Edit menu (or if the front panel knobs have been
moved with Quick-Edit mode enabled).
BankSel 0:004 32:3
CMPSR
002
3
pad: RiffTrippin’
MSB
LSB
Preset #