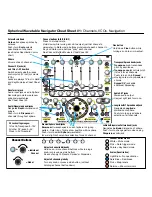
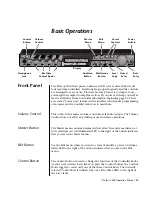
background image


24 


  E-mu Systems


Basic Operations

Front Panel Controller Modes


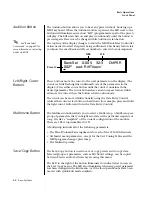
There is an LED next to each of the control knobs which illuminates to 
indicate that the knob setting has been changed from the value 
programmed in the preset (when Quick Edit mode is enabled). If the knob 
position is returned to the original setting, the LED is extinguished.

If the “


Knobs MIDI Out


” parameter in the Master menu (see “Knobs/Riff 

MIDI Out” on page 49) is set to “transmit,” the system sends a MIDI 
controller message when you turn off the Control knob. The MIDI 
controller message is sent on the current MIDI channel (also called the 
basic channel) using the controller number assigned in the Master menu 
(see “Real-time Controller Assignment” on page 46).

The knobs only generate a message when you move a knob to a new value. 
The current value jumps to the new value.
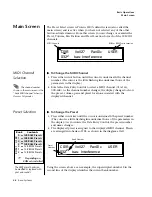
 

Quick Edit 


This mode uses the Controller knobs to “Quick-Edit” the currently selected 
preset without having to enter the Preset Edit menu. This mode is only 
active when on the Preset Select screen and when 


“Quick-Edit”


is enabled in 

the Master menu (see “Knob Preset Quick-Edit” on page 48). 

Initial controller values can be stored in every preset. When you move a 
knob with Quick-Edit enabled, the Initial Controller Value is updated with 
the knob’s new value. The knob’s LED lights indicating that the preset value 
has been changed. The three Control Rows’ MIDI A-L values are stored in 
the corresponding 


Initial Controller Amount


 parameter in the Edit menu (see 

“Initial Controller Amount” on page 120). The Save/Copy button LED 
illuminates to remind you that the preset has been edited. “Quick-Edits” 
made to a preset are lost if you select another preset before saving them. 


þ  


To Quick-Edit a Preset


_

_

_

_


Quick-Edit mode must 

be enabled in the Master menu. 


1.


Use the Control Knobs to change the sound of the current preset as 
desired.


2.


Press the Save/Copy button. The display reads, “Save Preset to.”


3.


Press the right cursor button to select the bottom row.


4.


Optional: Select a new preset location if you don’t want to overwrite 
the current preset, or if the current preset is a ROM preset.


5.


Press the Enter button to save the preset. 

Summary of Contents for proteus 2000

Page 1: ...Real time Controller information beginning page 23 There are several power user features in the interface which make programming even easier and we wouldn t want you to miss them Volume Control This c...

Page 2: ...the button is held continuously The cursor can be moved bidirectionally using the Data Entry Control while either cursor select button is held down for example press and hold the right cursor button a...

Page 3: ...ed and the programming of the preset Front Panel Controller Modes The Real time Controller Knobs serve three purposes 1 Real time control of synthesizer parameters 2 Quick Editing the initial settings...

Page 4: ...ode is only active when on the Preset Select screen and when Quick Edit is enabled in the Master menu see Knob Preset Quick Edit on page 48 Initial controller values can be stored in every preset When...

Page 5: ...the Master menu When you enter any of the Edit menus 1 The four Controller Knobs are used for editing 2 All the Controller LEDs are off 3 All the Control Row LEDS are off When you turn a knob the fiel...

Page 6: ...pan and preset location associated with the displayed channel Preset Selection To Change the Preset 1 Press either cursor key until the cursor is underneath the preset number The cursor is a little fl...

Page 7: ...e same parameter as MIDI volume control 7 and changes made over MIDI are shown in the display To Change the Channel Volume 1 Press either cursor key until the cursor is underneath the volume value 2 R...

Page 8: ...preset ADD algebraically with the Channel Pan setting Therefore if the pan setting in the preset were set to 63R moving the Channel Pan setting full left would return the sound to the center position...

Page 9: ...Field will change to show the first preset in each category To Change the Preset Category 1 Press either cursor key repeatedly until the cursor is underneath the preset category field 2 Rotate the Da...

Page 10: ...MIDI channels you want the Proteus 2000 to receive using the MIDI Channel Preset selection screen see previous instructions O O O O Save the Multisetup using the instruction provided in Chapter 3 Mult...

Reviews: