background image


24 


Step 8: Interface for successfully receiving files from other devices: 


Summary of Contents for UT55

Page 1: ...User s Manual UT55...

Page 2: ...en displays menus etc Products that are referred to in this document may be either trademarks and or registered trademarks of the respective owners The publisher and the author do not claim these trad...

Page 3: ...2 Install and Disassemble Batteries 12 Install Battery 12 Disassemble the Battery 13 5 Managing Your Installations 14 Install the Card Nano SIM Card MicroSD Card 14 Install the Hand held Strap 14 Inst...

Page 4: ...8 Troubleshooting 35 Appendix A Technical Specifications 35 Appendix B Compliance Information 36 B1 FCC Statement 36 Part 15B Equipment 36 FCC RF Radiation Exposure Statement 37 B2 Radio Wave Exposure...

Page 5: ...is ignored Symbols and Markings This section provides information about the symbols that are used on the UT55 it is accessories or packaging Symbol or Markings Description Power On Off Indicator Disp...

Page 6: ...Package Contents In addition to the primary tablet unit your product carton should contain all the below items UT55 RuggedTablet PC Packing Contents AC Adapter AC Power Cord Battery Stylus Optional Be...

Page 7: ...ng list Please inspect all items If any items are missing or appear damaged please inform your dealer immediately This packing list applies to standard models Select models may have different items A...

Page 8: ...the machine is in a normal working state Greenlight flash when the machine is asleep 5 The Hard Drive Light On when the hard drive is working Off when the hard drive is not working 6 Battery A Indica...

Page 9: ...of range unplug the charger and stop charging immediately Red light flashes once in 2 seconds Battery A remaining charge less than 10 Left side View Item Components Description 8 Power Key Power on or...

Page 10: ...lock Bottom View Item Component Description 14 Docking Connector Connects the tablet with the Tablet Docking Station Rear View Position Components Description 15 External GNSS Antenna Interface To ins...

Page 11: ...s 4G LTE 21 Battery 2 Supplies power to your Tablet PC when external power is not connected 22 Battery 2 Lock To lock unlock Battery 2 23 Battery 1 Lock To lock unlock Battery 1 24 Battery 1 Supplies...

Page 12: ...utomatically For more information see Battery safety page 32 Install and Disassemble Batteries Install Battery Turn the machine over to the back and insert 2 batteries to make sure the batteries are i...

Page 13: ...s a button and 4 LED lights on the battery and if you press the buttons shortly 4 LED lights to indicate the remaining battery charge If none of the 4 LED lights are on the remaining battery charge is...

Page 14: ...side of the machine The Nano SIM card port is on the left side of the lower two mouths and the SD card port is on the right Insert the card into the machine in the screen orientation Install the Hand...

Page 15: ...een 2S once 2 Battery temperature 60 Battery temperature 10 Red light flashes once for 0 5S 3 Temperature 45 Temperatures 0 AC only Green light flashes once for 0 5S 5 The battery is over pressured CO...

Page 16: ...ess the power key shortly to see the screen turned off The power LED will flash indicating that the system is in the sleep mode When the device enters sleep mode press the power on key to see the scre...

Page 17: ...app Use Ethernet The UT55 has an optional RJ45 outlet It can be inserted into an RJ45 network cable to connect to the Internet or interconnect with other Ethernet devices Step 1 Insert the RJ45 crysta...

Page 18: ...l below if the icon is OK there is no yellow exclamation point or red fork indicating that the Ethernet connection was successful Step 3 If you need to set up Ethernet you can choose the following men...

Page 19: ...19 Step 4 If you need to set up Ethernet information such as an IP address or gateway select the following menu Start Settings Network and Internet Ethernet Change Adapter Options...

Page 20: ...ur own WIFI hotspot and then click on Connect Step3 Enter the WIFI password and click on the Next Step 4 When the WIFI connection is successful you will see the following Connected Secure This indicat...

Page 21: ...oth devices Step 1 Turn on other Bluetooth devices such as a smartphone or a Windows laptop with Bluetooth Step 2 Click on Start Setting Devices Bluetooth other devices Turn on Bluetooth Step 3 Add a...

Page 22: ...22 Step 4 As follows you can find multiple Bluetooth devices such as using Windows notebook working with Bluetooth Step 5 Click on ALP AL00 and then click on connection...

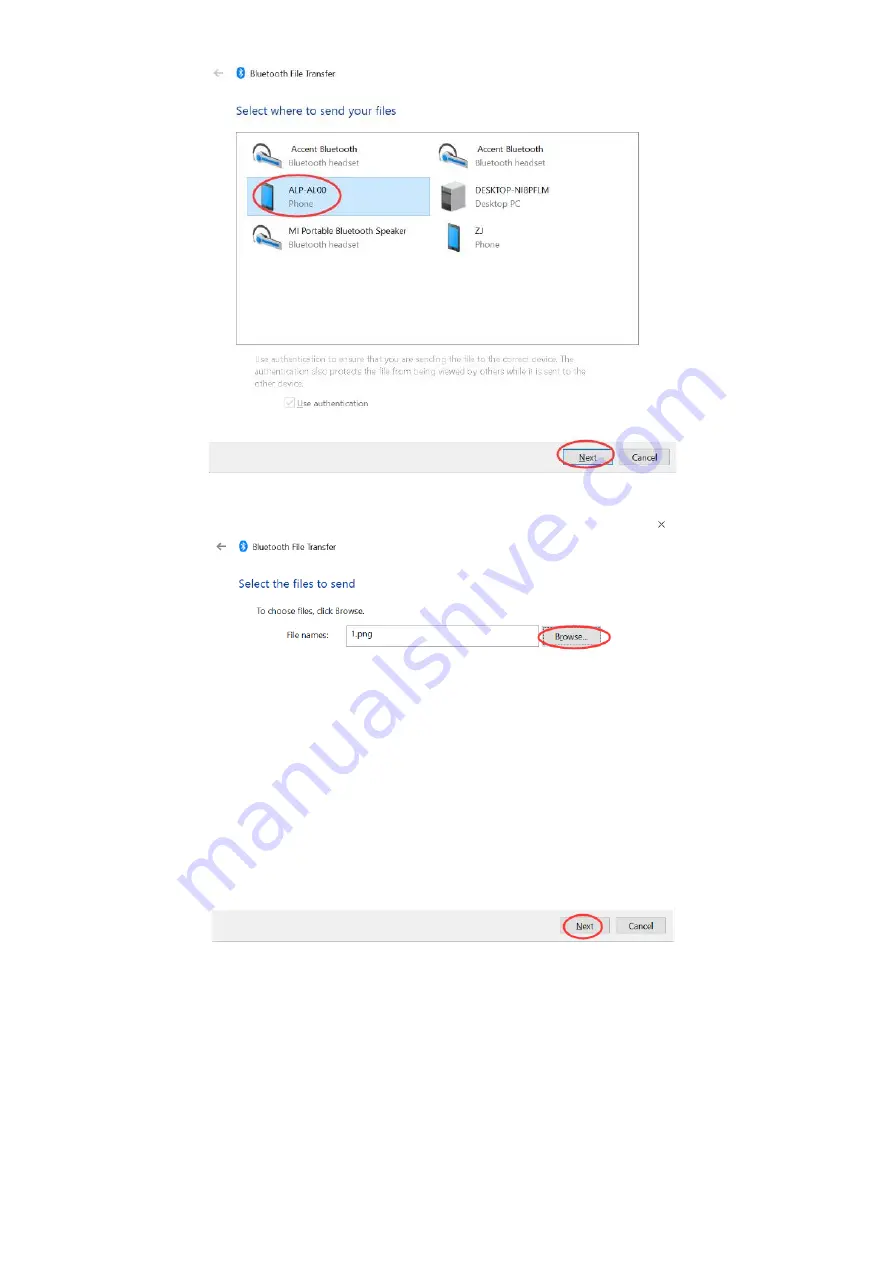
Page 23: ...r Connect the Paired will appear on ALP AL00 Step 7 Send or receive files over Bluetooth If you want to accept a file via BLUETOOTH you must open the Bluetooth receive file interface below otherwise w...

Page 24: ...24 Step 8 Interface for successfully receiving files from other devices...

Page 25: ...NSS function of UT55 Use u Center 8 24 as an example The u Center application can be downloaded from the official website of uBlox https www u blox com en Step 1 Download and install u center 8 24 Ste...

Page 26: ...S with serial mode Open the COM port from the following menu Receiver Port COM4 It may not be COM4 on different machines but the correct COM port of GNSS can be found in Windows Device Manager Select...

Page 27: ...signal view and you can see the following interface GNSS Mode 2 Use Sensor mode to turn on GNSS Use Sensor mode to turn on GNSS Select the Sensor mode from the following menu to turn on GNSS Receiver...

Page 28: ...ng path Start Settings Account Login Options Password If you have already set a password there is no need to set the password again You can go to the second step If there is no password please follow...

Page 29: ...the password setting Step 2 Add a PIN Enter the following path Start Settings Account Login Options PIN If you have already set a PIN code you do not need to set the PIN again You can go to the third...

Page 30: ...ge the password according to the prompts Set up Set the backlight brightness automatic adjustment function You can set the backlight brightness auto adjustment function on and off by the reference to...

Page 31: ...and closing of the automatic screen rotation function can be set by reference to the following path Start Settings System Display Rotation Lock Method 2 There is a quick switch for rotary locking in...

Page 32: ...and hold the keyboard s F7while pressing the device s power on key to see the following interface Step 4 When entering the BIOS settings interface you can view the version numbers of the BIOS and EC...

Page 33: ...ngs interface and select the menu Save Exit If you need to save the modified settings and exit you can select Save Changes and Exit If you do not need to save the modified settings and exit you can se...

Page 34: ...mended by the manufacturer is dangerous and the consequences and losses are at your own risk The battery charging temperature range is 0 to 45 Please do not charge the battery outside this ambient tem...

Page 35: ...have your serial number ready This can be found on the back of your device Appendix A Technical Specifications Ruggedness IP 67 Waterproof ESD Protection 4KV touch 8KV air Ultra LCD protection Option...

Page 36: ...e complies with Part 15 of the FCC Rules Operation is subject to the following two conditions 1 this device may not cause harmful interference and 2 this device must accept any interference received i...

Page 37: ...an those provided or that are integrated in the device may affect EMC performance The SAR Specific Absorption Rate limit as dictated by the FCC in the USA and by the IC in Canada is 1 6W kg averaged o...

Page 38: ...trie Canada applicables aux appareils radio exempts de licence L exploitation est autoris e aux deux conditions suivantes 1 l appareil ne doit pas produire de brouillage et 2 l utilisateur de l appare...

Reviews: