18
19
❙
BEFORE EACH USE
REMOVING HAIR WITH
1
2
3
•
Check the power cord (must not be pinched or crushed, wire must not be bare).
•
Check the cable connecting the base to the applicator (no visible impairment).
•
Check the external optical parts of
.
Check that the glass tip of the applicator (optical guide) is intact, and if this is not the case (if the optical guide is cracked or
chipped), changing the whole mobile head is essential. Ordering this part is possible at
store.esw-beauty.com
.
•
Verification of the internal optical parts.
- In all cases,
the device must be unplugged before
you start disassembling the mobile head.
- Before each use, and before plugging-in
, you must check the integrity of the internal optical parts: tube, filter
(flat red piece of glass), and optical guide. The filter must be cleaned systematically before each hair removal session with
. It must be clean and free of dust.
To proceed to the verification code:
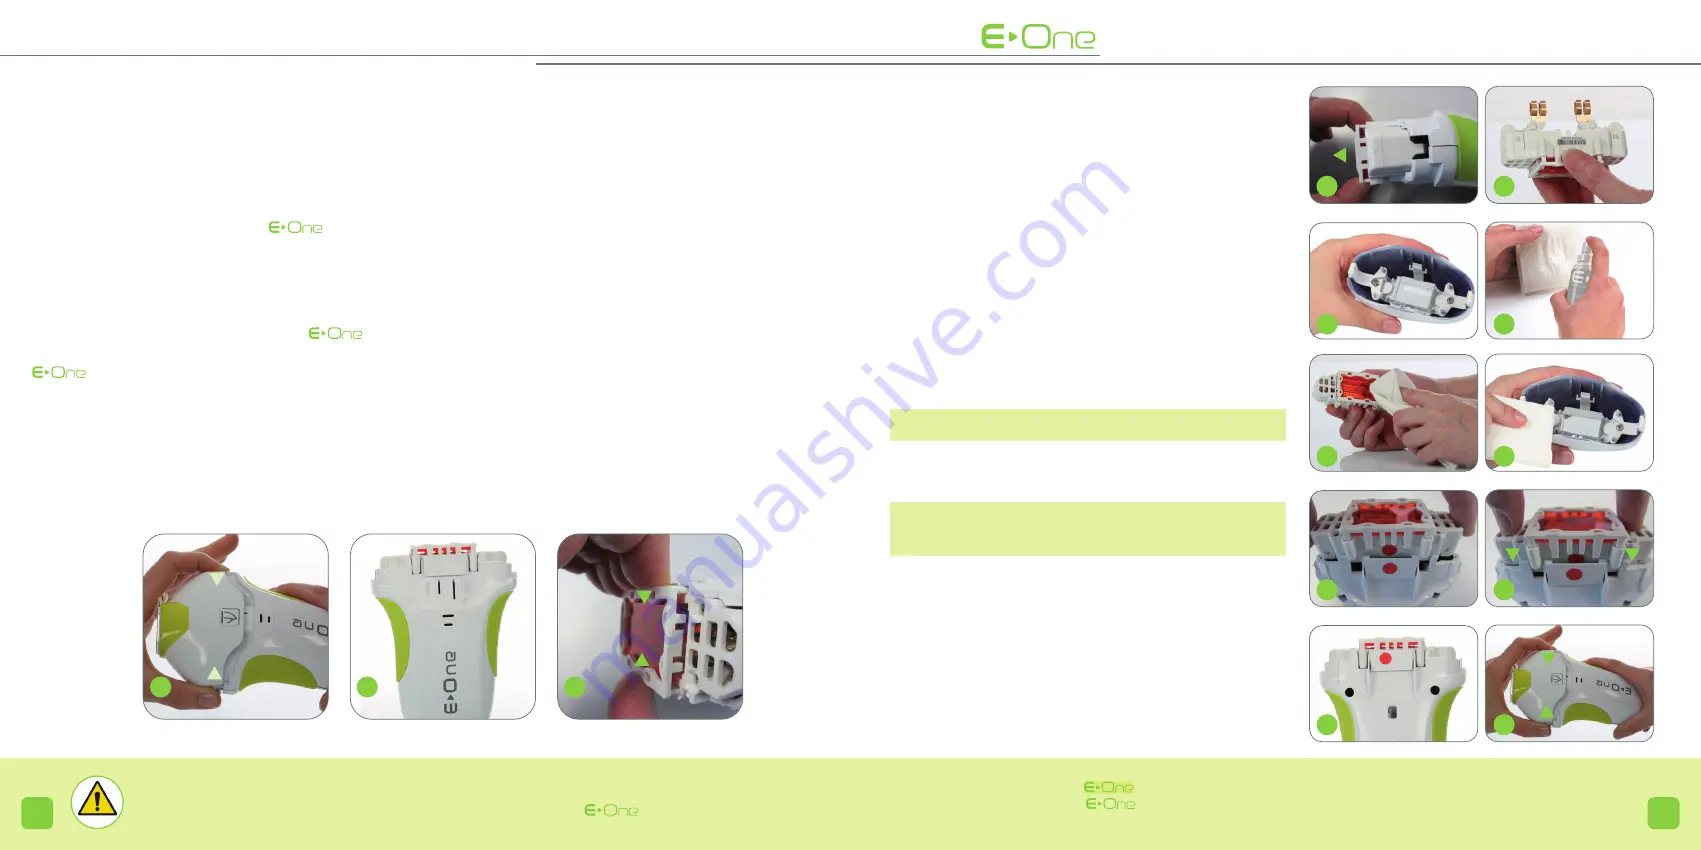
- Press simultaneously on the 2 locking tabs of the mobile head, and remove it (
1
).
- Delicately place the mobile head on a flat surface.
Once you have completed your treatment, you must wait for the fan to come to a complete stop (it may
take more than 10 minutes), before switching it off and unplugging it. This procedure enables the inter-
nal optical parts to cool down.
The other fans, located in the base of
, will only stop once the
device is unplugged.
4
5
6
7
8
9
10
11
12
13
VERIFICATION
•
Removing the
optic
cartridge with filter.
-
Once the mobile head is removed, the
optic
cartridge
with filter is then visible in the applicator (
2
).
- Remove the cartridge from the applicator: press firmly on
the filter support (
3
) and pull (
4
). The
optic
cartridge
with filter now presents itself to you (
5
); it is imperative
to hold it only by the plastic parts.
•
Cleaning of the internal optical parts.
-
Once the filter cartridge is removed, the transparent
optical glass is also accessible (
6
).
- Using the spray
clean
: spray it on a lint-free cloth
beforehand (
7
).
NOTE:
Never spray directly on the optical parts.
Afterwards clean
only
the accessible side of the filter with this
cloth (
8
). Repeat the same procedure for the accessible part
of optical glass (
9
).
NOTE:
The filter must never be separated from its
optic
cartridge.
-
When cleaning is complete, take the
optic
cartridge and
align it with the applicator with the help of the red dots (
10
).
Push it into the slide way of the applicator by pressing on it
(
11
), so as to ensure that it is properly in position (
12
).
- Re-attach the mobile part of the applicator by pressing
simultaneously on the locking tabs of the mobile head (
13
),
making sure to align the internal red dot of the head with the
red dot of the applicator.
NOTE:
For better efficiency of
, t is recommended to clean the filter before each use with the spray
clean
provided when you purchased
. Any damaged filter due to non-compliance with the procedure for use is not
covered by the manufacturers warranty.


