ELECTRICAL
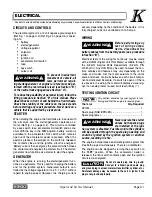
Read all of Section B and this section before attempting any procedure. Pay particular attention to all Notes, Cautions and Warnings
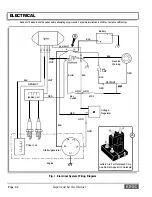
The charging circuit consists of a starter/generator, volt
age regulator and battery (Ref Fig. 1 on page K-2). The
solenoid must be functional in order to start the vehicle,
but is not considered part of the charging circuit.
1. If the battery charge is inadequate (less than 11
VDC), proceed as follows:
a) Check the battery voltage and inspect for loose or
corroded terminal posts and connections. Check
electrolyte level.
b) Check charging circuit component terminals for
proper, clean, tight connections.
c) Check for charging voltage as follows:
1) Raise the vehicle (see procedure in Section
B) so that both rear wheels are free to rotate.
2) With the engine off, measure the voltage at
the battery's terminals by placing the nega
tive(-) probe on the negative(-) post and the
positive ( +) probe on the positive ( +) post of
the battery. Note the reading.
3) Attach the DC voltmeter across the regula
tor's red and black leads.
4) Start the engine and accelerate to governed
speed.
5) The meter should read higher than before
starting the engine. In a reasonable amount
of time, the reading should settle between 14
and 15 volts, indicating the regulator is func
tioning properly.
6) If no increase over battery voltage is
observed, there is a malfunction in the
charging circuit.
7) If the reading is
above
15 volts, check to
assure the wiring harness and generator
field winding (green lead) is not grounded. If
it is not, replace the regulator.
8) If the reading is
below
14 volts, disconnect
the regulator's green field wire from the sys
tem harness. Temporarily connect the green
field wire to ground. If the voltage rises
above its prior reading, replace the regulator.
9) If the above procedures do not correct the
problem, check for faults in the vehicles wir
ing harness and/or generator.
STARTER/GENERATOR
Starter/Generator Removal
See ENGINE section.
Starter/Generator Disassembly
Tool List
Qty. Required
DVOM .......................................................................... 1
Wrench, 24 mm ........................................................... 1
Wrench, 10 mm ........................................................... 1
Wrench, 6 mm ............................................................. 1
Wrench, 5 mm ............................................................. 1
Socket, 10 mm, 3/8" drive ............................................ 1
Phillips screwdriver, 3/8" drive ..................................... 1
Two jaw puller ............................................................. 1
Straight blade screwdriver, ......................................... 1
Ratchet, 3/8" drive ....................................................... 1
I
NOTE
I
In general, start�r/generator servi�� is best
�-
---�-
performed by framed motor technicians who
have the knowledge and equipment to overhaul the unit. Some
checks and repairs however, can be accomplished by a skilled
mechanic. Make your own evaluation of the equipment and
skills available before starting disassembly.
Hold the pulley (1) and remove the pulley nut (2).
Remove the pulley, screws (4) and front cover (3) (Ref
Fig. 5 on page K-7).
Remove the brush covers (6) by prying out with a screw
driver. Pull up on the brush springs and move to the side
of brushes, slide the brushes out approximately 1/4" (6
mm) (Ref Fig. 6 on page K-7). Remove the through bolts
(7) and the rear cover (8). Remove the frame and field
coils (9). Remove the 5 mm screws from the brush holder
and 6 mm nuts from A 1 and A2 terminals. Remove the
brush holder. If the bearing needs to be replaced, use an
automotive style two jaw puller to remove the bearing
from armature (Ref Fig. 7 on page K-7).
Starter/Generator Inspection
1. Inspect the commutator for wear or damage.
2. Inspect the brush assembly for wear and damage to
the brush holder insulators. Check the brushes for
length, approximately 11/16" (17 mm) or to the line
marked on the brush and signs of carbonization.
3. Inspect the armature for distortion or broken wires.
4. Inspect the field coil insulators and lead wire.
5. Check the bearings for free rotation and lack of end
play on shaft. Replace if necessary.
Page K-6
Repair and Service Manual
Summary of Contents for 4 CADDY 1999
Page 6: ...TABLE OF CONTENTS Notes __________________________ _ Page iv Repair and Service Manual...
Page 10: ...SAFETY INFORMATION Notes _________________________ _ Page viii Repair and Service Manual...
Page 26: ...SAFETY Notes _ _ ___________________________ _ Page B ii Repair and Service Manual...
Page 48: ...BODY Notes _ _ ___________________________ _ Page C ii Repair and Service Manual...
Page 56: ...WHEELS AND TIRES Notes __________________________ _ Page D ii Repair and Service Manual...
Page 72: ...SPEED CONTROL Notes _ _ ________________________ _ Page F ii Repair and Service Manual...
Page 80: ...ENGINE Notes _ _ __________________________ _ Page G ii Repair and Service Manual...
Page 94: ...FUEL SYSTEM Notes _ _ _________________________ _ Page H ii Repair and Service Manual...
Page 110: ...ELECTRICAL Notes _ _ _________________________ _ Page K ii Repair and Service Manual...
Page 120: ...ACCESSORY WIRING Notes __________________________ _ Page L ii Repair and Service Manual...
Page 148: ...REAR SUSPENSION Notes __________________________ _ Page N ii Repair and Service Manual...
Page 154: ...REAR AXLE Notes _ _ ___________________________ _ Page P ii Repair and Service Manual...
Page 158: ...PAINT Notes _ _ ___________________________ _ Page Q ii Repair and Service Manual...
Page 162: ...TROUBLESHOOTING Notes _ _ ________________________ _ Page R ii Repair and Service Manual...
Page 170: ...LIMITED WARRANTY Notes __________________________ _ Page S ii Repair and Service Manual...
Page 176: ...LIMITED WARRANTY Notes __________________________ _ Page S 6 Repair and Service Manual...
Page 178: ...GENERAL SPECIFICATIONS Notes _________________________ _ Page T ii Repair and Service Manual...


