GENERAL INFORMATION & ROUTINE MAINTENANCE
Read all of Section B and this section before attempting any procedure. Pay particular attention to all Notes, Cautions and Warnings
Fill cold engine -
� Maximum oil level
for hot engine
to this point
Do not overfill
IL I
ADD
F
./
�
Low Add oil
Safe
Full
operating range
for hot engine
Fig. 7 Check Oil Level on Dipstick
I
NOTE
I
W?en adding oil _betw�en oil chang�s, do not
-
- mix brands and viscosity grades of 011.
Both the oil dipstick and fill cap must be in place before operat
ing the engine. Failure to install the dipstick and fill cap will
result in oil being discharged into the engine compartment.
Changing the Oil
Tool List
Qty.Required
Socket, 3/8" drive, 10 mm ........................................... 1
Ratchet, 3/8" drive ....................................................... 1
Extension, 3/8" drive, 8" .............................................. 1
Oil drain pan ................................................................ 1
For maximum performance and longevity, the engine oil
should be replaced after the first 100 hours of operation.
After the initial oil change, it should be repeated every
200 - 250 hours of operation or yearly, whichever comes
first. Vehicles used under harsh or dirty conditions should
change oil every 100 - 150 hours of operation.
Never
exceed 300 hours of operation before an oil change.
I
NOTE
I
If the vehicle is to be stored over the winter
·
· months, it can be stored with the old oil left in
the engine. The oil should be changed as part of spring mainte
nance. This will remove any moisture that has accumulated
during storage.
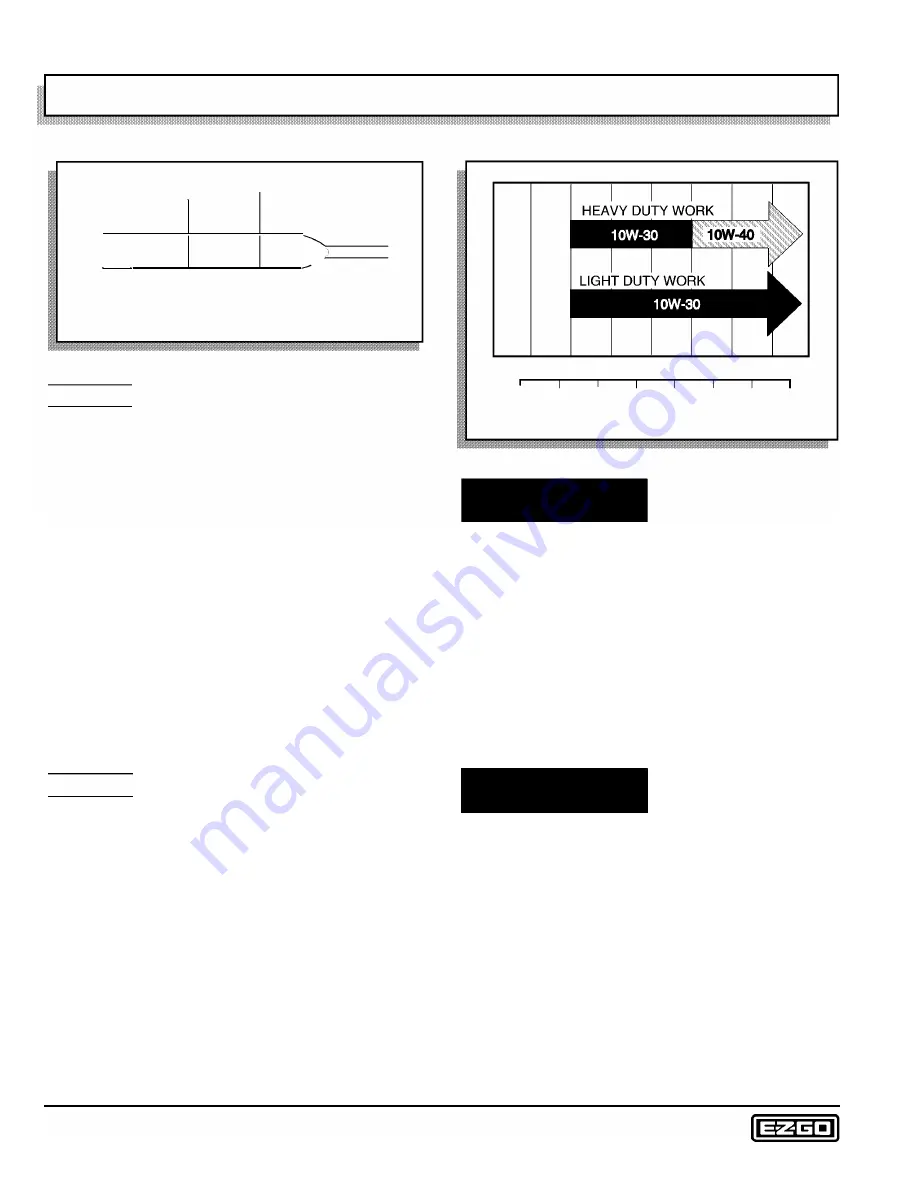
The selection of oil is dependent upon the service that
the vehicle will perform. Most vehicles require 1 OW-30
oil, whereas vehicles used at capacity or near capacity
load applications will utilize 1 OW-40 oil after a break-in
period of 100 hours (Ref Fig. 8 on page A-4).
The oil should be changed with the engine warm. Park
the vehicle on a level surface, lock the parking (PARK)
brake and remove the key. Place a drain pan under the
engine. Wipe the top of the engine clean with a cloth and
remove the oil fill cap (Ref Fig. 9 on page A-5).
F
0
-20
0
20
40
60
80 100
C
O
-30 -20 -10
0
10 20
30 40
(Air Temperature)
Fig. 8 Oil Viscosity Chart
AwARNINGA
Be aware that engine flu
ids may be hot and con
t act to the skin may
cause severe burns. Wear rubber gloves to protect
skin from exposure to the old oil.
Clean the area around the filter. Remove the three bolts
securing the oil filter to the engine. Remove the filter by
pulling it from the engine and allow the oil to drain. The
'O' rings may remain on the engine or the filter (Ref Fig. 9
on page A-5).
Inspect the filter. At the first oil change,
small
metal chips
and lint may be found. This is normal, resulting from the
break-in period. Inspect the filter at every oil change. The
presence of large metal chips could indicate possible
damage to the engine.
.AwARNINGA
when cleaning the oil filter.
Wear eye protection to
prevent splashed solvent
from contacting the eyes
Clean the filter by washing in any shop degreaser and
brushing the metal screen clean with a soft brush (Ref
Fig. 10 on page A-5).
Blow out the filter with low pressure air at 30 psi (200
kPa) or less from no closer than 3" (8 cm) and allow to
dry (Ref Fig. 11 on page A-5).
Wipe the area around the filter mount with a lint free cloth
and inspect both filter 'O' rings for damage; replace if
necessary. Install the filter into the engine. The filter
engages over a short nipple in the engine. The filter
should slide easily onto the nipple and seat against the
engine using light hand pressure only. Align the holes in
Page A-4
Repair and Service Manual
Summary of Contents for 4 CADDY 1999
Page 6: ...TABLE OF CONTENTS Notes __________________________ _ Page iv Repair and Service Manual...
Page 10: ...SAFETY INFORMATION Notes _________________________ _ Page viii Repair and Service Manual...
Page 26: ...SAFETY Notes _ _ ___________________________ _ Page B ii Repair and Service Manual...
Page 48: ...BODY Notes _ _ ___________________________ _ Page C ii Repair and Service Manual...
Page 56: ...WHEELS AND TIRES Notes __________________________ _ Page D ii Repair and Service Manual...
Page 72: ...SPEED CONTROL Notes _ _ ________________________ _ Page F ii Repair and Service Manual...
Page 80: ...ENGINE Notes _ _ __________________________ _ Page G ii Repair and Service Manual...
Page 94: ...FUEL SYSTEM Notes _ _ _________________________ _ Page H ii Repair and Service Manual...
Page 110: ...ELECTRICAL Notes _ _ _________________________ _ Page K ii Repair and Service Manual...
Page 120: ...ACCESSORY WIRING Notes __________________________ _ Page L ii Repair and Service Manual...
Page 148: ...REAR SUSPENSION Notes __________________________ _ Page N ii Repair and Service Manual...
Page 154: ...REAR AXLE Notes _ _ ___________________________ _ Page P ii Repair and Service Manual...
Page 158: ...PAINT Notes _ _ ___________________________ _ Page Q ii Repair and Service Manual...
Page 162: ...TROUBLESHOOTING Notes _ _ ________________________ _ Page R ii Repair and Service Manual...
Page 170: ...LIMITED WARRANTY Notes __________________________ _ Page S ii Repair and Service Manual...
Page 176: ...LIMITED WARRANTY Notes __________________________ _ Page S 6 Repair and Service Manual...
Page 178: ...GENERAL SPECIFICATIONS Notes _________________________ _ Page T ii Repair and Service Manual...


