SPEED CONTROL
Read all of Section B and this section before attempting any procedure. Pay particular attention to all Notes, Cautions and Warnings
PEDAL BOX ADJUSTMENTS
Tool List
Qty. Required
Needle nose pliers ....................................................... 1
Phillips screwdriver ...................................................... 1
Open end wrench, 9/16" .............................................. 1
Open end wrench, 1 /2" ................................................ 1
Open end wrench, 7/16" .............................................. 1
Open end wrench, 3/8" ................................................ 1
Allen wrench, 1/8" ....................................................... 1
I
NOTE
I
"any adjustments a:e. made in the pedal box
or accelerator area, it 1s necessary to go back
and perform the speed control linkage adjustment again. This
must
be done because any adjustment made in the pedal box
or accelerator area will inadvertently effect the linkages.
Accelerator Pedal Arm Adjustment
Lift front of vehicle using procedures and safety informa
tion in section 'B'.
Confirm the accelerator pedal arm (1) contacts the accel
erator pedal bracket (2) when in the release position (Ref
Fig. 7 on page F-5). If there is no contact, loosen the jam
nut (3) and rotate the rod (4) until contact is made.
I
NOTE
I
Note that the factory applies a thread sealant to
the accelerator rod threads before threading
the rod into the clevis.
Micro Switch Adjustment
When the system is in correct adjustment, the micro
switch in the accelerator pedal box will click when the top
of the accelerator pedal moves approximately 1/2" - 5/8"
(13 - 16 mm). The accelerator cable (as seen at the rear
axle) should have some slack present and not show any
movement until after the micro switch clicks.
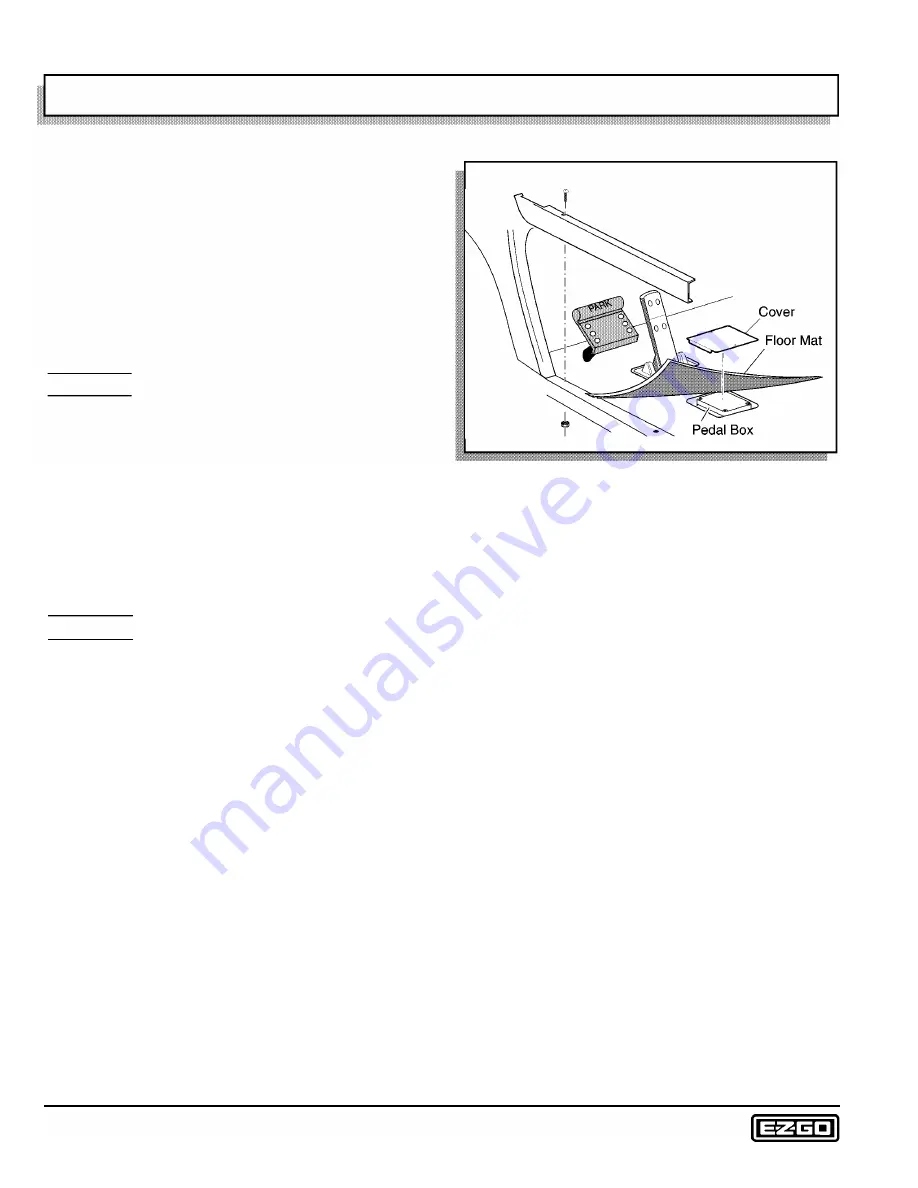
To access the micro switch, remove the rocker panel, lift
the floor mat and remove the access cover from the floor
(Ref Fig. 6 on page F-4). Remove the screws (15) and
cover (16) from the pedal box (Ref Fig. 7 on page F-5).
Loosen the setscrew (17) using an 1 /8" Allen wrench and
rotate the cam (18) to adjust it (Ref Fig. 7 on page F-5).
Adjust to permit 1 /2" - 5/8" (13 - 16 mm) of accelerator
pedal travel before the micro switch ( 19) clicks. Measure
the distance at the top of the pedal with the pedal arm
contacting the pedal bracket. Making sure the setscrew
(17) in the cam does not contact the micro switch actua
tor, tighten the setscrew to 45 - 55 in. lbs. (5 - 6 Nm)
torque.
/
Rocker Panel
Fig. 6 Access to Pedal Box
Control Arm Link
Access
Be sure that the control arm link (20) is parallel with the
bottom of the pedal box and tighten the jam nuts (21) to
10 - 11 ft. lbs. (14 - 15 Nm) torque (Ref Fig. 7 on page F-
5).
Apply a thin coating of white lithium grease to the slot in
the control arm link.
If the control arm (22) has been removed from the control
arm link (20), tighten the nut (23) to 25 - 43 in. lbs. (3 - 5
Nm)
torque and be sure that the arm rotates smoothly on
its shaft.
If the shaft (24) has been removed from the pedal box,
install and tighten the nut (25) to 10 - 12 ft. lbs. (14 - 16
Nm)
torque.
Be sure the accelerator pedal moves smoothly and the
accelerator cable (37) pulls smoothly on the governor
arm (38) (Ref Fig. 7 on page F-5).
Replace the cover on the pedal box. Tap lightly to set the
cover before installing screws. Replace the access cover
on the floor. Replace floormat and rocker panel. Re
check wide open throttle adjustment by instructions in
'Speed Control Linkage Adjustment' elsewhere in this
section.
Page F-4
Repair and Service Manual
Summary of Contents for 4 CADDY 1999
Page 6: ...TABLE OF CONTENTS Notes __________________________ _ Page iv Repair and Service Manual...
Page 10: ...SAFETY INFORMATION Notes _________________________ _ Page viii Repair and Service Manual...
Page 26: ...SAFETY Notes _ _ ___________________________ _ Page B ii Repair and Service Manual...
Page 48: ...BODY Notes _ _ ___________________________ _ Page C ii Repair and Service Manual...
Page 56: ...WHEELS AND TIRES Notes __________________________ _ Page D ii Repair and Service Manual...
Page 72: ...SPEED CONTROL Notes _ _ ________________________ _ Page F ii Repair and Service Manual...
Page 80: ...ENGINE Notes _ _ __________________________ _ Page G ii Repair and Service Manual...
Page 94: ...FUEL SYSTEM Notes _ _ _________________________ _ Page H ii Repair and Service Manual...
Page 110: ...ELECTRICAL Notes _ _ _________________________ _ Page K ii Repair and Service Manual...
Page 120: ...ACCESSORY WIRING Notes __________________________ _ Page L ii Repair and Service Manual...
Page 148: ...REAR SUSPENSION Notes __________________________ _ Page N ii Repair and Service Manual...
Page 154: ...REAR AXLE Notes _ _ ___________________________ _ Page P ii Repair and Service Manual...
Page 158: ...PAINT Notes _ _ ___________________________ _ Page Q ii Repair and Service Manual...
Page 162: ...TROUBLESHOOTING Notes _ _ ________________________ _ Page R ii Repair and Service Manual...
Page 170: ...LIMITED WARRANTY Notes __________________________ _ Page S ii Repair and Service Manual...
Page 176: ...LIMITED WARRANTY Notes __________________________ _ Page S 6 Repair and Service Manual...
Page 178: ...GENERAL SPECIFICATIONS Notes _________________________ _ Page T ii Repair and Service Manual...


