BODY
Page C-5
Repair and Service Manual
Read all of Section B and this section before attempting any procedure. Pay particular attention to all Notices, Cautions, Dangers and Warnings.
Body Replacement
Tool List
Qty. Reqd.
Electric/air drill ............................................................ 1
Drill bit, 7/32" ............................................................... 1
Socket, 3/8" ................................................................. 1
Socket, 7/16" ............................................................... 1
Socket, 9/16", deepwell, 3/8" drive.............................. 1
Ratchet, 3/8" drive ....................................................... 1
Wrench, 3/8"................................................................ 1
Wrench, 7/16".............................................................. 1
Wrench, 9/16".............................................................. 1
Rivet gun ..................................................................... 1
Phillips screwdriver...................................................... 1
Pry bar......................................................................... 1
Prior to removing the rear body, the foot rest or cargo bed, as
applicable, must be removed. See the applicable paragraphs
for instructions for replacement of those items.
Remove the rocker panels as described above.
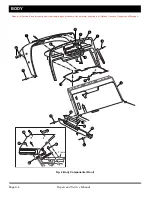
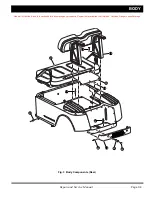
Remove seat from body (27) (Ref. Fig. 3 on Page C-3).
To prevent possible injury or death from bat-
tery explosion, batteries should always be
removed before any servicing that could gen-
erate sparks or repairs that require welding or
cutting.
It is important to use a sharp drill bit when
removing the rivets on the side of the vehicle.
Extreme care must be used when drilling out
the rivets located in the front of the body and
the bottom side of the body. Excessive pres-
sure could result in the drill bit being forced
through the body panel and penetrating a bat-
tery. As extra protection, it is recommended
that a protective piece of sheet metal be
placed between the battery and the rivet. Use
of a drill depth stop will provide additional pro-
tection.
Remove hardware (28) attaching seat back supports
(29) to body.
At the front of the rear body, remove the rivets (30)
securing the rear body to the frame and floorboard area.
Drill out the heads of the large head rivets (31) that
secure the bottom of the body panel to the side of the
vehicle.
Remove the rivets (32) that secure the floor of the bag-
well area to the frame underneath.
Remove the body.
If the trunk lid (33) is to be reused, remove the hardware
(34) securing the trunk lid to the body panel. Remove
the trunk lid.
Installation of rear body is in the reverse order of disas-
sembly using new rivets. Install the bolts (28) into the
seat supports (29) and tighten to 21 - 25 ft. lbs.
Rear Bumper Replacement
Tool List
Qty. Reqd.
Electric/Air drill .............................................................1
Drill bit, 7/32" ...............................................................1
Flat tip screwdriver.......................................................1
Allen wrench, 7/32" ......................................................1
For Golf Cars, drill out rivets (48) located at each end of
the rear bumper (49) (Ref. Fig. 3 on Page C-3). Care-
fully remove the plugs (53) with a screwdriver. Remove
the shoulder bolts (52) underneath the plugs. Remove
the rear bumper.
To replace the bumper, place the rear bumper against
the rear body panel and tighten the shoulder bolts (52)
to 9 - 12 ft. lbs. torque (Ref. Fig. 3 on Page C-3).
Replace the plugs. Using the existing holes in the frame
as a guide, drill holes in the bumper from underneath the
vehicle and install new rivets.
NOTICE


