background image

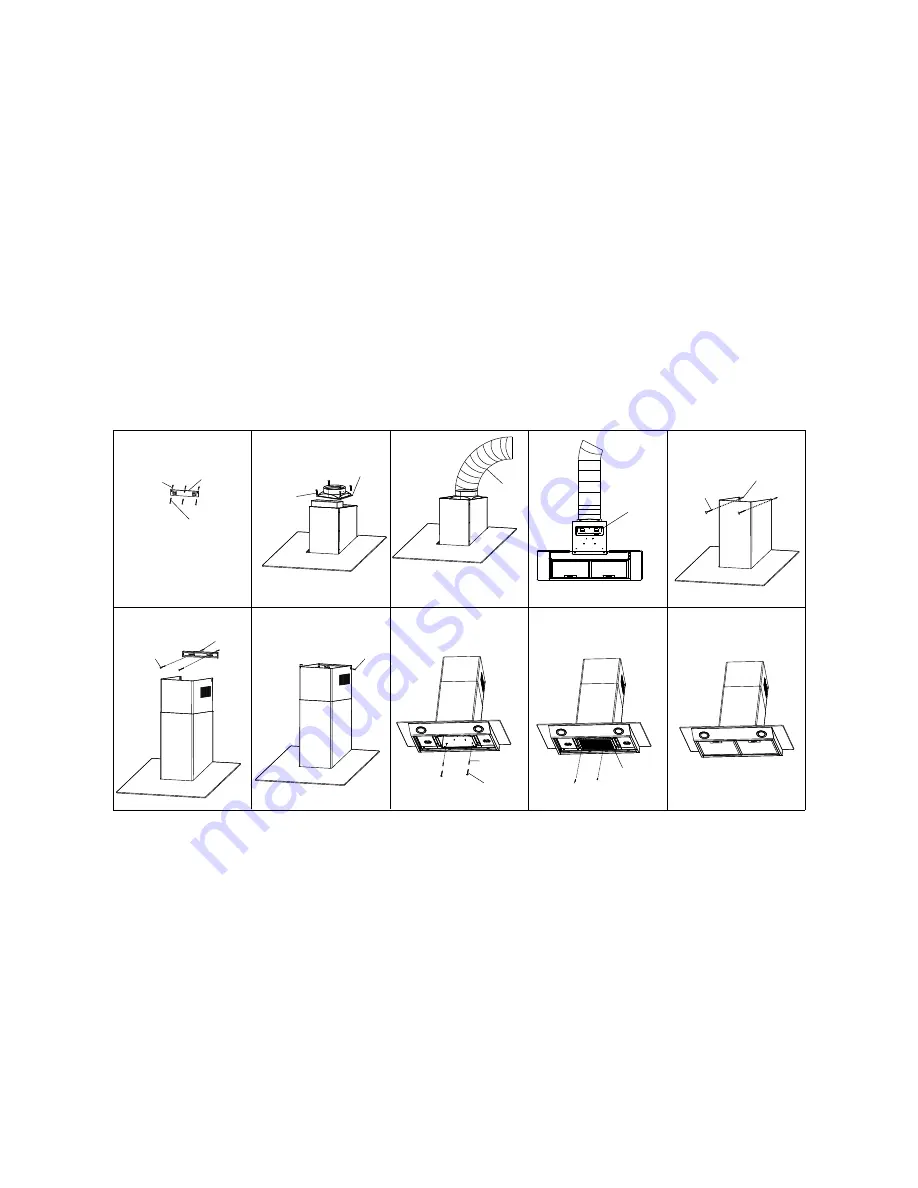
6.Put the second chimney inside of the first chimney and adjust 
the length as required. Use 2pcs screws ST4.2*30 to fix the 
bracket for chimney on the wall.

7.Use 2pcs screw M4*6 to fix the second chimney on the bracket.

8.


Use


2pcs


screw


ST4

.

2

*

30


and


2pcs


plastic


screw

 φ

10*45mm 


to


fix


the


body


to


the


wall.

9.Unscrew 2pcs M4*10 from the body and use these 2 screw to 
fix the carbon filter to the hood. If there’s no carbon filter, please 
skip this step.

10.Install the filter.  

1

2

3

6

7

9

Unscrew 
M4*10

Air outlet base

Flexible


pipe

Screw M4*10

Carbon filter

Screw ST5*45

Bracket for hood

Plastic


screw

10*45mm

)

Screw ST4.2*30

Plastic screw
( 10*45mm)

φ

 Screw ST4.2*30

Plastic screw

10*45mm

)

10

8

 Screw


M4*6

4

5

Screw ST2.9*14 

Plastic


screw 

7*27mm

)

Hang the hood 
on the bracket

Summary of Contents for UG15-76A

Page 1: ...RANGE HOOD INSTRUCTION MANUAL ...

Page 2: ......

Page 3: ...nd servicing Check that the main voltage corresponds to the one indicated on the rating plate fixed inside the hood If the hood is used in conjunction with non electrical appliances e g gas burning appliances a sufficient degree of ventilation must be guaranteed in the room in order to prevent the backflow of exhaust gas The kitchen must have an opening directly with the open air in order to guara...

Page 4: ...arcoal filters after specified period of time Clean the hood using a damp cloth and a neutral liquid detergent DISPOSAL Do not dispose this product as unsorted municipal waste Collection of such waste separately for special treatment is necessary WARNING In certain circumstances electrical appliances may be a danger hazard Do not check the status of the filters while the cooker hood is operating D...

Page 5: ...utdoors Don t use this product outdoors This appliance is not intended for use by persons including children with reduced physical sensory or mental capabilities or lack of experience and knowledge unless they have been given supervision or instruction concerning use of the appliance by a person responsible for their safety Children should be supervised to ensure that they do not play with the app...

Page 6: ...ase filters are washable 30 2 1 5 1 6 2 3 8 14 9 16 29 1 2 10 7 8 11 OPERATION OF CONTROLS The hood is operated using the touch control The on off switch turns the hood on and off The light switch turns the lamps on and off The blower switch turns the blower on to three speed settings 1 Low speed 2 Medium speed 3 High speed ...

Page 7: ... the hood Use as few of them as possible Larger ducting may be required for best performance with longer duct runs 5 The air must not be discharge into a flue that is used for exhausting fumes from appliances burning gas or other fuels Regulations concerning the discharge of air have to be fulfilled 6 Install wall cap Connect round metal ductwork to cap and work back towards hood location Use duct...

Page 8: ...crew the 4pcs M4 10 screw on top and use them to fix the air outlet base on the air system top 3 Fix the flexible pipe on the air outlet with tape and plastic strap 4 Hang the hood on the bracket 5 Put the first chimney on the hood and fix the chimney on the wall with 2pcs screw ST2 9 14 and 2pcs plastic screw φ7 27mm 25 1 2 min 25 1 2 ...

Page 9: ...the body to the wall 9 Unscrew 2pcs M4 10 from the body and use these 2 screw to fix the carbon filter to the hood If there s no carbon filter please skip this step 10 Install the filter 1 2 3 6 7 9 Unscrew M4 10 Air outlet base Flexible pipe Screw M4 10 Carbon filter Screw ST5 45 Bracket for hood Plastic screw φ10 45mm Screw ST4 2 30 Plastic screw 10 45mm φ Screw ST4 2 30 Plastic screw 10 45mm φ ...

Reviews: