European Safety Systems Ltd.
Impress House, Mansell Road, Acton, London W3 7QH
sales@e2s.com Tel: +44 (0)208 743 8880
Document D150-00-151-IS Issue 5 26-08-2020
Sheet 2 of 3
www.e2s.com Fax +44 (0)208 740 4200
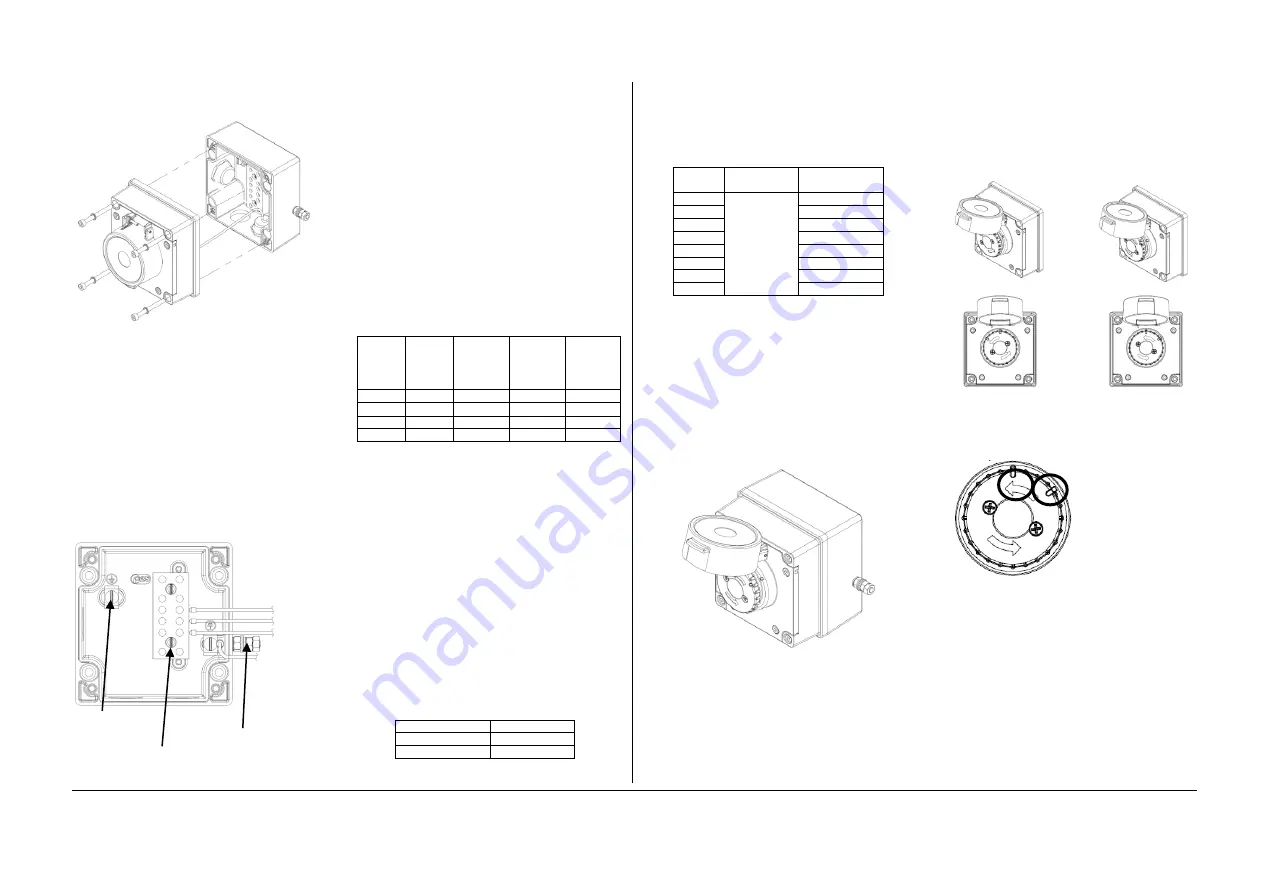
Once the screws are removed the cover will hang
down out of the way to gain access to the Ex e
terminal block, the internal earth terminal and
mounting hole recesses.
6)
Earthing
The unit has both internal and external earth
terminals.
It is recommended that a cable crimp lug is used
on the earth wires.
The internal earth wire is placed under a earth
clamp which will stop the cable twisting. This
secured by an M4 screw and spring washer.
The external earth lug should be located between
the two M5 washers provided and securely locked
down with the M5 spring washer and two locknuts.
Internal Earth
terminals
External
Earth Stud
Ex e terminal block
Note: Depending on options chosen an 8-Way DIN
Rail or 6-Way terminal block may be selected.
7)
Cable connections
There are 3 off cable entry holes suitable for
M20x1.5 Ex e approved cable glands or stopping
plugs
The unit can be wired in a number of different ways
depending on the resistor combination selected.
For detail, refer to wiring schematic D150-06-051.
EOL (End of line) device;
resistor
– ExxxR / diode – ED1 / zener – ExxxZ
Series (In line) device;
resistor
– SxxxR / diode – SD1 / zener – SxxxZ
Microswitch 1 = M/S 1
Voltage
option
Max
Voltage
Min resistor
value
allowable in
module
Type B unit
(2.0W)
Min resistor
value
allowable
in module
Type D unit
(1.0W)
Min resistor
value
allowable
in module
Type E unit
(1.75W)
6 V dc
9 V dc
47 ohms
91 ohms
51 ohms
12V dc
15 V dc
120 ohms
240 ohms
150 ohms
24V dc
28 V dc
470 ohms
820 ohms
510 ohms
48V dc
56 V dc
1K8 ohms
3K3 ohms
2K0 ohms
When wiring to Increased Safety terminal
enclosures, you are only permitted to connect one
wire into each way on the terminal block, unless a
pair of wires are crimped into a suitable ferrule.
For the six-way terminal block wire sizes allowable
are 0.5mm² to 4.0mm². For the 8-way DIN rail wire
sizes allowable are 0.5mm² to 2.5mm².
Leads connected to the terminals shall be insulated
for the appropriate voltage and this insulation shall
extend to within 1mm of the metal of the terminal
throat. They shall only be installed and wired with
cable in an ambient temperature of -10°C to +80°C
All terminal screws, used or unused, shall be
tightened down to between 0.5 Nm and 0.7 Nm
7.1) Fitted LED, Diode or Zener Diode
If a diode module is pre-fitted as either an EOL or
series device, the following current limitation
applies:
Unit Voltage
Max. Current
48V DC
0.75A
6, 12 & 24V DC
2.0A
If a Zener diode module is pre-fitted as either EOL
or Series device, the following current limitation
applies:
Zener
Voltage
Max. Input
Voltage
Max. Current
3.3V
56V DC
230mA
4.7V
162mA
5.1V
149mA
5.6V
136mA
6.2V
122mA
6.8V
112mA
10V
76mA
12V
63mA
In any scenario, the lowest value of maximum
current should be used. For example, if the unit
has both a diode and a Zener diode, the Zener
diode would determine the maximum input current
of the unit, since its max. current is lowest.
8)
Testing unit operation
The push button unit can be tested without the
need to replace any element.
To test, lift the cover lift flap to reveal the push
button. The button should be pressed into the body
to activate the unit and place it into the operated
condition.
The call point switch will now change over its
contacts to operate the alarm.
Once testing is complete the unit needs to be reset
from the operated condition.
Rotate the push button anticlockwise by an angle
of 55º, see guide alignment marks on button and
cover, shown below (1). The push button should
pop back up to its original position.
Ensure that the push button has also twisted back
clockwise by 55º to its original position see guide
marks on button and cover, shown below (2).
The unit is now reset.
1. On operated unit
2. Button should pop
Twist push button
up and twist back to
Anticlockwise 55º
original position
to reset
Note: use alignment
marks circled to
indicate the push
button’s status
/position.
Unit currently shown
as
‘standby
condition’
Resetting an operated unit is the same as resetting
a tested unit.


