Installation, Operation and Parts Manual
EE-6215EKZ
19
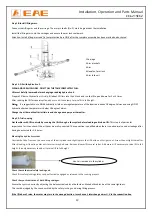
Step
10:
Install
lifting
arms.
Connect
the
lifting
arm
and
the
carriage.
The
arm
pin
shafts
(No.
2)
must
be
greased
at
the
installation
Install
the
lifting
arms
onto
the
carriages
and
ensure
the
arm
lock
could
work.
Attention:
Install
Lifting
arms
and
fix
feet
protection
bars
ONLY
after
the
complete
assembly
has
been
erected
and
anchored.
Step
11:
Fill
with
hydraulic
oil.
CLEAN
AND
FRESH
OIL
ONLY.
DON’T
FILL
THE
TANK
COMPLETELY
FULL.
Lift
must
be
fully
lowered
before
changing
or
adding
hydraulic
oil.
Prepare
13
liters
of
hydraulic
oil.
Firstly,
fill
about
10
liters
into
the
oil
tank
and
run
the
lift
up
and
down
for
2
or
3
times.
After
running
the
lift
for
several
cycles,
add
more
oil
if
necessary
to
raise
lift
to
full
height.
Note
:
It
is
suggested
to
use
NO.46
hydraulic
oil
when
average
temperature
of
the
location
is
above
18
degree
Celsius
and
using
NO.32
hydraulic
oil
when
temperature
is
below
18
degree
Celsius.
Change
the
oil
6
months
after
initial
use
and
change
once
per
year
thereafter.
Step
12:
Trial
running.
Get
familiar
with
lift
controls
by
running
the
lift
through
a
few
cycles
before
loading
vehicle
on
lift.
This
step
is
of
particular
importance
for
it
can
check
if
the
oil
hoses
are
well
connected.
The
connection
is
qualified
when
there
is
no
abnormal
sound
or
leakage
after
having
been
tested
for
5
‐
6
times.
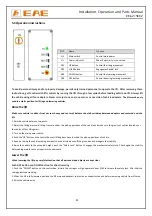
Bleeding
the
hydraulic
system
Unscrew
but
don't
remove
the
nut
on
top
of
the
oil
cylinder
and
slightly
press
the
UP
button
until
oil
gets
out.
Screw
the
nut
tight
thereafter.
After
bleeding,
oil
level
in
power
unit
reservoir
may
be
down.
Raise
and
lower
lift
several
cycles.
Add
more
oil
if
necessary
to
raise
lift
to
full
height.
It
is
only
necessary
to
add
oil
to
raise
lift
to
full
height.
Check
the
mechanical
safety
locking
unit.
Check
if
its
safety
locking
plates
can
be
effectively
engaged
or
released
in
the
running
process.
Check
the
synchronization
of
both
lifting
carriages.
Ensure
the
synchronization
by
adjusting
the
balance
steel
cables
at
both
sides.
Make
both
cables
be
of
the
same
tightness.
This
could
be
judged
by
the
sound
emitted
by
the
safety
locking
unit
during
lifting
process.
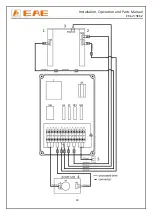
If
the
lift
doesn't
raise,
the
motor
may
turn
in
the
wrong
direction.
In
such
event,
interchange
wires
U,
V
in
the
connection
box.
1.Carriage
2.Arm
pin
shaft
3.Arm
4.Handle
of
arm
lock
5.Arm
lock
unit
Vent
air
remained
in
the
cylinder


