background image


                      Installation,  Operation  and  Parts  Manual 


EE-6435V2.B.PD


25

5.4.2


Use


the


play


detector


Turn


the


selection


switch


to


the


state


of


“PD”


T

he


PD


is


designed


for


powered


moving


the


wheels


of


the


vehicle


enabling


inspection


of


suspension


and


steering


joints.


1.


Ensure


vehicle


is


positioned


centrally


on


the


PD


plates,


steering


lock


off


and


engine


running


(to


enable


the


power


steering


system)


2.


Raise


lift


to


desired


working


height


to


enable


you


to


clearly


view


the


suspension


/


steering


joints


to


be


inspected


and


park


the


lift


into


the


mechanical


locking


system.


3.


Using


either


the


inspection


torch


or


the


key


fob,


Pressing


and


holding


the


left


button


will


operate


the


nearside


PD


plate


(rotation


of


steering)


from


extent


to


extent,


once


button


released


plates


will


return


to


the


center


position.


Pressing


and


holding


the


Right


button


will


operate


the


offside


PD


plate


(side


to


side


movement)


from


extent


to


extent,


once


button


released


plates


will


return


to


the


center


position.


If


the


rechargeable


LED


torch


style


remote


control


is


chosen


allow


to


charge


for


3


hours


before


initial


use,


always


replace


it


back


to


its


holder


to


have


it


charged


when


not


in


use.


Attention:


the


remote


control


works


within


a


radius


of


5.7m


from


the


main


control


box.


Summary of Contents for EE-6435V2.B.PD

Page 1: ...ctrical Release With play detector Lifting capacity 4000KG 5000KG Installation Operation and Parts Manual Please read this entire manual carefully and completely before installation or operation of th...

Page 2: ...ther domestic legislation The reproduction or disclosure of instructions or an extract thereof is prohibited and offenders are liable to prosecution EAE reserves the right or initiates criminal procee...

Page 3: ...nstruction of the lift 11 3 3 Dimensions 12 3 4 Safety devices descriptions 13 3 5 Technical data 14 3 6 Nameplate 14 INSTALLATION INSTRUCTIONS 15 4 1 Preparations before installation 15 4 2 Installat...

Page 4: ...as experts or qualified persons 1 2 1 Scope of checking Regular checking essentially involves performing a visual inspection and a functional test This includes checking the condition of the componen...

Page 5: ...ork near or under the vehicle Never remove safety related components from the lift Do not use if safety related components are damaged or missing 1 3 11 Do not rock the vehicle while on the lift or re...

Page 6: ...re clearly depicted on the lift to ensure that the operator is aware of and avoid the dangers of using the lift in an incorrect manner The labels must be kept clean and they have to be replaced if det...

Page 7: ...rator parking area only for operating the lift is defined as OPERATEOR ZONE During operations persons are admitted to the area beneath the vehicle only when the vehicle is already in the elevated posi...

Page 8: ...rom the ground personnel must be careful to avoid impact with parts of the machine not marked with special colors Fig 6 RISK OF VEHICLE MOVING Caused by operations involving the application of force s...

Page 9: ...EA BENEATH AND IMMEDIATELY SURROUNDING THE LIFT AND ALSO THE PLATFORMS MUST BE KEPT CLEAN REMOVE ANY OIL SPILLS IMMEDIATELY RISKS RELATED TO IMPROPER USE Persons are not permitted to stand or sit on t...

Page 10: ...ions never stack to more than 2 meters in height never make stacks of single packs Always stack pairs of packs in a cross pattern so that the base is bigger and the resulting stack is more stable Once...

Page 11: ...movement of the oil cylinder To ensure safety for operators it is equipped with mechanical safety locks in the four posts which will automatically engaged in the process of lifting so as to prevent t...

Page 12: ...nstallation Operation and Parts Manual EE 6435V2 B PD 12 3 3 Dimensions DATA MODEL 48L 52L 57L RL 4880 5280 5780 OL 5970 6370 6870 CL 4888 5288 5788 CL1 4438 4838 5338 L1 1580 1980 2280 L2 970 970 127...

Page 13: ...agnet Release the safety lock 5 Limit switch Cut off power supply in case the cable slacks 6 Rising limit switch Control the rising height and protect the oil cylinder 7 Lowering limit switch Make the...

Page 14: ...time of the main lift 70S Full lowering time of the main lift 60S Rated capacity of the PD 4000kg Working pressure Main lift 20MPa PD 24MPa Electricity AC 400 or 380V 5 50Hz Capacity 2 2kW Hydraulic...

Page 15: ...oundations and connections The user must have the following work performed before erecting the lift Construction of the foundation following consultation with the manufacturer s customer service or an...

Page 16: ...een the lifting platform and fixed elements e g wall in all lifting positions There must be sufficient space for driving vehicles on and off C20 25 concrete base with strength more than 3000psi Minimu...

Page 17: ...case any parts missed but if you do not contact us and insist installing upon the lack of some parts we as well as our dealers will not bear any responsibility for this and will charge for any parts...

Page 18: ...of some clearance from the ground 2 Have the platforms of the lift suspended by the forklift and then screw off the upside bolt and remove the first platform on to the wooden battens initially prepare...

Page 19: ...end higher than the height of cross beam 2 Pull the post to the cross beam as the direction arrow showed in the following drawing Fasten the top end of safety ladders to the top plate of each post 3...

Page 20: ...il ONLY CLEAN AND FRESH OIL ONLY Lift must be fully lowered before changing or adding hydraulic oil Pour 10 liters anti abrasion hydraulic oil into the oil tank The level of oil shall reach the tippet...

Page 21: ...m Make the platform be locked at height of 800mm and adjust the limit switch as showed in the following drawing with hex socket spanner 3mm Step 13 Fix the expansion bolts Refer to 3 3 and adjust the...

Page 22: ...ntrol button works as hold to run 8 If limit switches work well 9 If grounding wire is connected 10 If the lift rises and lowers smoothly 11 If there is no abnormal noise during running with rated loa...

Page 23: ...utton Control the initial lowering movement SB2 Safety lock DOWN II button 1 1 In case the clearance between the platform and the floor is more than 300mm press DOWN II button to lock the platform 1 2...

Page 24: ...the lift Make sure vehicle is neither front nor rear heavy and center of balance should be centered over the lift 1 Turn on the power switch 2 Park the vehicle on the platforms to ensure its gravity i...

Page 25: ...ft into the mechanical locking system 3 Using either the inspection torch or the key fob Pressing and holding the left button will operate the nearside PD plate rotation of steering from extent to ext...

Page 26: ...e safety lock is not engaged 1 Push the front rod of the four electromagnets under the cross beam to have the four safety blocks released from the safety rods 2 Press and screw loose counter clockwise...

Page 27: ...make adjustment Damaged gear pump Replace it Too low oil level Add oil The hose connection is loose Tighten it The cushion valve is not well screwed up or jammed Clean or make adjustment Platforms go...

Page 28: ...Every day 2 Synchronization of the ascending movement Push the UP button check and ensure the four mechanical safety blocks give off sound simultaneously Both runways shall rise steadily without abno...

Page 29: ...sing when the limit switch is activated Every 3 months 10 Steel cables Lubricated with NO 1 lithium grease Change with new steel cables every 2 years or ten single wires have broken Every 3 months 11...

Page 30: ...Installation Operation and Parts Manual EE 6435V2 B PD 30 Annex 1 Steel cable connection...

Page 31: ...0 2 Lift cylinder 6 207105011 Dust proof ring DHS30 30 38 5 6 5 1 Lift cylinder 7 207102017 Y seal ring 17 25 6 1 PD cylinder 8 207106013 Guiding ring 25 2 5 5 5 1 PD cylinder 9 207106001 Guiding ring...

Page 32: ...hose DE8 1 57L 4 624001 PU hose DE8 1 52L 4 624001 PU hose DE8 1 48L 5 624001008 Oil hose L 4500mm 1 52L 5 624001010 Oil hose L 4100mm 1 48L 5 624001117 Oil hose L 5200mm 1 57L 6 330101016 PD valve 6...

Page 33: ...n Qty Remark 10 624001123 Oil hose L 4400mm 1 57L 11 310102013 90 connector with swivel 08N M14S 1 48L 52L 57L 12 615018001 Right angle throttle valve MR30 A24 B16 1 48L 52L 57L 13 615027005 5T cylind...

Page 34: ...g valve fixed throttle hole BCYF C 13 5 1 8 330201010 Gear pump CBK F225 H 1 9 330308008 Leveling solenoid valve DHF06 228H DC24 1 10 330302001 Single way valve DYF C 1 11 330304001 Overflow valve EYF...

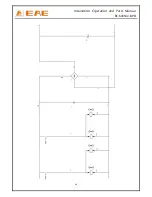
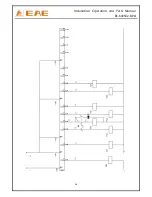
Page 35: ...Installation Operation and Parts Manual EE 6435V2 B PD 35 Annex 3 Electrical schemes and parts list...

Page 36: ...Installation Operation and Parts Manual EE 6435V2 B PD 36...

Page 37: ...Installation Operation and Parts Manual EE 6435V2 B PD 37...

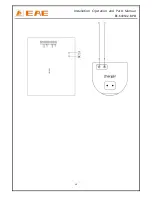
Page 38: ...Installation Operation and Parts Manual EE 6435V2 B PD 38...

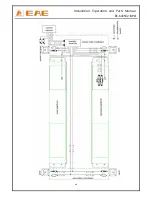
Page 39: ...Installation Operation and Parts Manual EE 6435V2 B PD 39...

Page 40: ...Installation Operation and Parts Manual EE 6435V2 B PD 40...

Page 41: ...Installation Operation and Parts Manual EE 6435V2 B PD 41...

Page 42: ...round terminal 27 320505011 Retaining chip 2 KA 320601005 Relay feet fixer 1 320601009 Relay holder 1 QF 320801001 Circuit breaker DUAL 3 5kW 1 QF 320801003 Circuit breaker DUAL 1 QF1 320803005 Circui...

Page 43: ...Secondary crossbeam 1 5 Main platform 1 6 Secondary platform 1 7 Slip plate 2 8 Front wheel retaining plate 2 9 PD assembly 1 10 PD assembly 1 11 614027281 Portable box 90 4 48L 52L 57L 12 615027049...

Page 44: ...allation Operation and Parts Manual EE 6435V2 B PD 44 Pos CODE Name QTY NOTE 19 208101001 Steel cable clip 4 20 615027038B Steel cable 2 48L 20 615027037B Steel cable 2 52L 20 615027036 Steel cable 2...

Page 45: ...10270221 Padding plate of limit switch 2 12 202110009 Hex socket button head screw M5 16 4 13 203101012 Hex nut M20 8 14 204101011 Flat washer M20 4 15 202109012 Hex socket cylinder head screw M5 30 8...

Page 46: ...econdary crossbeam 1 2 410274120 Pulley A 4 3 205101070 Lubrication bearing 40 50 40 4 4 612027002 Safety block A 2 5 420270020 Side slider block 4 6 420270050 Spacer A 4 7 420270060 Spacer B 4 8 4102...

Page 47: ...se protection ring 2 33 420270070 Oil hose protective sheath 4 34 205101001 Lubrication bearing 4 35 203103006 Hex nut M8 12 36 320301011 Limit switch 8108 4 37 204301007 Circlip 20 16 38 204301005 Ci...

Page 48: ...m A 52L 50T 1 52L 51T 1 614027575 Platform A 48L 50T 1 48L 52T 1 614027577 Platform A 48L 40T 1 52L 40T 1 614027579 Platform A 48L 40T 1 48L 40T 2 614027572 Platform B 57L 50T 1 57L 50T 2 614027574 Pl...

Page 49: ...ew M 8 20 2 24 202111028 Hex socket flat head screw M12 80 8 25 410274513 Front wheel retaining plate 2 26 201102027 Hex head full swivel screw M12 30 4 27 410277313 Limit rod 2 57L 27 410277063 Limit...

Page 50: ...liary lifting platform main 1 47 320301009 Limit switch 8104 1 48 202109026 Hydraulic block 1 Pos Name Specification Qty 1 614027586 Drive on ramp 6435BWF C18 2 2 410270201 Roller wheel shaft 6435B A8...

Reviews: