4
04
OPERATION
Before use cylinder, please visually check all units, to make sure there are no damage on
cylinder, port threads, coupler and hose. No oil leaking and shortage of parts. If you find
any problem please stop using your equipment and contact with your nearest authorized
EAGLE PRO Service Center or Sales office.
Use a pump with a release valve or a 3-way valve and one hose to connect with lock nut
cylinder. After connected all parts, please fully hand-tighten all couplers. If not, oil will be
leaked when you operate the equipment.
03
CONNECTION
WARNING:
YELLOW LINE
EAGLE PRO Lock Nut cylinders are not equipped with a stop ring
to retain the Piston rod. When the
around the piston rod
becomes visible, please stop lifting immediately; further extension could
damage the seals or result in the piston rod being forced out of the cylinder. Tilt saddle (if
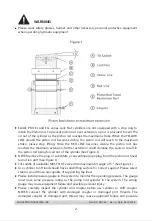
available) must not exceed the maximum tilt angle of 5 ° (See Figure 1).
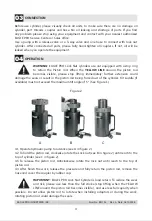
Figure 2
A
B
C
4.1 Operate hydraulic pump to advance (see A in figure 2).
4.2 To hold the piston rod, clockwise rotate the Lock nut (see B in figure 2) until reach to the
top of cylinder (see C in figure 2)
4.3 To release the piston rod, Anticlockwise rotate the lock nut until reach to the top of
piston rod
4.4 After finish the work, release the pressure and fully return the piston rod, remove the
hose and cover the coupler by rubber cap.
.
IMPORTANT:
EAGEL PRO Lock Nut Cylinder is load return. To reduce the wear
and risk, please use less than the full stroke (stop lifting when the YELLOW
LINE around the piston rod becomes visible.), and use less full capacity when
possible. Do not allow piston rod to rotate when installing adaptors or during the work,
rotating piston rod could damage the seals.
EAGLE PRO INDUSTRIES, INC.
Form No. E01104
Rev. A Date: 06.10.2009


