Copyright © 2003 Eagle Tree Systems, LLC
http://www.eagletreesystems.com
Page 2
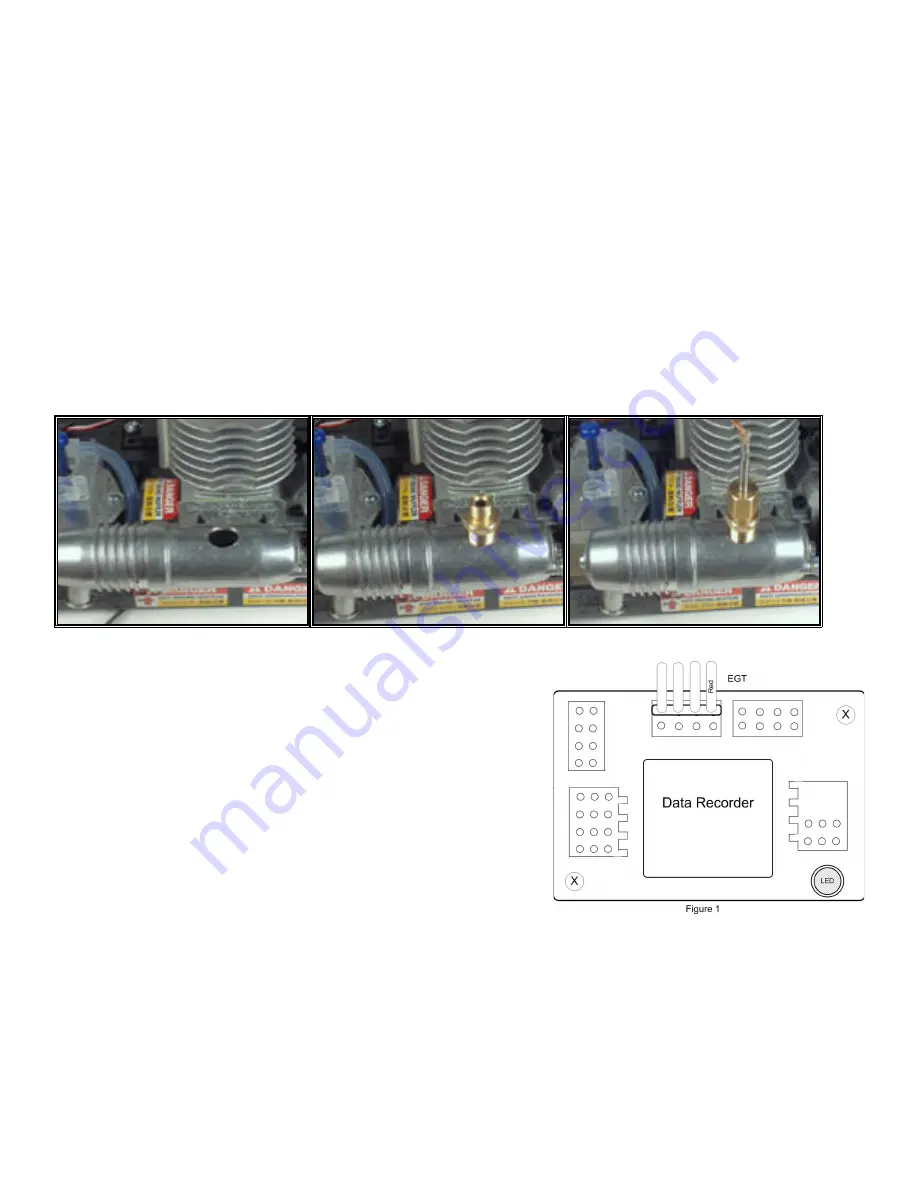
a punch or other sharp object, and drill a 3/8” hole straight down through the surface. A drill press with clamps makes this a bit easier. Make sure that you don’t drill
in too far after penetrating the wall of the pipe. See Figure 1.
If you are using a 1/8” NPT tapered pipe tap (available at your hardware store), follow the instructions with the tap. Typically a 5/16” hole is drilled straight down,
then insert the pipe tap is used to cut the threads. IMPORTANT: The pipe tap is tapered, so you want to only want to turn the tap until the bottom threads of the tap are
only slightly deeper than flush with the inside of the exhaust pipe wall. If you tap in too far, your fitting will be have to screwed in very deeply.
Now that you have either drilled or tapped your hole, install the engine side of the fitting by tightening the tapered thread end into the hole (Figure 2). Ideally the tip of
the fitting would be flush with the inside of the exhaust flow path, and not much deeper. However, if your pipe wall is thin, you may need to go deeper. Tighten the
fitting so that it is securely mounted, but don’t over tighten to avoid damaging the muffler/exhaust. Once this step is complete, thoroughly clean the muffler and
fitting to remove any metal shavings, then reinstall on the engine.
To install the probe in the fitting, slide the top part of the fitting over the probe with the threads facing outward, and then slide the small brass ferrule (you didn’t lose it,
did you?) onto the probe. Then hand screw the assembly into the bottom part of the fitting. The probe should be adjusted so that the tip is approximately centered in
the exhaust gas stream. Tighten the top nut of the fitting just tight enough to keep the probe firmly mounted (Figure 3).
The last step is to attach the wires of the probe to the Thermocouple Expander board. The probe wires are attached to the board via a screw terminal block. Just loosen
the center screw and the screw nearest the top edge of the board (for probe 1), insert the red wire in the center hole, and the yellow wire in the top hole, and tighten. If
you are installing two probes, the red wire of each is placed in the center hole. If desired, the wire can be cut to shorten it. Use heatshrink on the ends of the each
wire to keep the insulation from unbraiding if you decide to cut it.
Figure 1
Figure 2
Figure 3
Connecting the Thermocouple Expander to the Recorder
The expander plugs into your Data Recorder as shown in Figure 1. Make sure that you connect it in
the correct location on the recorder, and with the correct polarity! Connect the Thermocouple
Expander to your Recorder.
Logging Data with the Thermocouple Expander
Data from both Thermocouple channels can be logged by clicking “Tools, Parameters To Log in the
Recorder”, and selecting the “Thermocouple Temperature A” and/or “Thermocouple Temperature
B.”
If you have purchased a Secondary Thermocouple Expander, see the additional instructions that
should have been included with your Secondary Expander.
Visualizing Data with the Thermocouple Expander
Choosing “Tools, Choose Instruments to Display on PC Screen” and checking one or more of the following lets you see recorded or live mode data in the app:
•
Thermocouple Meter A
•
Thermocouple Meter B
•
Thermocouple A Numeric
•
Thermocouple B Numeric
To see a graph of the data, click on “Graph Data!” and “Thermocouple A” and “Thermocouple B” graph options will appear in the graphing options for the Y axes.
To see the file with Excel or other viewer, save the file as usual, and the file header will have “Thermocouple A” and “Thermocouple B” columns.
If you have purchased a Secondary Thermocouple Expander, see the additional instructions that should have been included with your Secondary Expander.
If you have the Seagull Wireless option, the Thermocouple Expander channels can also be configured for the LCD Display. See the Seagull users manual for
instructions on configuring parameters with the LCD Display.


