background image

39

tor and about 6 inches of cable through the opening under the sonar
mount. Close the cover, plug the connector into the sonar unit and
mount the unit on the built-in bracket.

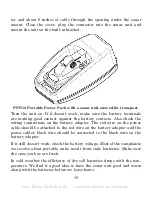
PPP-12 Portable Power Pack with a sonar unit stowed for transport.

Turn the unit on. If it doesn't work, make sure the battery terminals
are making good contact against the battery contacts. Also check the
wiring connections on the battery adapter. The red wire on the power
cable should be attached to the red wire on the battery adapter and the
power cable's black wire should be connected to the black wire on the
battery adapter.

If it still doesn't work, check the battery voltage. Most of the complaints
we receive about portable units result from stale batteries. Make sure
the ones you buy are fresh.

In cold weather the efficiency of dry cell batteries drops with the tem-
perature. We find it a good idea to have the sonar unit good and warm
along with the batteries before we leave home.

www.Busse-Yachtshop.de      email: info@busse-yachtshop.de

Summary of Contents for CUDA 250 - ADDITIONAL

Page 1: ...Pub 988 0152 101 www eaglesonar com Cuda 250i S Map Fish finding Sonar GPS Installation and Operation Instructions www Busse Yachtshop de email info busse yachtshop de ...

Page 2: ...are trademarks of Zenrin Co Ltd Eagle Electronics may find it necessary to change or end our policies regulations and special offers at any time We reserve the right to do so without notice All features and specifications subject to change without notice All screens in this manual are simulated On the cover Cuda 250 S Map shown Other models covered in the manual are similar For free owner s manual...

Page 3: ...and supplies 14 Transom installation 14 Trolling motor installations 14 Shoot through hull installations 14 Selecting a Transducer Location 15 How low should you go 16 Shoot thru hull vs Transom Mounting 17 Hulls With Floatation Materials 26 Testing Determines Best Location 27 Shoot thru hull Installation 29 Power and Cable Connections 31 Mounting the Sonar Unit In Dash or Bracket 33 Portable Sona...

Page 4: ...art Speed 61 Depth Cursor 63 Depth Range Automatic 63 Depth Range Manual 64 FasTrack 65 Fish I D Fish Symbols Depths 65 FishTrack 67 Grayline 68 Overlay Data 69 Ping Speed HyperScroll 70 Reset Options 72 Sensitivity Auto Sensitivity 72 Automatic Sensitivity 73 Set Keel Offset 74 Sonar Color Mode 76 Sonar Page Sonar Chart Display Options 76 Full Sonar Chart 76 Split Zoom Sonar Chart 77 Digital Data...

Page 5: ...100 Selecting Any Map Item With the Cursor 102 Set a Waypoint 102 Create Waypoint on Map 104 Navigate To a Waypoint 104 Set Man Overboard MOB Waypoint 105 Navigate to Cursor Position on Map 106 Navigate to a Map Place 108 Creating and Saving a Trail 108 Displaying a Saved Trail 110 Navigating Trails 111 Visual Trailing 111 Navigate a Trail 112 Cancel Navigation 114 Section 7 Advanced GPS Operation...

Page 6: ...7 Trip Down Timer 127 Trip Up Timer 127 Waypoints 127 Delete a Waypoint 127 Edit a Waypoint 127 Waypoint Name 127 Waypoint Symbol 128 Waypoint Position 128 Section 8 System GPS Setup Options 131 Alarms 131 Auto Satellite Search 132 Coordinate System Selection 133 Map Fix 136 Customize Page Displays 137 Customize Position Page 137 Customize Map or Navigation Page 138 GPS Simulator 138 Initialize GP...

Page 7: ...up Help 148 Reset Options 148 Screen Contrast and Brightness 149 Set Language 150 Set Local Time 150 Show WAAS Alarm 151 Software Version Information 152 Sounds and Alarm Sound Styles 153 Track Smoothing 153 Trail Options 154 Delete All Trails 155 Update Trail Criteria 155 Specific Trail Options 156 Trail Visible Invisible and Other Trail Options 157 Units of Measure 157 www Busse Yachtshop de ema...

Page 8: ...also visually check to make sure a clear safe path to the waypoint is always available WARNING When a GPS unit is used in a vehicle the vehicle operator is solely re sponsible for operating the vehicle in a safe manner Vehicle operators must maintain full surveillance of all pertinent driving boating or fly ing conditions at all times An accident or collision resulting in damage to property person...

Page 9: ...ing the manual So we designed our book so that you don t have to read the whole thing from front to back for the information you want At the start or end of each segment we ll tell you what content is coming up next If it s a concept you re already familiar with we ll show you how and where to skip ahead for the next important topic We ve also made it easy to look up any tips you may need from tim...

Page 10: ...other in chronological order They re all you ll need to know to find your way on the water quickly When you come to a GPS menu command on the screen you can look it up in the manual by skimming over the table of contents or index just flipping through Section 6 or scanning through the setup options in Section 7 This unit is ready to use right out of the box but you can fine tune and customize its ...

Page 11: ...acklit keypad Input power 10 to 17 volts DC Current drain 170 ma lights off 250 ma lights on Case size 5 8 H x 4 3 W x 2 5 D 14 7 cm H x 10 8 cm W x 6 6 cm D sealed waterproof suitable for saltwater use Back up memory Built in memory stores GPS data for dec ades User settings are stored when unit is turned off Languages 10 menu languages selectable by user Sonar Frequency 200 kHz Transducer A Skim...

Page 12: ...ace water temp Yes built into transducer GPS Receiver antenna Internal 12 parallel channel GPS WAAS Position updates Every second Position points 1 000 waypoints 1 000 event marker icons Man Overboard MOB feature precisely marks man overboard location with special icon then automatically displays navigation data to that position Audible alarms Arrival off course destination passed anchor Graphic s...

Page 13: ...ines A sonar consists of a transmitter transducer receiver and display In simple terms here s how it finds the bottom or the fish The transmitter emits an electrical impulse which the transducer con verts into a sound wave and sends into the water The sound frequency can t be heard by humans or fish The sound wave strikes an object fish structure bottom and bounces back to the transducer which con...

Page 14: ...so lets the unit show your location on a GPS plotter as well as point the way to your destination This unit uses an internal antenna receiver module which makes the whole system work something like your car radio But instead of your favorite dance tunes this receiver tunes in to a couple of dozen GPS satellites circling the earth It will also listen in to the WAAS satellites in orbit but more abou...

Page 15: ...lobal navigation system for the armed forces of the U S and its allies Civilian use was also avail able at first but it was less accurate because the military scrambled the signal somewhat using a process called Selective Availability SA GPS proved so useful for civilian navigation that the federal govern ment discontinued SA on May 2 2000 after the military developed other methods to deny GPS ser...

Page 16: ... automobile roof even your body Like most GPS receivers this unit doesn t have a compass or any other navigation aid built inside It relies solely on the signals from the sat ellites to calculate a position Speed direction of travel and distance are all calculated from position information Therefore in order for the unit to determine direction of travel you must be moving and the faster the better...

Page 17: ... ground in North America Aircraft and vessels on open water can get consis tently good WAAS reception but terrain foliage or even large man made structures can sometimes block the WAAS signal from ground receivers You will find that using your GPS receiver is both easy and amazingly accurate It is easily the most accurate method of electronic navigation available to the general public today Rememb...

Page 18: ...rif type For example the Enter Icons key is shown as ENT and the Menu key is shown as MENU Menu Commands A menu command or a menu option will appear in small capital letters in a bold sans serif type like this ROUTE PLANNING These indicate that you are to select this command or option from a menu or take an action of some kind with the menu item Text that you may need to enter or file names you ne...

Page 19: ...e Menu key twice Next repeatedly press or press and hold the down arrow key to scroll down the menu and select highlight the My Trails menu command Finally press the Enter key Step 2 would mean Press the down arrow key repeatedly to scroll to the trail named Trail 1 and press Enter Next press the right arrow key and then the down arrow key to highlight the Navigate command then press Enter www Bus...

Page 20: ...12 Notes www Busse Yachtshop de email info busse yachtshop de ...

Page 21: ...e the approximate location for the transducer and its cable route 3 Determine the location of your battery or other power connection along with the power cable route 4 Install the transducer and route the transducer cable to the so nar GPS unit 5 Route the power cable from the unit s location to an appropriate power source and connect it there 6 Connect the transducer power cable to the unit and m...

Page 22: ... you prefer the option of routing the cable through the transom you will need a 5 8 drill bit NOTE The following installation types also call for these recommended tools and required supplies that you must provide supplies listed here are not included Transom installation Tools include two adjustable wrenches drill 29 0 136 drill bit flat head screwdriver Supplies high quality marine grade above o...

Page 23: ...apable of propelling the boat at speeds faster than 35 mph Typically a good transom location on aluminum boats is between the ribs closest to the engine 3 The transducer should be installed with its face pointing straight down if possible For shoot thru applications Many popular fishing boat hulls have a flat keel pad that offers a good mounting surface On vee hulls try to place the transducer whe...

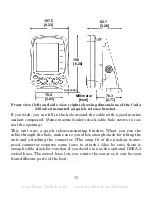
Page 24: ...t situations you should install your Skimmer transducer so that its centerline is level with the bottom of the boat hull This will usually give you the best combination of smooth water flow and protec tion from bangs and bumps CAUTION Clamp the trans ducer cable to transom near the transducer This will help prevent the transducer from entering the boat if it is knocked off at high speed Good locat...

Page 25: ...cer a little higher for more protection There are two extremes you should avoid Never let the edge of the mounting bracket extend below the bottom of the hull Never let the bottom the face of the transducer rise above the bottom of the hull Shoot thru hull vs Transom Mounting In a shoot thru hull installation the transducer is bonded to the inside of the hull with epoxy The sonar ping signal actua...

Page 26: ...nd metal hulls Those hulls require either a transom mount or a thru hull installation Fourth if your Skimmer transducer has a built in temp sensor it will only show the temperature of the bilge not the water surface temp Follow the testing procedures listed in the shoot thru hull installation section at the end of this lesson to determine if you can satisfactorily shoot through the hull TRANSOM TR...

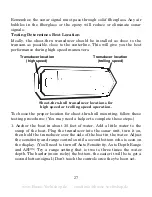
Page 27: ...If the transducer s face isn t parallel with the ground remove the transducer and ratchets from the bracket Place the ratchets into the holes in the bracket with the letter B aligned with the dot stamped in the bracket Reassemble the transducer and bracket and place them against the transom Again check to see if you can move the transducer so it s parallel with the ground If you can then go to ste...

Page 28: ...k nut at this time Assemble transducer and bracket 4 Drilling mounting holes Hold the transducer and bracket assembly against the transom The transducer should be roughly parallel to the ground The transducer s centerline should be in line with the bottom of the hull Don t let the bracket extend below the hull Ratchets Nut Metal washer Metal washer Bolt Rubber washers www Busse Yachtshop de email ...

Page 29: ...the bracket and re assemble it with the cable passing through the bracket over the bolt as shown in the following figures Route cable over bolt and through bracket Side view left and seen from above right Attach the transducer to the transom Slide the transducer up or down until it s aligned properly with the bottom of the hull as shown in the preceding and following figures Tighten the bracket s ...

Page 30: ...g bilge pumps VHF radio wires and cables and aerators can be picked up by the sonar Use caution when routing the transducer cable around these wires WARNING Clamp the transducer cable to the transom close to the transducer This can prevent the transducer from enter ing the boat if it is knocked off at high speed If you need to drill a hole in the transom to pass the connector through the required ...

Page 31: ...sher is supplied with the TMB S Attach motor mounting bracket to transducer 2 Slide the adjustable strap supplied with the TMB S through the slot in the transducer bracket and wrap it around the trolling motor Po sition the transducer to aim straight down when the motor is in the water Tighten the strap securely 3 Route the transducer cable alongside the trolling motor shaft Use plastic ties not i...

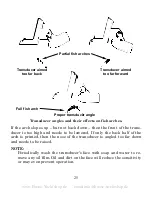
Page 32: ...ORIENTATION AND FISH ARCHES If you do not get good fish arches on your display it could be because the transducer is not parallel with the ground when the boat is at rest in the water or at slow trolling speeds www Busse Yachtshop de email info busse yachtshop de ...

Page 33: ...e nose of the transducer is angled too far down and needs to be raised NOTE Periodically wash the transducer s face with soap and water to re move any oil film Oil and dirt on the face will reduce the sensitivity or may even prevent operation Transducer aimed too far back Transducer aimed too far forward Proper transducer angle Partial fish arches Full fish arch www Busse Yachtshop de email info b...

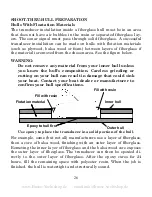
Page 34: ...r hull can result in damage that could sink your boat Contact your boat dealer or manufacturer to confirm your hull specifications Use epoxy to place the transducer in a solid portion of the hull For example some but not all manufacturers use a layer of fiberglass then a core of balsa wood finishing with an outer layer of fiberglass Removing the inner layer of fiberglass and the balsa wood core ex...

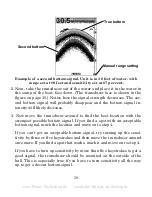
Page 35: ...ocedures You may need a helper to complete these steps 1 Anchor the boat in about 30 feet of water Add a little water to the sump of the boat Plug the transducer into the sonar unit turn it on then hold the transducer over the side of the boat in the water Adjust the sensitivity and range controls until a second bottom echo is seen on the display You ll need to turn off Auto Sensitivity Auto Depth...

Page 36: ...ith the strongest possible bottom signal If you find a spot with an acceptable bottom signal mark the location and move on to step 4 If you can t get an acceptable bottom signal try turning up the sensi tivity by three or five keystrokes and then move the transducer around once more If you find a spot that works mark it and move on to step 4 If you have to turn up sensitivity by more than five key...

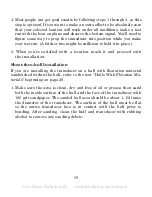
Page 37: ...allation Shoot thru hull Installation If you are installing the transducer on a hull with floatation material sandwiched within the hull refer to the text Hulls With Flotation Ma terials beginning on page 26 1 Make sure the area is clean dry and free of oil or grease then sand both the inside surface of the hull and the face of the transducer with 100 grit sandpaper The sanded hull area should be ...

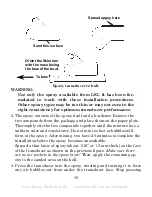
Page 38: ...y Do not mix too fast or bubbles will form in the epoxy After mixing you have 20 minutes to complete the installation before the epoxy becomes unworkable Spread a thin layer of epoxy about 1 16 or 1 5 mm thick on the face of the transducer as shown in the previous figure Make sure there are no air pockets in the epoxy layer Then apply the remaining ep oxy to the sanded area on the hull 3 Press the...

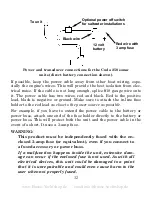
Page 39: ...ahead and attach the power cable directly to the battery CAUTION When using the unit in a saltwater environment we strongly rec ommend that you shut off the power supply to the power cable when the unit is not in use When the unit is turned off but still connected to a power supply electrolysis can occur in the power cable plug This may result in corrosion of the plug body along with the electri c...

Page 40: ...e battery or power buss attach one end of the fuse holder directly to the battery or power buss This will protect both the unit and the power cable in the event of a short It uses a 3 amp fuse WARNING This product must be independently fused with the en closed 3 amp fuse or equivalent even if you connect to a fused accessory or power buss If a malfunction happens inside the unit extensive dam age ...

Page 41: ...will not work until the wires are attached correctly Mounting the Sonar Unit In Dash or Bracket You can install the sonar unit on the top of a dash with the supplied bracket It can also be installed in the dash with an optional FM 6 dash mounting kit In dash mounting template for Cuda 250 NOTE This figure is not printed to scale Top ALWAYS VERIFY DIMENSIONS Cut along this line www Busse Yachtshop ...

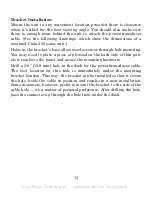
Page 42: ...plywood on the back side of thin pan els to reinforce the panel and secure the mounting hardware Drill a 5 8 15 9 mm hole in the dash for the power transducer cable The best location for this hole is immediately under the mounting bracket location This way the bracket can be installed so that it covers the hole holds the cable in position and results in a neat installation Some customers however p...

Page 43: ...ou run the cable through the hole make sure you allow enough slack for tilting the unit and attaching the connector The snug fit of the push on water proof connector requires some force to attach Also be sure there is enough cable slack for rotation if you decide to use the optional GBSA 3 swivel base The swivel base lets you rotate the sonar so it can be seen from different parts of the boat Mill...

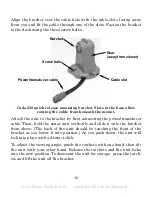
Page 44: ... vertically and slide it onto the bracket from above The back of the unit should be touching the front of the bracket as you lower it into position As you push down the unit will lock into place with a distinct click To adjust the viewing angle pinch the ratchets with one hand then tilt the unit with your other hand Release the ratchets and the unit locks into the new position To dismount the unit...

Page 45: ... use one hand to press and release the spring loaded ratchets while you move the unit with the other hand An op tional GBSA 3 swivel base is shown with the quick release bracket Bracket front Depress ratchets to release Swivel base www Busse Yachtshop de email info busse yachtshop de ...

Page 46: ...d inside the power pack The PPP 12 requires eight AA alkaline batteries Batteries are not included To use a portable power pack you install the batteries and then attach the sonar unit to the power pack s bracket Plug in the power transducer cable and you re ready to fish The PPP 12 has a quick release mounting bracket built into the case Installing the Batteries Release the latch on the front of ...

Page 47: ...tery adapter The red wire on the power cable should be attached to the red wire on the battery adapter and the power cable s black wire should be connected to the black wire on the battery adapter If it still doesn t work check the battery voltage Most of the complaints we receive about portable units result from stale batteries Make sure the ones you buy are fresh In cold weather the efficiency o...

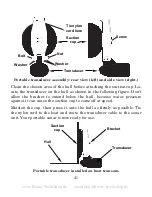
Page 48: ...mble the transducer and bracket as shown in the following figure Attach the transducer to the bracket with the supplied hardware Make sure there is one washer on each side of the transducer inside the bracket Slide the other washer over the end of the bolt and thread the nut onto it Screw the suction cup onto the bracket using the supplied screw and flat washer Tie the nylon cord through the hole ...

Page 49: ...er pressure against it can cause the suction cup to come off at speed Moisten the cup then press it onto the hull as firmly as possible Tie the nylon cord to the boat and route the transducer cable to the sonar unit Your portable sonar is now ready for use Portable transducer installed on boat transom Hull Suction cup Bracket Transducer Washer Washer Nut Bolt Screw Suction cup Transducer Tie nylon...

Page 50: ... information on this see the earlier segment on Transducer Orientation and Fish Arches Now that you have your unit installed move on to Sec 3 Basic Sonar Operations There we ll present a series of step by step tutorials to teach you the basics of your sonar operation www Busse Yachtshop de email info busse yachtshop de ...

Page 51: ... The unit sounds a tone when you press any key This tells you the unit has accepted a command Numbers in the photo correspond to key ex planations below Eagle Cuda 250 S Map 5 4 2 8 7 9 6 3 1 www Busse Yachtshop de email info busse yachtshop de ...

Page 52: ...d to create event marker icons 6 EXIT The Exit key lets you return to the previous screen clear data or close a menu 7 WPT The Waypoint key is used to save and recall waypoints search for waypoints and access the waypoint list It is also involved in some navigation functions 8 ZOUT This key lets you zoom the screen out On the Sonar Page this key returns you to a full sonar chart display showing th...

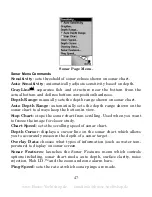
Page 53: ...discuss them and all the other commands in more detail in Sec 4 Advanced Sonar Operation Sonar Mode has two primary menus the Main Menu and the Sonar Menu Main Menu The Main Menu contains basic function and setup option commands You access the Main Menu by pressing MENU MENU You execute a command by using or to highlight a command and pressing ENT To clear the Main Menu screen and return to the ma...

Page 54: ...nation Sonar Setup sets various sonar options GPS Setup sets various GPS receiver options System Setup sets general configuration options Sun Moon Calulations finds the rising and setting time of the sun and the moon Trip Calculator shows trip status and statistics Timers controls the up timer down timer and alarm clock settings Sonar Menu The Sonar Menu provides access to major sonar features and...

Page 55: ... Chart stops the sonar chart from scrolling Used when you want to freeze the image for closer study Chart Speed sets the scrolling speed of sonar chart Depth Cursor displays a cursor line on the sonar chart which allows you to accurately measure the depth of a sonar target Overlay Data chooses what types of information such as water tem perature to display on sonar screen Sonar Features launches t...

Page 56: ...play option This is a cross section view of the water column beneath the boat The chart moves across the screen displaying sonar signals that represent fish struc ture and the bottom Sonar Page showing full sonar chart mode Surface clutter Structure Bottom signal Fish arches around school of bait fish In FasTrack fish arches show as horizontal bars Depth scale Digital data overlay depth temperatur...

Page 57: ...ons in the Advanced Sonar Operation section but to show you how easy the sonar unit is to operate the following page contains a simplified 10 step quick reference that will cover most fish finding situations The quick reference describes how your unit will operate with all the sonar features in their automatic modes which are set at the factory www Busse Yachtshop de email info busse yachtshop de ...

Page 58: ...7 Watch the display for the appearance of fish arches When you see arches you have found fish 8 Gauge the fish depth by visually comparing the fish arches with the depth scale on the right side of the screen or get a more accurate meas ure with the Depth Cursor Press MENU to DEPTH CURSOR ENT Press to align the cursor line with the fish arch The depth appears in a box at the right end of the cursor...

Page 59: ...g you might want to tinker with from time to time Sensitivity Sensitivity controls the unit s ability to pick up echoes If you want to see more detail try increasing the sensitivity There are times when too much clutter appears on the screen Decreasing sensitivity will reduce the clutter and show the strongest fish echoes if fish are present As you change the sensitivity setting you can see the di...

Page 60: ...et at 50 percent Fig 3 Sensitivity set at 20 percent Fig 4 Sensitivity set at 100 percent You can change the sensitivity level whether you are in Auto or Manual Sensitivity mode The adjustment procedure works the same in both modes but gives you slightly different results Fig 3 Fig 4 Bait fish Thermocline with fish Fish arches Fig 1 Fig 2 www Busse Yachtshop de email info busse yachtshop de ...

Page 61: ... sensitivity level with a bias toward the setting you selected Adjusting sensitivity in Manual Sensitivity Mode is similar to driving a car without cruise control you have complete control of the car s speed In the sonar unit manual mode allows you to set sensitivity at to the maximum or minimum settings Depending on water conditions the bottom signal may completely disappear from the screen when ...

Page 62: ...p While you are experimenting and learning it is possible to scram ble the settings so the sonar picture disappears from the screen If that happens remember it is easy to switch back to full automatic operation by restoring the factory default settings To Restore Factory Settings 1 Press MENU MENU to SYSTEM SETUP ENT to RESET OP TIONS ENT 2 A reset options confirmation message will appear Select Y...

Page 63: ... swims under your boat you will hear it Fish I D can also be useful when you want to screen out some of the sonar detail In one case a fishermen in San Francisco Bay saw clouds of clutter in the water but no fish arches When a downrigger was pulled up it brought up several small jellyfish The fishermen switched his sonar to Fish I D which screened out the schools of jellyfish and clearly showed ga...

Page 64: ...g boat fuel Eagle is the first sonar manufacturer to provide this type of training tool for cus tomers This PC application simulates the actual sonar unit on your computer You can run it from your computer keyboard or use your mouse to press the virtual keys Easy download and installation instructions are avail able on our web site www Busse Yachtshop de email info busse yachtshop de ...

Page 65: ...lge pumps engine vibration ignition systems wiring and air bubbles passing over the face of the transducer In all cases noise can produce unwanted marks on the display The ASP feature has four settings Off Low Medium and High If you have high noise levels try using the High ASP setting If however you are having trouble with noise we suggest you take steps to find the interference source and fix it...

Page 66: ...er alarm is the Zone Alarm which consists of a bar on the side of the screen Echoes that appear inside the range of the bar trigger the alarm The last alarm setting is the Depth Alarm which has both a Shallow and a Deep setting Only the bottom signal will trigger this alarm This is useful anchor alert a shallow water alert or for navigation Depth Alarms The depth alarms sound a tone when the botto...

Page 67: ...s menu right To adjust and turn on the shallow alarm 1 Press MENU MENU to ALARMS ENT 2 Press to SONAR ALARMS ENT 3 Press or to SHALLOW ALARM ENABLED and press ENT 4 Press to SHALLOW DEPTH ENT 5 Use to change the first digit then press to the next digit Re peat these steps until you have entered the desired depth and press ENT To switch to a different depth setting open the Sonar Alarms menu and re...

Page 68: ...n on the right side of the screen To adjust and turn on the zone alarm 1 Press MENU MENU to ALARMS ENT to SONAR ALARMS ENT 2 Press to ZONE ALARM ENABLED ENT to ADJUST ZONE ALARM ENT Sonar Alarms menu with Adjust Zone selected left Adjust Zone Alarm selection box with Upper selected right 3 To set upper boundary for the Zone Alarm use to select UPPER then press to move the top of the bar to the des...

Page 69: ...ected The check box to the left is checked indicating the alarm is turned on To turn the fish alarm on 1 Press MENU MENU ALARMS ENT 2 Press to SONAR ALARMS ENT 3 Press FISH ALARM ENABLED and press ENT to turn on check the alarm Press Exit repeatedly to get back to the main page display Chart Speed The rate that echoes scroll across the screen is called the chart speed Maximum is the default We rec...

Page 70: ...instead of a fish arch Reducing the chart speed may result in a shorter line that more closely resembles a regular fish return Sonar Page menu with Chart Speed command selected left Chart Speed Control Bar right If you do experiment with chart speed remember to reset it to maxi mum when you resume trolling or moving across the water at a higher speed To change chart speed 1 From the Sonar Page pre...

Page 71: ...f a target 1 From the Sonar Page press MENU to DEPTH CURSOR ENT 2 The depth cursor appears Press to lower the cursor line Press to raise the cursor line 3 To clear the depth cursor press EXIT Depth Range Automatic When turned on for the first time the bottom signal is automatically placed in the lower half of the screen This is called Auto Ranging and is part of the automatic function Depending up...

Page 72: ...when the unit is in the man ual mode There are 12 depth ranges from 5 feet to 800 feet To switch to Manual Depth Range 1 Turn off automatic depth range From the Sonar Page press MENU to AUTO DEPTH RANGE ENT 2 Press to DEPTH RANGE ENT and the Depth Range Control Scale appears 3 Press or to select a different depth range A horizontal dark bar highlights the selected range 4 When the new range is sel...

Page 73: ... the boat is not moving fish signals are long drawn out lines on a normal chart display FasTrack converts the graph to a vertical bar graph that with practice is useful for stationary fishing Fish I D Fish Symbols Depths The Fish I D feature identifies targets that meet certain conditions as fish The microcomputer analyzes all echoes and eliminates surface clutter thermoclines and other undesirabl...

Page 74: ...ish from fish You may see fish symbols on the screen when actually there are no fish The reverse is also true Does that mean Fish I D is broken No the feature is interpreting sonar returns in a specific way to help take some of the work out of reading the screen Remember Fish I D is one of many tools we pro vide so you can analyze your sonar returns for maximum fish finding information This and ot...

Page 75: ...feature is on The default setting for FishTrack is off To turn on FishTrack NOTE These instructions will turn on FishTrack and Fish I D at the same time 1 From the Sonar Page press MENU to SONAR FEATURES ENT 2 Press to FISH ID DEPTHS ENT EXIT EXIT To turn off FishTrack repeat these instructions Turning off FishTrack in this manner will not turn off Fish I D symbols Sonar Features menu with Fish I ...

Page 76: ...s of equal size one with gray and the other with out then the target with gray is the stronger signal This helps distin guish weeds from trees on the bottom or fish from structure Grayline is adjustable Experiment with your unit to find the Grayline setting that s best for you Sonar Page menu with GrayLine command selected left The GrayLine control bar right To adjust the Grayline level 1 From the...

Page 77: ...m Large or Enormous Data Size is displayed in the bottom of the Overlay Data Shown win dow and may be changed using the keys Overlay Data command on the Sonar Menu left Overlay Data Shown selection menu center In this example we scrolled down the data list to highlight Ground Speed It will be displayed in a small size Data list with Total Distance selected right After you have selected the data an...

Page 78: ...which the transmitter and transducer broadcast sonar sound waves pings into the water The unit has a default ping speed of 50 percent At normal boating speeds this auto matically provides enough return echoes to refresh the screen and scroll the chart at maximum chart speed But when you are running at high speeds or just want the fastest pos sible screen update you may want to use the HyperScroll ...

Page 79: ... the sensitivity to a level that eliminates the clutter When you turn HyperScroll off you can return to your original sensitivity level Sonar Menu with Ping Speed command selected left Ping Speed Control Bar at default setting right To change Ping Speed 1 From the Sonar Page press MENU to PING SPEED ENT 2 The Ping Speed Control Bar appears Press to increase ping speed Press to decrease ping speed ...

Page 80: ...nged several settings and want to return the unit to basic automatic operation 1 Press MENU MENU to SYSTEM SETUP ENT to RESET OPTIONS ENT 2 A confirmation message will appear Select YES and press ENT 3 All the menus are cleared and all options return to factory settings System Menu with Reset Options command selected Sensitivity Auto Sensitivity The sensitivity controls the ability of the unit to ...

Page 81: ... clutter the water col umn In that case a decrease in sensitivity is needed to reduce some of the clutter In automatic mode you can adjust sensitivity up to 100 percent but the unit will limit your minimum setting It will continue to make small adjustments allowing for the setting you selected In manual mode you have complete control over sensitivity with the ability to set it anywhere from zero t...

Page 82: ...pears Press or to pick a different sensitivity setting When it is set at the desired level and press EXIT NOTE To return to the original factory setting for Auto Sensitivity see the entry in this section on Reset Options If sensitivity is in manual mode the Reset Options command will switch back to Auto and re set the factory setting at the same time Set Keel Offset This unit measures water depth ...

Page 83: ... as a negative 3 5 feet which makes the depth indicators perform as if the transducer is lower in the water than it really is 1 Press MENU MENU to SONAR SETUP ENT 2 Select SET KEEL OFFSET and press ENT 3 The Keel Offset dialog box appears Press so the displayed number shows a minus sign instead of the plus sign 3 To change the next digit press then use to enter 3 Move to the next digit and enter 5...

Page 84: ...eal see the entry on that topic elsewhere in this section To change the chart mode color scheme 1 From the Sonar Page press MENU to SONAR FEATURES ENT 2 Press to SONAR CHART MODE ENT 3 Press or to Mode Name ENT 4 Press EXIT EXIT to return to the Sonar Page Sonar Page Sonar Chart Display Options The Cuda 250 offers three Sonar chart display options To choose one press EXIT to clear any menus then p...

Page 85: ...he zoom bar on the far right shows the area that is zoomed when the zoom is in use See the Zoom section for more information Full Sonar Chart The Overlay Data depth and water temperature are set to a different text size Split Zoom Sonar Chart A split chart shows the underwater world from the surface to the bot tom on the right side of the screen The left side shows an enlarged ver sion of the righ...

Page 86: ...lay data is set to the default large text size The water temperature is set to the medium text size Digital Data Chart This mode shows nine digital boxes or windows containing by default Water Depth Water Temp Position Error Bearing Distance Speed Travel Time Track and Off Course Digital Data Chart www Busse Yachtshop de email info busse yachtshop de ...

Page 87: ...on your unit before attaching a transducer it may enter a demo mode The words demo mode flash on the bottom of the screen and a sonar chart will play Unlike the simulator the demo mode is for demonstration only and will automatically stop as soon as you turn on the unit with a transducer attached The simulator will continue to function normally Stop Chart If you are running multiple units on a boa...

Page 88: ...liminates surface clutter signals from the display It does this by changing the sensitivity of the receiver decreasing it near the surface and gradually increasing it as the depth increases There are four levels of surface clarity available off low medium or high The default level is off To adjust the Surface Clarity level 1 From the Sonar Page press MENU to SONAR FEATURES ENT ENT 2 Press to selec...

Page 89: ...n the Zoom commands are used For example turning on the 2X zoom will show all echoes that are be tween the top and bottom of the 2X zoom bar The 4X zoom will show only the echoes between the top and bottom of the 4X zoom bar To switch the zoom 1 Press ZIN to increase the zoom display to 2X Press ZIN again for a 4X zoom 2 Press ZOUT to reduce the zoom and show more of the chart To turn on the Zoom ...

Page 90: ...f an arrow key The Zoom Pan feature lets you rapidly move the zoomed area up and down to different depths By pointing your zoom at different portions of the chart you can get a good close up look at structure or cover below you To use Zoom Pan switch to a manual depth Range setting see page 49 and turn on 2X or 4X Zoom Then use the keys to pan up and down the water column www Busse Yachtshop de em...

Page 91: ...efective the battery terminals or wiring on the terminals are corroded or the bat tery needs charging Unit operates only in demo mode The transducer or antenna module has not yet been connected or has been disconnected To leave demo mode make sure that either the transducer or the antenna is securely connected before turning the unit on Unit freezes locks up or operates erratically 1 Electrical no...

Page 92: ...r greater than the water you are in If this hap pens place the unit in the manual mode then change the range to a realistic one for example 0 100 feet and increase the sensitivity As you move into shallower water a bottom signal should appear 4 Check the battery voltage If the voltage drops the unit s transmitter power also drops reducing its ability to find the bottom or targets Bottom echo disap...

Page 93: ...ay to show much more detail 4 The boat must be moving at a slow trolling speed to see fish arches If the boat is motionless fish stay in the cone showing on the screen as straight horizontal lines NOISE A major cause of sonar problems is electrical noise This usually ap pears on the sonar s display as random patterns of dots or lines In se vere cases it can completely cover the screen with black d...

Page 94: ...art the engine Increase the RPM with the gearshift in neutral If noise ap pears on the display the problem could be one of three things spark plugs alternator or tachometer wiring Try using resistor spark plugs alternator filters or routing the sonar unit s power cable away from engine wiring Again routing the power cable directly to the battery helps eliminate noise problems Make sure to use the ...

Page 95: ...ou just can t wait to get outside turn to the one page Quick Reference on page 99 Keyboard Eagle Cuda 250 S Map 1 PWR The power key turns the unit on and off and activates the backlight 2 PAGES Use in conjunction with the arrow keys the Pages key switches the unit between the different GPS Page screens 3 MENU Press this key to show the menus and submenus which allow you to select a command or adju...

Page 96: ...surface to bottom On the Full Map display this lets you see a larger geographic area on the display Less detail is seen as you zoom out 9 ZIN Zoom In This key lets you zoom in the screen On the Sonar Page it enlarges fish signals and bottom detail On the Full Map dis play zooming in lets you see greater detail in a smaller geographic area on the display Power lights on and off To turn on the unit ...

Page 97: ...om any of the display options by pressing MENU MENU To clear the menu screen and return to the page display press EXIT Main Menu The Main Menu commands and their functions are Screen changes the contrast or brightness of the display screen Sounds enables or disables the sounds for key strokes and alarms and sets the alarm style Enable NMEA 183 Output enables NMEA 0183 output and disables temperatu...

Page 98: ...options Sun Moon Calculations finds the rising and setting time of the sun and the moon Trip Calculator shows trip status and statistics Timers controls the up timer down timer and alarm clock settings Pages The unit has two Pages categories one for each of the two major operat ing modes Sonar and GPS The categories are the Map Page and the Sonar Page Each Page category has its own display options...

Page 99: ...ides detailed information on the status of the Cuda s satellite lock on and position acquisition To get to the Satellite Status Page press PAGES to Map to SATELLITES EXIT No matter what Page display you are on a flashing current position indicator question mark symbol and flashing GPS data displays indi cate satellite lock has been lost and no position has been acquired The Satellite Status Page s...

Page 100: ...e area if the unit is facing north The GPS receiver is tracking satellites that are in gray The receiver has not locked onto a satellite if the number is black therefore it isn t being used to resolve the position Beneath the circular graph are the bar graphs one for each satellite in view Since the unit has twelve channels it can dedicate one channel per visible satellite The taller the bar on th...

Page 101: ...age This screen has a compass rose that not only shows your direction of travel but also the direction to a recalled waypoint To get to the Navi gation Page press PAGES to MAP to NAVIGATION EXIT The navigation screen looks like the one below when you are not navi gating to a waypoint or following a route or trail Your position is shown by an arrow in the center of the screen Your trail history pat...

Page 102: ...ition information displays are flashing satellite lock has not been acquired and no position fix has been determined A question mark will also flash on the pres ent position arrow in the center of the compass rose Speed is the velocity you are making over the ground If you wanted you could customize the Speed window to display Closing Speed in stead Closing Speed is also known as velocity made goo...

Page 103: ...as a dotted line The cross track error range is shown on the compass rose as a wide white corridor enclosing the course line The outer edges of this white corridor represent lines that show the current cross track error range The default for the cross track error range is 0 20 miles For example if the present position symbol touches the right cross track error line then you are 0 20 miles to the r...

Page 104: ...se and track from a bird s eye view By default this unit shows the map with north always at the top of the screen This can be changed See the topic Map Orientation in Sec 8 If you re navigating to a waypoint the map also shows your starting location present position course line and destination You do not have to navigate to a waypoint to use the map Full Map is the de fault screen that appears whe...

Page 105: ...4 000 miles Map Page opening screen left Map page zoomed to 100 miles cen ter Map page zoomed to 15 miles right The maximum zoom range is 20 miles You can zoom in closer but the map only will be enlarged without revealing more map content except for a few major city streets The background map includes low detail maps of the whole world containing cities major lakes major rivers and political bound...

Page 106: ... page display option EXIT Map with Sonar Page This page mode splits the screen in half with a map on the left and the sonar chart on the right This screen option can be found on the Pages Menu under the Map Page category Map with Sonar page left Resize Window command selected from sonar menu center Resizing the window right When this screen is activated you need to specify which side of the Menu i...

Page 107: ... or structures When the unit acquires position a tone sounds and a position acquired message appears 5 With position acquired press PAGES key and select Full Map display which shows your position in the center Zoom in closer to see greater detail press ZIN zoom in key Zoom out to see more area less detail press ZOUT zoom out key Scroll display north south east or west using arrow keys To stop scro...

Page 108: ...ss under clear sky condi tions NOTE Clear sky means open sky unobstructed by terrain dense foliage or structures Clouds do not restrict GPS signal reception If for some reason satellite acquisition takes longer you may be inside a structure or vehicle or in terrain that is blocking signal reception To correct this be sure you are positioned so the unit s antenna module has as clear a view of the s...

Page 109: ...the map back to the current position or the last known position Tip Use the cursor to determine the distance from your current position or last known position when working indoors to any map object Use the arrow keys to position the cursor over the object or land mark The distance measured in a straight line appears in the box at the bottom of the screen Press EXIT to clear the cursor The selected...

Page 110: ...in memory then recalled later for navigation purposes You can create a waypoint at the cursor position on the map or at your current position while you are navigating You can create a waypoint at any location by manually entering the position s latitude and longitude To create and save a Waypoint These first two techniques use the Quick Save method the fastest and easiest way to create a waypoint ...

Page 111: ...sible on map NOTE The Quick Save method uses the default waypoint symbol until you edit an existing waypoint and change its symbol Edit Waypoint Symbol is described in Sec 7 After you have changed a waypoint symbol the unit will remember the one you chose and use it the next time you quick save a waypoint To revert to the default sym bol edit the waypoint or use the Reset Options Step 3 Step 4 Ste...

Page 112: ...the longitude is correct Press ENT then EXIT EXIT to return to the previous page display The waypoint is saved and automatically given a name with a sequential number such as waypoint 001 The waypoint symbol and number appear on the map and in the waypoint list Navigate To a Waypoint You can select any waypoint visible on the Map Page with the cursor then use the Navigate to Cursor command You how...

Page 113: ...verboard It is particularly dangerous at night or if there is no land in sight This unit has a man overboard feature that shows navigation data to the location where the feature was activated To ac tivate it press the ZOUT and ZIN keys at the same time Your position at the time these keys are pressed is used as the man overboard posi tion Caution Saving a new Man Overboard waypoint will overwrite ...

Page 114: ... reference It can be edited the same as any other waypoint To cancel navigation to MOB press MENU MENU to CANCEL NAVIGA TION ENT to YES ENT The unit stops showing navigation information Navigate to Cursor Position on Map The GO TO CURSOR command navigates to the current cursor position on the map It s a quick and handy way to navigate to anything you can see on the map display 1 Use the cursor wit...

Page 115: ...otted line from your current position to the cursor position The Navigation Page displays a compass rose showing navigation information to your destination See the following examples The 30 mile zoom figure left clearly shows the dotted course line con necting your current position to your destination The 30 mile zoom cen ter shows both current position and direction to destination on screen The N...

Page 116: ...stops showing navigation information Creating and Saving a Trail A trail or plot trail is a string of position points plotted by the Cuda 250 as you travel It s a travel history a record of the path you have taken Trails are useful for repeating a journey along the same track They are particularly handy when you are trying to retrace your trip and go back the way you came On the screen trails are ...

Page 117: ...ginning a new one My Trails com mand left The Trails Menu center The arrow to the right of Trail 3 indicates the trail is active and the check to the left indicates the trail is visible on the map display The Edit Trail menu right with the Name command selected 2 Press to the Active Trail Name ENT 3 Press to ACTIVE ENT This unchecks the Active option 4 To return to the previous page press EXIT rep...

Page 118: ... ENT Use to select NEW TRAIL and press ENT Caution You also have the option of completely turning off trail record ing under the trail Options command If however the Update Active Trail option is left turned off it will cancel the automatic trail creation feature Displaying a Saved Trail The active trail is automatically displayed on the with the default set tings You can selectively turn trail di...

Page 119: ...nforma tion during the trip such as the time to your destination The other two methods provide a full range of navigation data and work with both the Map Page and Navigation Page The only difference be tween them is navigating a trail follows a trail forward from start to end while backtracking follows a trail in reverse from end to start When hiking at walking speed with a hand held GPS we often ...

Page 120: ...l Name ENT 3 Press to NAVIGATE ENT 4 Press to NAVIGATE ROUTE ENT The unit begins showing navigation information along the trail NOTE If you are already located at or near the beginning of your trail the arrival alarm will go off as soon as you hit Enter Just press EXIT to clear the alarm 5 Now begin moving and let your Cuda 250 guide you 6 When you reach your destination be sure to cancel your nav...

Page 121: ... navigating is represented by a flashing line The Navigation Page will also show the navigated trail as a flashing line The bearing arrow on the compass rose points to the next waypoint on the trail The arrival alarm will go off when you near a trail waypoint and the bearing arrow on the compass rose will swing around and point to the next waypoint Press EXIT to clear the alarm Figure 3 Figure 4 F...

Page 122: ...ed at or near the end of your trail the arrival alarm will go off when you hit Enter Press EXIT to clear the alarm 5 Now begin moving and let your Cuda 250 guide you 6 When you reach your destination be sure to cancel your navigation press MENU MENU to CANCEL NAVIGATION ENT The unit asks if you re sure Press ENT Cancel Navigation You can turn off any of the navigation commands after you reach your...

Page 123: ... Press EXIT to return to regular operation The distance from the boat s current position to the cove is 5 78 miles left The distance from Houston to New Orleans is 316 9 miles right Find Distance from Point to Point You can also measure distance between two other points on the map 1 While on the Map Page press MENU to FIND DISTANCE ENT 2 Move the cursor to the first position A rubber band line app...

Page 124: ... can pick from when creating an icon Icons are similar to waypoints but they do not store as much informa tion as waypoints do You can not use a menu to navigate to icons as you can with waypoints But you can use the map cursor and navigate to any icon on the map An icon can be created at the cursor position on the map or at your cur rent position while you are navigating Create Icon on Map 1 Use ...

Page 125: ...ct Icon Symbol menu 2 Use or or or to select your icon symbol then press ENT The icon appears on the map Delete an Icon You can delete all the icons at one time all icons represented by a par ticular symbol or use the cursor to delete a selected icon from the map 1 Press MENU to DELETE MY ICONS ENT 2 Press to DELETE ALL ICONS DELETE BY SYMBOL or DELETE FROM MAP and press ENT www Busse Yachtshop de...

Page 126: ...ave been deleted The Delete From Map command will prompt you to move the cursor over an icon to select it After selecting the icon press ENT and it will disappear from the map Navigate to an Icon Use the Navigate to Cursor command and the cursor to select the de sired icon on the map 1 Center cursor crosshairs over the icon 2 To navigate to the selected icon location press MENU ENT EXIT Fol low co...

Page 127: ... having to reprogram the unit after arriving at each waypoint Once programmed into the GPS unit a route gives users the option of navigating forward through the route waypoints or in reverse order You can even begin navigating in the middle of a route Create and Save a Route You can create a route by selecting existing waypoints from the way point list or you can set a series of route waypoints on...

Page 128: ...om Map command selected 3 Use the Zoom keys and arrow keys to move the map and cursor until the cursor is centered on the spot where you want your route to begin If you are starting at your current position or the current cursor posi tion you are already at the starting spot 4 Set the first route waypoint and press ENT In this example we started our route at the entrance of the cove where our boat...

Page 129: ...xtending from the previously set waypoint to the cursor This line will become the course for the route Route creation sequence continued Fig 4 Point 3 set at channel mouth Fig 5 Fourth waypoint set further south along the beach at a recogniz able landmark Bob Hall Pier Waypoint PLFM Q W ends the route at an oil platform some distance from the shore Fig 6 Press EXIT to save the route and you return...

Page 130: ...E press MENU ENT or from the MAP PAGE press MENU MENU to ROUTE PLANNING ENT 2 Press to route name ENT 3 Press to DELETE ROUTE ENT to YES ENT Tip You can also delete all routes at once 1 From the NAVIGATION PAGE press MENU ENT or from the MAP PAGE press MENU MENU to ROUTE PLANNING ENT 2 Press to DELETE ALL ENT to YES ENT Edit a Route To edit a route name 1 From the NAVIGATION PAGE press MENU ENT or...

Page 131: ... select a command from the Edit Route Waypoints menu and press ENT Add From Map lets you insert a waypoint in the route by clicking on a map location with the cursor Add Waypoint calls up the Waypoint List so you can insert a waypoint from the list Remove Waypoint will delete the selected waypoint from the route View Way point will show you where the selected waypoint is on the map Navigate a Rout...

Page 132: ...YES ENT The following figures show what the Navigation Page and Map Page look like while navigating a route Fig 1 shows the Navigation Page at the start of a route heading straight for the first waypoint Wpt 1 In Fig 2 the traveler has arrived at Wpt 1 the arrival alarm has been triggered and the bearing arrow on the compass rose has turned to point toward Wpt 2 off to the northeast Figure 2 Figur...

Page 133: ...nd waypoint to the beginning waypoint 1 From the NAVIGATION PAGE press MENU ENT or from the MAP PAGE press MENU MENU to ROUTE PLANNING ENT 2 Press to select route name ENT to REVERSE ENT to NAVIGATE ROUTE ENT 3 Upon arrival at your destination cancel navigation press MENU MENU to CANCEL NAVIGATION ENT to YES ENT Trails Delete a Trail This is the command used to erase or delete a trail Press MENU M...

Page 134: ... Tip You can quickly call up the Edit Trail menu by selecting a trail on the map with the cursor Move the cursor over a trail and a pop up box appears Press WPT and the Edit Trail menu opens Trail selected with map cursor left The box at the bottom of the screen shows distance and bearing from current position to the se lected point on the trail The Edit Trail menu right Utilities Utilities are us...

Page 135: ...to waypoint name ENT to DELETE ENT to YES ENT To return to the main page display press EXIT EXIT To delete a waypoint from the map 1 Select the waypoint with the cursor 2 Press WPT to DELETE ENT to YES ENT To return to the main page display press EXIT repeatedly To delete all waypoints at one time press MENU MENU to SYSTEM SETUP ENT to DELETE ALL MY WAYPOINTS ENT to YES ENT To return to the main p...

Page 136: ...tude is correct Press EXIT 3 Longitude press to LONGITUDE ENT Press or to change the first character then press to the next character and repeat until the lon gitude is correct Press EXIT 4 When latitude and longitude are correct press EXIT repeatedly to re turn to the main page display Selecting a Waypoint To select a waypoint on the map for navigating editing etc use the arrow keys and center th...

Page 137: ...FERENCE ENT which will launch the Select Point menu with three options My Waypoints Map Places and Highway Ex its Highlight the desired category and press ENT The Find By menu will appear Choose the desired option Find by Nearest or Find By Name and press ENT Use to select a waypoint or map feature When the point has been selected press ENT ENT and its position ap pears as the reference position 4...

Page 138: ...130 Notes www Busse Yachtshop de email info busse yachtshop de ...

Page 139: ...aypoint The off course alarm warns you when your track drifts too far to the right or left of the course line to the waypoint For example if the alarm is set to 0 1 mile then the alarm flashes a message if you drift 0 1 of a mile or more to the right or left of the line to the waypoint The anchor alarm is triggered when you drift outside of a preset radius Again using the 0 1 mile as an example if...

Page 140: ...turned on for the first time it does not know what your position or elevation altitude is It does know the current UTC time and date since it has an internal clock that keeps time while the unit is turned off If the time and or date are incorrect you can set it using the Set Local Time menu The unit begins searching for the satellites using the above data that it acquired the last time it was turn...

Page 141: ...Press MENU to GPS AUTO SEARCH ENT to YES ENT Coordinate System Selection The Coordinate System Menu lets you select the coordinate system to use when displaying and entering position coordinates To get to Coordinate System Selection 1 Press MENU MENU to GPS SETUP ENT 2 Press to COORDINATE SYSTEM ENT www Busse Yachtshop de email info busse yachtshop de ...

Page 142: ...ch 6 degrees wide in longitude British Irish Finnish German New Zealand Swedish Swiss Taiwan and Greek grid systems are each the national coordinate system used only in their respective countries In order to use these grid systems you must be in the respective country This unit will pick the matching datum for you when you select the grid See the entry on Map Datum Selection for more information T...

Page 143: ...D 1 From the Coordinate System menu press to SETUP LORAN TD and press ENT NOTE If the Loran TD conversion is chosen you must enter the local Lo ran chain identification for the master and slaves 2 To access the Loran Chain Secondary 1 or Secondary 2 menus highlight the category and press ENT Use the keys to choose the desired setting and press ENT Press EXIT to close the menu Setup Loran TD highli...

Page 144: ...he edge of the map USGS maps are parallel others may not be Also this works better with smaller scale maps The reference position can be anywhere on the map but the closer it is to your loca tion the smaller the numbers will be that you will have to deal with Once you have decided on a reference position you can save it as a waypoint See the waypoint section for information on saving a way point S...

Page 145: ...on informa tion will be shown as a distance from the reference point you chose Customize Page Displays The Position Navigation and Map pages can be customized to allow you to display will be on displayed each page Customize Position Page While on the Position Page press MENU to CUSTOMIZE ENT The dis play box in the top left corner begins flashing Use the arrow keys to select a display box containi...

Page 146: ...e bottom of the screen display the customized data GPS Simulator The GPS simulator lets you simulate outdoor navigation It is a great way to practice using your unit You can set the starting location by en tering latitude longitude or from a stored waypoint or map place location You can navigate and change speed on the map by using the arrow keys STEER WITH ARROWS or by setting the track and speed...

Page 147: ...lator menu Pick a STARTING PO SITION at or near the beginning of your trail route Enter an approximate TRACK shown in compass degrees that will point you toward the start of the trail route 2 Set SPEED to zero Select STEER WITH ARROWS command and press ENT which turns on the simulator and returns you to the Map Page 3 Begin navigating along the trail route If you are close enough to the first wayp...

Page 148: ...initialize the GPS in another location Map Auto Zoom This receiver has an auto zoom feature that eliminates much of the but ton pushing common with other brands of GPS receivers It works in conjunction with the navigation feature First start navigation to a waypoint See the waypoint section for more information on navigating to a waypoint Then with the auto zoom mode on the unit zooms out until th...

Page 149: ...left Map Data Menu right Earth Map Detail From the Map Page press MENU to MAP DATA ENT Press ENT to se lect from four levels of map detail Off Low Medium and High After the option is set press EXIT Pop up Map Info From the Map Data menu press to POPUP MAP INFORMATION With the option highlighted press ENT to turn on check or turn off uncheck the feature Fill Water With White From the Map Data menu ...

Page 150: ...ap to see the third and fourth rings In this example the distance to the third ring is 75 miles and distance to the fourth ring is 100 miles To set range rings From the Map Data menu press to RANGE RINGS With the range rings highlighted press ENT to turn on check or turn off uncheck the option To set Lat Long Grid From the Map Data menu press to LAT LON GRID LINES With Lat Lon Grid Lines highlight...

Page 151: ...ap Datum Menu right Map Detail Category Selection This menu determines which mapping features are shown on the screen This includes waypoints trails icons cities highways etc You can selectively turn on or off any of these items customizing the map to your preferences To get to Map Categories 1 From the Map Page press MENU to MAP CATEGORIES ENT 2 Use to select a category then press to cycle throug...

Page 152: ...in north up left and in track up right This is fine if you are always traveling north What you see to your left corresponds with the left side of the map and what is on your right is shown on the right side of the map and so on If however you travel any other direction the map does not line up with your view of the world In Track Up mode map shows N and arrow to indicate north www Busse Yachtshop ...

Page 153: ...U to MAP ORIENTATION ENT Use to select the desired mode then press ENT Press EXIT EXIT to return to the main page display Map Orientation selected on Map Menu left North Up option selected on Map Orientation menu right Overlay Data To change the digital data shown on the Map Sonar or Map with Sonar pages press PAGES then use to select the Full Map Sonar or Map with Sonar page and press EXIT To sel...

Page 154: ...to the top of the data list and a check mark appears beside the data type If you want you may use to select other Data Types for display Data list showing Ground Speed selected to display on Map Page 3 To return to the previous page press EXIT To turn off displayed data 1 From the Map Sonar or Map with Sonar page press MENU to OVERLAY DATA ENT www Busse Yachtshop de email info busse yachtshop de ...

Page 155: ...ype then press turn on check the data type and modify the data size Use to scroll through four data size options Small Medium Large and Enormous After you are satisfied with the data size press EXIT The selected data type will be displayed in the new size To change the font size for another Data Type press ENT and repeat these steps beginning with step two above 3 To return to the previous page pr...

Page 156: ...ed press ENT to turn it on check and turn it off uncheck After the option is set press EXIT EXIT to return to the main page display System Setup Menu left with Pop up Help highlighted The Pop up Help message for the Sensitivity command right Reset Options To reset all features to factory defaults Press MENU MENU to SYSTEM SETUP ENT to RESET OPTIONS ENT to YES ENT NOTE Reset Options does not erase ...

Page 157: ...reen menu press MENU MENU ENT To adjust the display s contrast The CONTRAST slider bar is already selected Press to move the bar The left end of the scale is minimum contrast The right end is maxi mum contrast Screen command highlighted left Screen Menu with Contrast bar selected right www Busse Yachtshop de email info busse yachtshop de ...

Page 158: ...guage This unit s menus are available in 10 languages English French Ger man Spanish Italian Danish Swedish Russian Dutch and Finnish To select a different language 1 Press MENU MENU to SYSTEM SETUP ENT 2 Press to SET LANGUAGE ENT 3 Use to select the desired language and press ENT All menus now appear in the language you selected Set Local Time Using the local time setting is handy when estimating...

Page 159: ... press ENT In the center of the local time menu is CONFIG DST It allows your unit to automatically make the adjustment for Daylight Savings You may se lect which set of rules matches DST in your region or accept the de fault Once you are satisfied with the time settings press EXIT repeat edly to get back to the main page display Show WAAS Alarm When the signal is available your unit will automatic...

Page 160: ...re usually offered to customers as free downloads from our web site www eaglesonar com These upgrades make the unit perform better or introduce a new fea ture or function You can find out what software version is running in your Cuda by using the Software Information command Main Menu with Software Information selected left The Software Information screen right 1 Press MENU MENU to SYSTEM SETUP EN...

Page 161: ...ck To set Alarm Volume Press to VOLUME Press to move the bar The left end of the scale is low volume The right end is high volume To set Alarm Style Press to ALARM STYLE ENT Press to change the alarm style then press ENT After the option is set press EXIT EXIT to return to the main page display Track Smoothing This is a factory setting on the GPS Setup menu that should always be left on When stopp...

Page 162: ...ther options can be applied to a particular trail You can display or hide trails create a new trail delete a trail or change the way trails are updated To access the Trails Menu Press MENU MENU to MY TRAILS ENT Main Menu left Trails Menu center Trail Options right www Busse Yachtshop de email info busse yachtshop de ...

Page 163: ...om a straight line the unit drops a plot point onto the trail This con serves plot trail points If a plot trail uses all of the available points al lotted to it the beginning points are taken away and placed at the end of the trail From the Trails Menu press to TRAIL OPTIONS ENT to UPDATE CRITERIA ENT Use to select criteria type ENT If you selected Time the Update Rate data entry box appears on th...

Page 164: ...ing right Specific Trail Options Delete Trail To delete a specific trail From the Trails Menu press to Trail Name ENT The Edit Trail menu appears as seen in the following fig ure Press to DELETE TRAIL ENT to YES ENT Edit Trail menu left with Delete Trail highlighted Delete Trail con firmation message center New Trail selected on Trails menu right www Busse Yachtshop de email info busse yachtshop d...

Page 165: ...il On the Edit Trail menu press to highlight the section you want to change then press ENT Make your changes then press EXIT to close this menu Units of Measure This menu sets the units of measure used for Speed and Distance Depth Temperature Altitude and Heading To change units of measure Press MENU MENU to SYSTEM SETUP ENT ENT Units of Measure on System Setup menu left Units of Measure Menu righ...

Page 166: ...rence in a residential installation This equipment generates uses and can radiate radio frequency energy and if not installed and used in accordance with the in structions may cause harmful interference to radio communica tions However there is no guarantee that interference will not occur in a particular installation If this equipment does cause harmful interference to radio or television recepti...

Page 167: ...able right to use these Databases for supplemental naviga tion reference purposes but only as long as you comply with the terms and conditions of this License Agreement We reserve the right to terminate this license if you violate any aspect of this License Agreement You are responsible for using official government charts and prudent navigation for safe travel 3 The Databases housed in your produ...

Page 168: ...E FOR ANY SPECIAL CONSEQUENTIAL INCIDENTAL OR OTHER INDIRECT DAMAGE OF ANY KIND Some states do not allow the exclusion or limitation of incidental or consequential damages so the above limitations or exclusions may not apply to you This warranty does NOT apply in the following circumstances 1 when the product has been serviced or repaired by anyone other than us 2 when the product has been con nec...

Page 169: ...AS JUST DESCRIBED IS THE EXCLUSIVE REMEDY AVAILABLE TO YOU AGAINST US FOR ANY DEFECT MALFUNC TION OR NON CONFORMITY CONCERNING THE PRODUCT OR FOR ANY LOSS OR DAMAGE RESULTING FROM ANY OTHER CAUSE WHATSOEVER WE WILL NOT UNDER ANY CIRCUM STANCES BE LIABLE TO ANYONE FOR ANY SPECIAL CONSEQUENTIAL INCIDENTAL OR OTHER INDIRECT DAMAGE OF ANY KIND Some states do not allow the exclusion or limitation of in...

Page 170: ... policies regulations and special offers at any time We reserve the right to do so without notice in Canada If you re in Canada and you have technical return or repair questions please contact the Factory Customer Service Department Before any product can be returned you must call customer service to determine if a return is necessary Many times customer service can resolve your problem over the p...

Page 171: ...pair or replacement you must first receive a return authorization number from Customer Service Products shipped without a return authorization will not be accepted When shipping we recommend you do the following 1 Please do not ship the knobs or mounting bracket with your unit 2 If you are sending a check for repair please place your check in an envelope and tape it to the unit 3 For proper testin...

Page 172: ...Visit our web site www eaglesonar com Eagle Pub 988 0152 101 Copyright 2005 All Rights Reserved Printed in USA 113005 LEI Eagle www Busse Yachtshop de email info busse yachtshop de ...

Reviews: