background image

4 CONNECT WITH EXTERNAL DEVICES

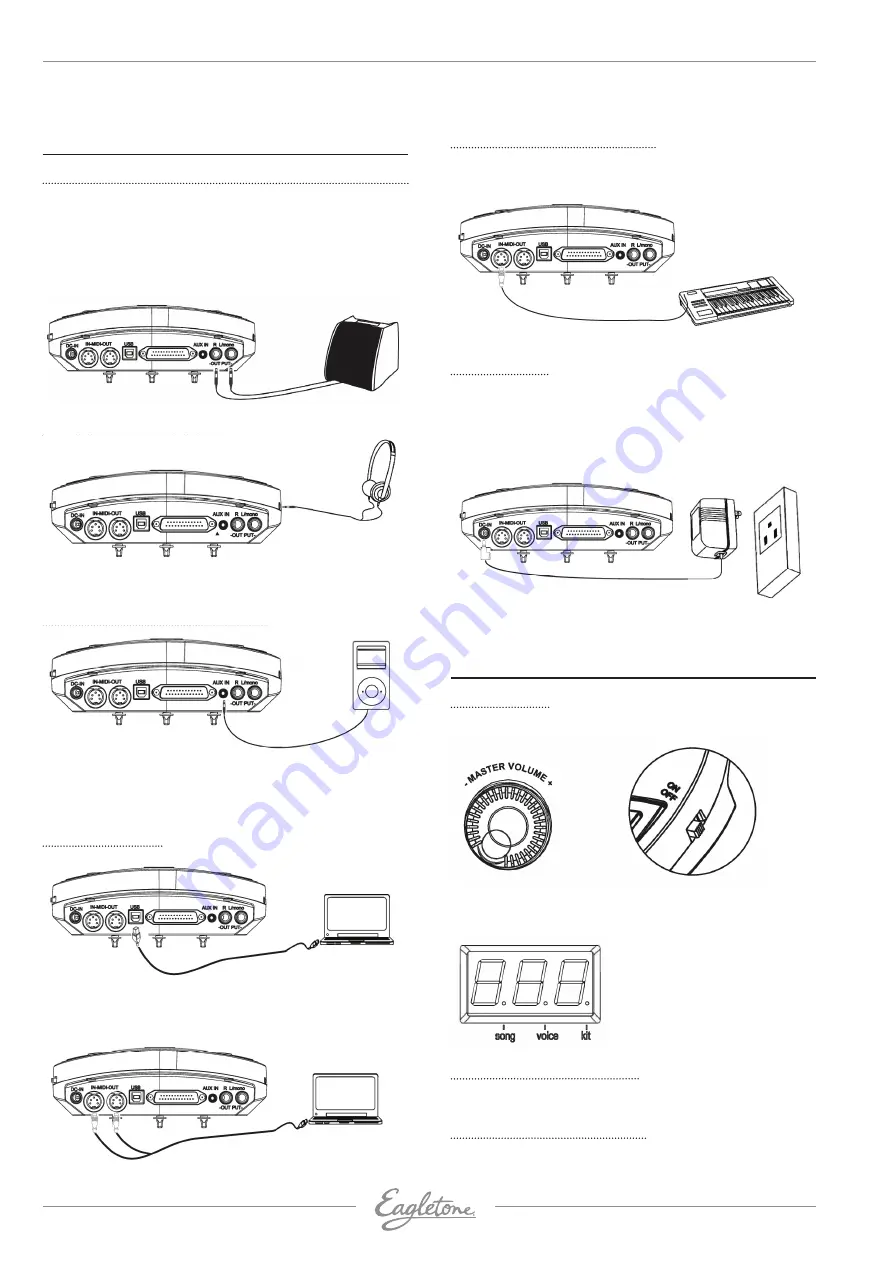
Connecting with audio system or drum speaker cabinet

Connect one end with L/mono R, and the other end with audio 

system or drum amplifier such as EDA series.

Note:

1.  L/mono is only for the left channel output.

2.  When connecting with stereo devices, it needs to connect 

L/mono and R connectors. The volume is controlled by the 

module volume knob and device volume knob.

Connect with headphones

Connect the phone with ⅛" stereo connector on the module The 

volume is controlled by the volume knob on the module.

Connect with MP3 or CD player

Connect the output of MP3 or CD player with the AUX IN connec-

tor of the module. The input signal can be mixed with the drum 

signal. User can strike the pad according to the metronome 

click of input signal.

Connect with PC

•  Connect PC via USB. Receives and delivers MIDI signal.

•  Connect PC via MIDI port

MIDI IN: receives external MIDI signal.

MIDI OUT: delivers pad signal to external MIDI device or PC.

Connect with MIDI keyboard

MIDI port: connect with the MIDI OUT connector of MIDI 

keyboard or external pads as the external audio source to 

control this digital drum.

Power supply

1.  Turn off the module power switch.

2.  Connect the power supply with DC IN connector.

3.  Confirm all the pads are correctly connected. Set the 

module volume to minimum, then turn on the power switch 

of the module. The display lights up and it enters into the 

drum kit menu.

Turn off the power switch before connecting with other devices.

5. OPERATION

Power switch

1.  Confirm all the cables are connected well, then set the 

module volume to minimum, then turn on the power switch.

2.  When the display lights up, enter into the module menu 

operation (enter into the drum kit menu when on.

Adjust the master volume

Strike the pads and adjust the volume knob for proper master 

volume.

Select drum kit and reverb

1.  Press [KIT REV ON/OFF] key to enter into drum kit setting 

or to switch drum kit and reverb effect.

User’s manual english 

EAGLETONE E-TOUCH ELECTRONIC DRUMS

11

GETTING READY TO PLAY THE DRUMS  / FACTORY SETTINGS 

O

Summary of Contents for Compact E-touch

Page 1: ...www eagletone com electronic drum user s manual...

Page 2: ...nstrument is not be used for an extended period of time Unplug the AC adaptor during electric storms Avoid plugging the AC adaptor into the same AC outlet as appliance with high power consumption such...

Page 3: ...g 16 Select pad voice 16 Adjust pad volume 17 Pad pan 17 Pad tuning 17 Establish user drum kit 17 Song setting 18 Select song 18 Song playing 18 Accompaniment volume 18 Drum sound of the song 19 Song...

Page 4: ...ulting in injury Be careful around pipe ends inside the pipe and screw ends metal shavings etc May injure your fingers Inside this package Before assembly please makde sure that all the items listed b...

Page 5: ...PACKAGING INFORMATION User s manual english EAGLETONE E TOUCH ELECTRONIC DRUMS 5 PANEL CONTROLS O...

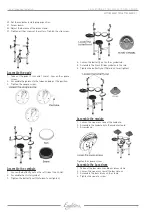
Page 6: ...cymbal tubes 7 Loosen the screws at the collars 8 Adjust the cymbal collars to proper height 9 Screw down to fix the cymbal tubes 10 Loosen the screws at the collars 11 Adjust the hi hat collars to p...

Page 7: ...Hi Hat cymbal 3 Tighten the butterfly nut Note don t overtighten 4 Loosen the butterfly nut on the cymbal rod 5 Assemble the Crash Ride cymbal onto the rod 6 Tighten the butterfly nut Note don t over...

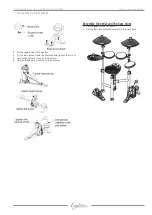
Page 8: ...Loosen the square screw of the hammer 8 Tighten the square screw to fix the hammer Assemble the pedal and the bass drum 1 Put the pedal to the left floor 2 Put the bass drum with hammer to the right f...

Page 9: ...r of the module and the pad 2 Use the cable tie to tie the cable 12 ties ride crash tom 2 tom 1 tom 3 hi hat cymbal snare module cable tie 12 totally bass hi hat control User s manual english EAGLETON...

Page 10: ...a third time to stop 12 SET UP Practical setting button 13 RECORD Records the drum sound 14 VOICE VOL PAN TUN Sets up the voice volume pan and tune 15 CLICK Turns on off the metronome 16 ON OFF It tu...

Page 11: ...nal to external MIDI device or PC Connect with MIDI keyboard MIDI port connect with the MIDI OUT connector of MIDI keyboard or external pads as the external audio source to control this digital drum P...

Page 12: ...ly to enter into the pan setting The display displays letter P first and then the pan value The VOICE LED lights up 2 Strike the pad of which the pan to be adjusted Use DATA button to adjust the pad p...

Page 13: ...e song tempo Drum sound of the song percussion Press DRUM OFF button to start close the drum sound func tion If DRUM OFF starts the drum sound will be closed and DRUM OFF LED lights on Tempo setting a...

Page 14: ...st and the crosstalk rejection level next 2 Use DATA button to adjust the trigger sensitivity rejec tion level C 01 16 non recycle The higher value means higher rejection level Trigger curve 1 Press S...

Page 15: ...a Mac OSX After connection the system recognizes this equipment as USB COMPOSIT E DEVICE USB is only used when connected with MIDI devices Note when USB is connected with PC all MIDI data can be sent...

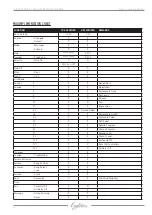
Page 16: ...0 X O Pan 11 X X Expression 64 O Sustain Pedal 65 X X Portamento On Off 66 X X Sostenuto Pedal 67 X X Soft Pedal 80 X X Reverb Program 81 X X Chorus Program 91 X X Reverb Level 93 X X Chorus Level 120...

Page 17: ...phony 32 Drum kits 20 preset drum kits KIT01 20 15 user drum kits USER01 15 Voice 250 voices DRUMS PERCUSSION SFX Effect the reverb switch Audio sequencer DEMO SONG 20 Recording real time recording bu...

Page 18: ...3 3 JAZZ1 4 ROCK1 4 LATIN1 5 ROCK2 5 DANCE1 6 ROCK3 6 EAST1 7 FUNK1 7 FUNK1 8 FUNK2 8 FUNK2 9 LATIN1 9 FUNK3 10 LATIN2 10 LATIN 11 BOSSA 12 JAZZ1 13 JAZZ2 14 BRUSH 15 ORCH 16 DANCE1 17 DANCE2 18 EAST1...

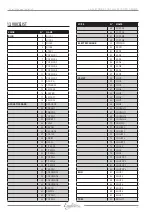
Page 19: ...SNCOMBO3 38 SNCOMBO4 39 SNCOMBO5 40 SNCOMBO6 41 SRSTD 42 SRIMC4 43 POPSN1 44 POPSN2 VOICE N NAME 45 POPSN3 46 POPSN4 47 POPSN5 48 POPSN5 ELECTRIC SNARE 49 SYNSN01 50 ESN11 51 ESN1 52 ESN2 53 ESN3 54 E...

Page 20: ...132 REVCYM4 133 RIDEJZ1 134 RIDEJZ2 135 RIDESTD VOICE N NAME 136 RIDE1 137 RIDE2 138 REV CYMBAL 139 SPLSH1 140 SPLSH2 141 CRASHC1 142 CNCYMBAL 143 CRASHPOP1 144 CRASHPOP2 145 CRASHPOP3 146 CRASHPOP4...

Page 21: ...G 210 TAIKO1 211 TAIKO2 212 TAIKO3 213 TAIKO4 214 TAIKOSD1 215 TAIKOSD3 216 CHIM1 217 CHIM2 218 STICK2 219 TIM1 220 TIM2 221 TIM3 222 TIM4 223 TIMS 224 TMPNS3 225 BELLTREE VOICE N NAME 226 High Q 227...

Page 22: ...2 Pedal Hi Hat 77 PHH2 45 A2 Low Tom 93 TOM1 46 A 2 Open Hi Hat 70 OHHSTD 47 B2 Low Mid Tom 99 TOM7 48 C3 Hi M id Tom 98 TOM6 49 C 3 Crash Cymbal 1 118 CRSHSTD1 50 D3 High Tom 95 TOM3 51 0 3 Ride Cym...

Page 23: ...Shaker 234 SHAKER 83 85 Jingle Bell 235 JINGLEBELL 84 C6 Bell Tree 225 BELLTREE 85 C 6 Castanets 236 CASTANETS 86 06 Mute Surdo 237 MUTESUROO 87 0 6 Open Surdo 238 OPNSUROO 15 DEMOSONGLIST N SONG TYPE...

Reviews: