background image

60

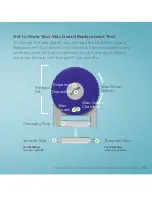
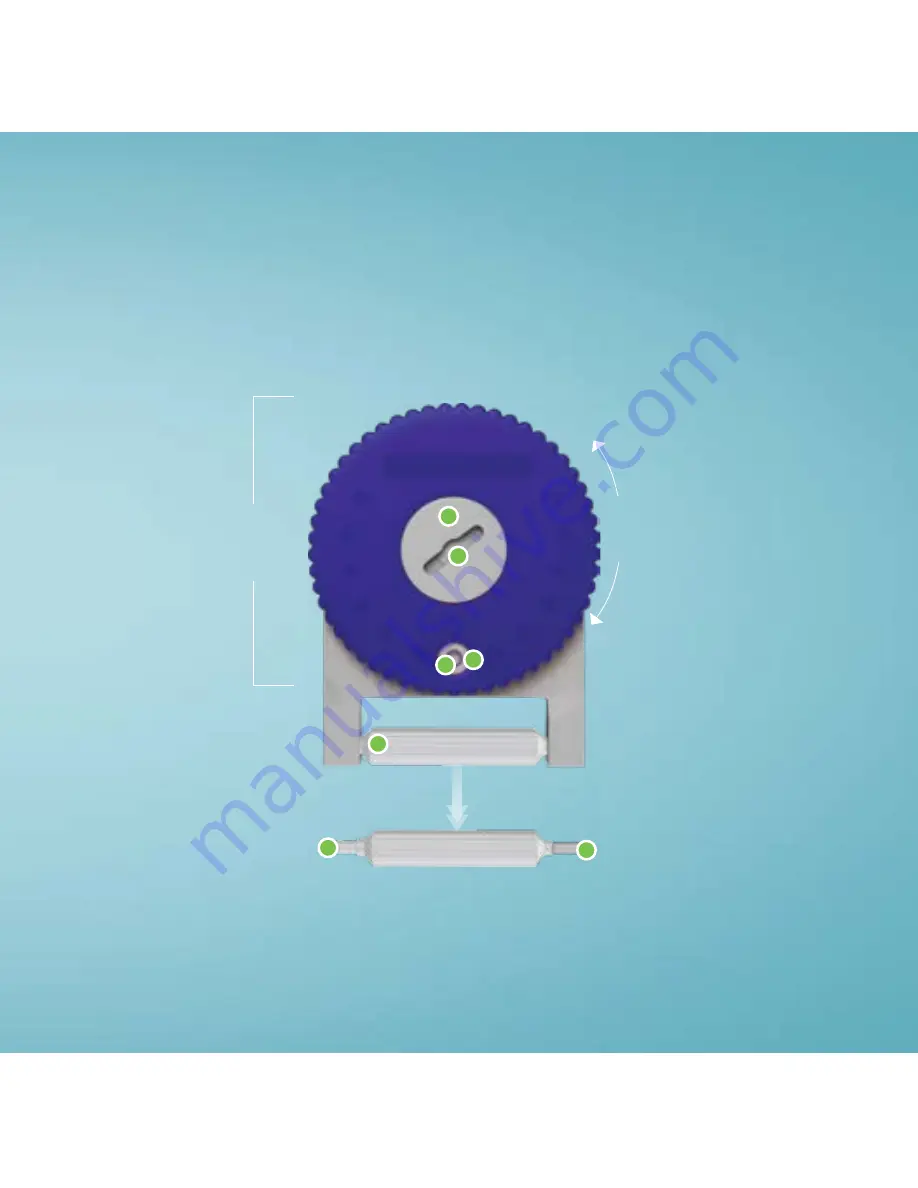
Wax Guard 

Wheel

Storage 

Kit

Changing Tool

Depository

Dispenser

Threaded Side

Smooth Side

For 

removing  

used wax guards.

For 

inserting 

new


wax guards.

Wax Guard 

Chamber

Wax 

Guard 

Get to Know Your Wax Guard Replacement Tool

To change the wax guard, you will need the blue Wax Guard 
Replacement Tool

*


found in the Care Kit. The wax guard is very 

small and so is the tool to replace it, so don’t be shy in asking 
someone for help with this part if you need to.

*Only use tool and wax guards provided by Eargo.

Summary of Contents for Max

Page 1: ...Eargo Plus User Guide ...

Page 2: ...II Get ready to start hearing life to the fullest A companion video of this user guide can be found at eargo com showme ...

Page 3: ...07 09 21 Preparing Your Ears Inserting and Removing Your Eargo Devices 01 Indications for Use 67 69 73 75 36 47 Share the Love Troubleshooting Guide Support Appendix 31 Adjusting Sound Profile Your First Month and Beyond Eargo Care Finding the Perfect Fit 27 Let s Get All Charged Up 11 ...

Page 4: ...mily hopefully this will we re super excited to have you as a part of the Eargo family and we know you re going to enjoy your new Eargo Max hearing devices STEP 2 CHARGE Charge your Eargo devices Pg 09 STEP 1 CLEAN Clean your ears Pg 05 STEP 3 SIZE Pick your size Pg 27 STEP 4 ADJUST Find the right setting for you Pg 31 GET GOING IN 4 EASY STEPS ...

Page 5: ...ize Flexi Domes Micro USB Cord 2 Shower Stickers USB Plug Cleaning Brush Each pair of Eargo devices comes pre loaded with Regular size Flexi Fibers Eargo Max Care Kit 3 Refer a Friend Cards Wax Guard Replacement Tool Microfiber Cloth Quick Start Guide QSG 6 Regular Size Flexi Fibers ...

Page 6: ... available information concerning the prospective user that the prospective user has any of the following conditions i Visible congenital or traumatic deformity of the ear ii History of active drainage from the ear within the previous 90 days iii History of sudden or rapidly progressive hearing loss within the previous 90 days iv Acute or chronic dizziness v Unilateral hearing loss of sudden or re...

Page 7: ...that states that your hearing loss has been medically evaluated and that you may be considered a candidate for a hearing aid The physician will refer you to an audiologist or a hearing aid dispenser as appropriate for a hearing aid evaluation The audiologist or hearing aid dispenser will conduct a hearing aid evaluation to assess your ability to hear with and without a hearing aid The hearing aid ...

Page 8: ...aring loss should be directed to an audiologist for evaluation and rehabilitation since hearing loss may cause problems in language development and the educational and social growth of a child An audiologist is qualified by training and experience to assist in the evaluation and rehabilitation of a child with a hearing loss Additional Notices A hearing aid will not restore normal hearing and will ...

Page 9: ...ntact a physician If for any reason your hearing devices do not operate properly do NOT attempt to fix them yourself Not only are you likely to violate any applicable warranties you could cause further damage Caution Always wear an Eargo device with a Flexi Fiber Make sure that the Flexi Fiber is correctly attached In rare cases the Flexi Fiber could remain in your ear when removing the Eargo devi...

Page 10: ...etimes it can interfere with hearing by blocking the ear canal Ear wax can also plug the sound openings or charging contacts on your Eargo devices In other words clean those ears A clean ear is a happy and better functioning ear Our in house doctors and audiologists urge you to not skip this step even if you feel your ears are pretty clean already We recommend talking to your doctor or a hearing h...

Page 11: ...6 ...

Page 12: ...7 Replaceable Flexi Fibers Removal Thread Microphone Speaker Getting To Know Your Eargo Left is L Right is R Gold Contact ...

Page 13: ...evice into your ear MICROPHONE The Microphone picks up sounds from your surroundings Fair warning it works super well so you might want to avoid groups of loud teenagers small yappy dogs or those car stereos that shake the ground when they pass SPEAKER The Speaker amplifies sound The world s about to be piped through in stereo GOLD CONTACT The Gold Contact is used in the charging of your device EA...

Page 14: ... charger also needs to get charged from time to time If you re the curious sort and we can t blame you if you are open the lid of the charger and take a peek inside Those babies look good don t they Keep the lid open until you see the lights of the charger come on about 3 seconds It takes longer for these lights to come on the first time you open the lid as your system is waking up from its deep s...

Page 15: ...battery lights glow white Full Charge When charger is at low charge one battery light glows red Low Charge Open the lid of the charger and the indicator lights will come on after about 3 seconds Checking the Charge Charger Indicator Lights ...

Page 16: ...ome You know how it is As you know by now we like to make things as easy as we can for you So when your Eargo devices arrive they re already placed inside the charger but they may need a little more charge Connect the smaller end of the micro USB cord to the charger and the larger end of the cord to the USB plug Plug the USB plug into a powered wall outlet While charging the charger the Eargo devi...

Page 17: ...e But don t worry if those lights turn off that s just the charger trying not to show off your devices are still being charged Bada bing bada boom It ll take about 6 hours to charge up fully Then you re good to go In a literal and figurative sense Charger Lid Micro USB Cord Charger Indicator Lights Eargo Charger Eargo Device Indicator Lights ...

Page 18: ...val thread should be out and up Do not force it into place With a little wiggle it will slide right into the cradle PUSH Gently push straight down on the black body of the Eargo device above the gold contacts not on the white Flexi Fibers When it is correctly positioned the cradle light will change from blue to white CHECK CRADLE INDICATOR LIGHTS When the cradle lights change from solid blue to so...

Page 19: ...evice directly over the charging cradle Push down into cradle with a gentle wiggle Flip the device before insertion so removal thread is facing up CORRECT CHARGING POSITION INCORRECT CHARGING POSITION 1 2 3 Charging Cradle ...

Page 20: ...n you first insert the Eargo devices into the cradle This is normal the charger is just calibrating But if the charging lights continue to flash blue for an extended period of time or remain solid blue the Eargo devices are not inserted correctly Remove and re insert the Eargo devices You will know you re all set when the charging lights under the Eargo devices remain solid white and the Eargo Dev...

Page 21: ... Lights Charging lights inside cradle change from blue to white 4 SOLID WHITE LIGHT Eargo device inserted correctly SOLID BLUE LIGHT Eargo device inserted incorrectly CONTINUOUS FLASHING Eargo device only partially inserted ...

Page 22: ... assessing how much charge the Eargo devices have left This way the charger will know if it should charge the devices full blast or just gently trickle charge them Clever little charger eh After this assessment period the lights will show how much juice you have in each Eargo device 1 to 4 lights and will dim after approximately 10 seconds It takes approximately 6 hours to fully charge your Eargo ...

Page 23: ...ng during a 10 second assessment period HOW YOUR DEVICE INDICATOR LIGHTS WORK JUICE LEVEL 1 4 lights illuminate Eargo Device Indicator Lights FULL CHARGE 4 white lights on device is fully charged LOW CHARGE 1 red light on device has extremely low charge ...

Page 24: ...19 ...

Page 25: ...p working condition When not in use store them in the charger That ll keep them fully charged Please do not drop your Eargo devices or your charger onto any hard surfaces Maximizing Battery Life To maximize the battery life of your Eargo devices it is best to charge them once a day overnight Turning Off Your Eargo Devices Placing your Eargo devices in the charger automatically turns them off ...

Page 26: ...atically 10 seconds after they are removed from the charger Bada boom BEFORE AND AFTER If you apply hairspray or cosmetics please do so BEFORE inserting the Eargo devices Otherwise they could clog the microphone Likewise if you apply hand lotion please do so AFTER the devices have been inserted so the lotion does not clog the microphone INSERTING When you take the device out of the charger the rem...

Page 27: ...ophone up and the removal thread down As we said before bada bing bada boom INCORRECT Too far in INCORRECT Halfway out INCORRECT Upside down CAUTION Do not use if device is damaged or removal thread is missing Please contact Eargo immediately Do not insert the Eargo device too deep into the ear canal The removal thread needs to remain accessible Do not proceed if there is any discomfort or pain ...

Page 28: ...nal Kind of like how an orchestra takes a minute or so to make sure they re in tune with one another You don t have an orchestra in your ear but you know what we mean If the ringing doesn t stop try pulling back on the device ever so slightly This sometimes stops the ringing You can also try rotating the device slightly to make sure the microphone is not touching the ear canal and causing feedback...

Page 29: ... resistance when you first insert the Eargo device and it doesn t feel like it has gone in all the way the Eargo device might just need a little help Give it a little nudge left right up or down to see if you have a bend in your ear canal and if you can nudge it around the bend so it goes into place more fully But PLEASE be gentle and don t force it It may help to gently pull the middle of your ea...

Page 30: ...ce will be almost completely invisible The main part of the device that may be visible is the very back In fact this is why we make Eargo devices black and not various skin colors You see the ear canal appears quite dark since it receives little light so a black Eargo device is better camouflaged and more closely resembles the shadow in the canal than a skin colored one would Clever right ...

Page 31: ...hen Eargo devices are designed for all day use but not all night Please remove them before sleeping and especially before showering After removal it s a good idea to inspect your devices for wax build up or to replace the Flexi Fibers or wax guards if needed You can read more about this in the Eargo Care section page 47 CAUTION In rare cases the Flexi Fiber could remain in your ear when removing t...

Page 32: ...bers If the Regular size feels too loose swap them with the Large size to see if those are a better fit You can find the Large size Flexi Fibers inside the Eargo Max Care Kit We recommend you wear your Eargo devices for an hour or so before making a final decision on fit Talk laugh eat shout at the evening newscast really pack that hour up with excitement Your Eargo devices are designed to comfort...

Page 33: ...28 Replaceable Flexi Fibers Gray Markings Base of Nose Nose Body of Device Finding the Perfect Fit PEEK UNDER THE HOOD ...

Page 34: ...e Make sure to bring the popcorn Grasp the body of the Eargo device between your thumb and index finger With your other hand grasp the Regular size Flexi Fiber on one side at the bottom and peel it up and away from the body of the device REMOVE THE REGULAR SIZE Finding the Perfect Fit CHANGING SIZES ...

Page 35: ...owards the base Then give it a look to ensure that it s all the way on the nose If you can still see some of the gray markings on the nose the Flexi Fiber is not on properly Continue twisting the Flexi Fiber down the nose until the gray markings are covered REPLACE WITH THE LARGE SIZE Caution Make sure that the Flexi Fiber is correctly attached In rare cases the Flexi Fiber could remain in your ea...

Page 36: ...31 Quick double tap 31 SP1 SP2 SP3 SP4 LOW PHONE PROGRAM 1 PROGRAM 2 PROGRAM 3 PROGRAM 4 MED HIGH MAX ...

Page 37: ...sel Sound settings are highly personal and often vary between ears and in different settings Each ear is different so do this for each ear independently And remember your Eargo devices should make sounds and speech crisper but not louder per se SP1 is a special setting that has lower amplification and a special equalization curve designed for phone calls When talking on a phone try this setting to...

Page 38: ...33 ...

Page 39: ...cifically designed for people who need a little more amplification than the Flexi Fibers provide Flexi Domes are made with the same patented Flexi Fibers but with an added soft dome tip So if you feel you need the extra horsepower simply switch out the Flexi Fibers on your device for the Flexi Domes provided in your Care Kit If you have any questions please call your personal hearing professional ...

Page 40: ...35 ...

Page 41: ...rful brain of yours will adjust very quickly to hearing more of the sound spectrum again And two we have a team of personal hearing professionals with decades of experience working with people who are adjusting to wearing hearing devices for the first time They also have to a person outstanding haircuts and pearly white teeth Smart and dashing Hey we have high standards around here But most import...

Page 42: ...nice gentle breeze in and out of the ear isn t an absolute pleasure has obviously never experienced one In other words they re incredibly comfortable So comfortable you might forget you re wearing them If it wasn t for the incredible sound quality that is And if your Eargo devices ever feel uncomfortable just try repositioning them pull them backward forward or rotate them a little Just make sure ...

Page 43: ...to squander or disperse But amazing vocabulary aside autophony is one of the most common things people notice when they begin wearing an in ear hearing device Remarkably this typically goes away within a week or two when your brain gets adjusted to it And eventually ignores it We find you quite charming but your brain probably figures why fritter yay away time listening to you when there are so ma...

Page 44: ...hing it can And giggling happily to itself Anyway our point is little sounds may suddenly seem very loud Things like water running bags of chips crinkling paper crumpling babies crying and the sound of traffic Your brain needs a little time to get used to hearing these high frequency sounds again It probably hasn t heard them for a long time Give it a little while The first weeks with your Eargo d...

Page 45: ...40 ...

Page 46: ...41 ...

Page 47: ...und profile SP to see which one gives you the greatest clarity If these background noises continue to be an issue after 30 days adjust the volume back down Play around with the SPs As in life or marriage or the exact way to make a good gumbo there is no right or wrong answer And remember you can select different SPs for each ear One final word on volume Eargo devices should sound crisp and not lou...

Page 48: ...prove So if you ve been hanging around with a bunch of boring people or the conversationally challenged it might be time to freshen up the ol friend group After the first few weeks many people find that it s easier to hold a conversation in noisy environments And your speech discrimination will likely continue to improve over time Possibly for several months But remember the key to anything is pra...

Page 49: ...44 ...

Page 50: ...to the ear The proximity can create a feedback loop between the phone s speaker and the device s microphone If this happens move the phone back from your ear a bit or try holding it at an angle SP1 is designed for the phone so if you ever experience feedback while on the phone be sure to try this setting Some people also have success using speaker phones ...

Page 51: ...atch TV at a much lower volume after they start wearing their Eargo devices Usually the same volume that s comfortable for their spouse or family One of the many ways in which the Eargo devices benefit the people who AREN T wearing them too If you find you still want the TV louder than your family does you can temporarily increase the volume of your Eargo devices by using a higher SP while watchin...

Page 52: ...wme for your viewing pleasure OK they haven t won any awards but we think they should 47 Eargo Care Keeping your Eargo devices in good shape is very important DAILY CARE Wipe and brush off excess wax daily LONG TERM CARE Replace Flexi Fibers if clogged with wax LONGER TERM CARE Replace interior wax guard if clogged with wax ...

Page 53: ...removal There s often a sizable amount of wax that may come out during the initial days of using your devices That amount should lessen over time It s very important to keep your devices clean Wax buildup or other debris may lessen their sound quality and performance Never thought you d spend so much time hearing about ear wax did you Well surprise 48 ...

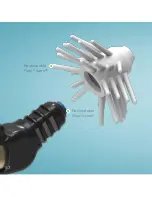
Page 54: ...d dried outside of those hot ears of yours That s probably more than you ever wanted to know about ear wax but there it is We suggest you inspect your Eargo devices daily ideally before you put them in If you see any wax on the microphone Flexi Fibers the nose contacts or body of the device please brush it off or wipe away with cloth the brush can be found in the Care Kit MICROPHONE Using the clea...

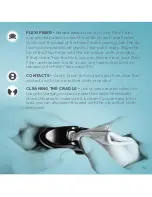
Page 55: ...d If that doesn t do the trick you can also remove your Flexi Fiber and replace it with a new one see instructions on replacing the Flexi Fiber page 55 CONTACTS Gently brush the contacts and then wipe the contacts with the microfiber cloth provided CLEANING THE CRADLE Lint or wax can also collect on the gold charging contacts inside the cradle Periodically check this area to make sure it is clean ...

Page 56: ...hould say We love our charger so you ll have to forgive us for going on about it whenever we re given the chance Before placing your Eargo devices in the charger make sure the devices are completely dry Long term exposure to moisture can harm your devices Let your devices air dry or dry them with a dry cloth Don t use hot air or a hair dryer to dry your Eargo devices It might give them that stylis...

Page 57: ...ease do not immerse or submerge your devices in water alcohol or any liquid Also do not wear them while swimming or in the shower hot tub or steam room We ve even included a couple of handy shower stickers that you can use in your bathroom to remind you to take out your Eargo devices before showering ...

Page 58: ...53 Replaceable Flexi Fibers Replaceable Wax Guard ...

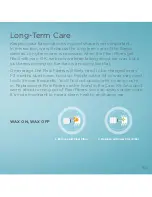
Page 59: ...oying like that On average the Flexi Fibers will likely need to be changed every 1 2 months due to wax build up People with a lot of wax may need to do it more frequently You ll find out quickly which camp you re in Replacement Flexi Fibers can be found in the Care Kit And don t worry about running out of Flexi Fibers you can always order more It s more important to have a clean healthy and happy ...

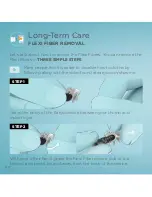
Page 60: ...t how to remove the Flexi Fibers You can remove the Flexi Fibers in THREE SIMPLE STEPS Many people find it is easier to visualize how to do this by following along with the video found at eargo com showme With your other hand grasp the Flexi Fiber on one side at the bottom and peel it up and away from the body of the device STEP 2 ...

Page 61: ...tly pull the bottom of the Flexi Fiber away from the nose of the body of the device and then just peel it up It will come right off with no resistance STEP 3 Pull the Flexi Fiber completely away from the body of the device to reveal the nose of the body and replaceable wax guard It is recommended that you discard the used Flexi Fiber ...

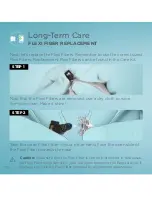
Page 62: ... shine Long Term Care FLEXI FIBER REPLACEMENT Next let s replace the Flexi Fibers Remember to use the correct sized Flexi Fibers Replacement Flexi Fibers can be found in the Care Kit Caution Make sure that the Flexi Fiber is correctly attached In rare cases the Flexi Fiber could remain in your ear when removing the Eargo device If this happens have the Flexi Fiber removed by a healthcare professio...

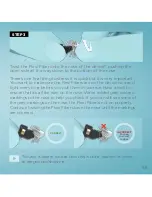
Page 63: ...tight every time before you put them in your ear Have a look to ensure that it s all the way on the nose We ve added gray colored markings to the nose to help you check If you can still see some of the gray markings on the nose the Flexi Fiber is not on properly Continue twisting the Flexi Fiber down the nose until the markings are covered Push on and twist further INCORRECT CORRECT To have a clea...

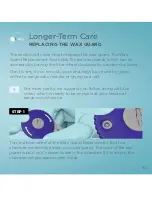
Page 64: ...ean If it is you re all set If not then you can try to clean or replace the internal wax guard To clean the wax guard of wax and other debris gently brush the wax guard with the tip of the device pointed down to let gravity help pull wax away You can also change this wax guard anytime you notice a substantial amount of wax build up or roughly every 3 to 5 months The time to change will vary depend...

Page 65: ...s Wax Guard Chamber Wax Guard Get to Know Your Wax Guard Replacement Tool To change the wax guard you will need the blue Wax Guard Replacement Tool found in the Care Kit The wax guard is very small and so is the tool to replace it so don t be shy in asking someone for help with this part if you need to Only use tool and wax guards provided by Eargo ...

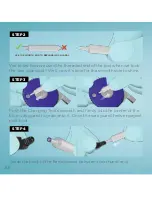
Page 66: ...acement many people find it is easier to visualize how to do this by following along with the video which can be found at eargo com showme Remove the Changing Tool from its clip at the bottom of the Wax Guard Replacement Tool STEP 1 Longer Term Care REMOVING THE USED WAX GUARD ...

Page 67: ... device to grab onto the used wax guard The key word is gently You don t need to apply too much force Let the thread do all of the work here TWIST STEP 3 Once the tool has grabbed onto the wax guard pull firmly on the tool to remove the wax guard from the device Voila Wax guard removed The wax guard is disposable Do not attempt to clean or reuse a wax guard This could damage your hearing device ...

Page 68: ...of the Changing Tool with used wax guard engaged into the middle of the dispenser as shown Slide the Changing Tool sideways across the dispenser slot Pull the tool vertically to release the used wax guard into the depository Next it s time to put on a clean new wax guard STEP 5 ...

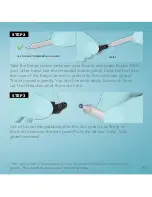
Page 69: ... appear gray inside STEP 2 STEP 1 This section will cover how to replace the wax guard The Wax Guard Replacement Tool holds 15 new wax guards which can be accessed by turning the blue wheel clockwise or counter clockwise Don t worry if you run out you can always buy more by going online to eargo com reorder or giving us a call For more clarity we suggest you follow along with the video which is re...

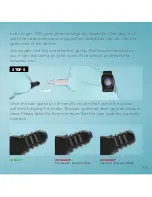
Page 70: ... it Once the wax guard feels engaged pull it out STEP 3 You know how we used the threaded end of the tool when we took the wax guard out Well now it s time for the smooth side to shine STEP 2 USE THE SMOOTH END TO REPLACE WAX GUARDS Grasp the body of the Eargo device between your thumb and STEP 4 ...

Page 71: ...rd is correctly inserted Too far out Push in further INCORRECT CORRECT index finger With your other hand gently insert the Changing Tool with the clean wax guard engaged as straight as you can into the open nose of the device Once again the key word here is gently Don t push too hard or you might risk damaging the nose of the device and that s the business end Too far in Pull out slightly INCORREC...

Page 72: ...d that is to say they are non working samples but your friends will still be able to experience the comfort and virtual invisibility of Eargo for themselves You can share the love with your friends by giving them one of the Refer a Friend cards from this box or they can order a sample pack at eargo com or by calling 1 800 61 EARGO 1 800 613 2746 If any of them purchase Eargo devices they ll probab...

Page 73: ...68 ...

Page 74: ...Eargo devices don t charge Eargo devices not placed correctly in charger Charger discharged No LEDs showing on charger Did not take the lid off Charger discharged No sound Dead battery Wax or debris is blocking the speaker or microphone Different volume in left and right ear Not set to correct program Hearing loss different between ears Troubleshooting Guide ...

Page 75: ... the device Remove and reposition Eargo devices correctly in charger signaled by the lights changing from blue to white Charge charger using USB cord and USB plug Take the lid off Charge charger using USB cord and USB plug Charge your Eargo devices Clean Flexi Fiber tip and microphone with brush Replace Flexi Fibers or internal wax guards Cycle through SPs on one ear until volume matches in both ...

Page 76: ...r Flexi Fibers remain in your ear when removing the Eargo device Flexi Fibers not attached securely Can t get Flexi Fibers off of Eargo device for replacement Pulling Flexi Fibers straight back Device is uncomfortable too tight or loose Flexi Fibers are too large or too small ...

Page 77: ...to automatically turn them off Have the Flexi Fibers removed from your ear by a healthcare professional Grab at the bottom of the Flexi Fibers and pull it out and up see page 52 Try a different size Flexi Fiber see page 29 for instructions ...

Page 78: ...us pages Have questions We have answers and are ready to help Just give us a call at 1 800 261 0702 Guarantee HAPPINESS GUARANTEED If you re not happy with your Eargo devices return them within 45 days for a full refund Call us at 1 800 261 0702 and we ll tell you how But don t be surprised if we sound sad We hate to see you go ...

Page 79: ...74 WELL THAT S IT You ve made it to the end Bravo Now get out there and start hearing life to the fullest ...

Page 80: ...ngs Eargo devices contain batteries which are dangerous if swallowed To help prevent accidental ingestion of batteries Keep out of reach of children and pets Check your medications before taking them batteries have been mistaken for pills Never put batteries in your mouth as they can easily be swallowed NATIONAL BUTTON BATTERY INGESTION HOTLINE 202 625 3333 As with many batteries Eargo device batt...

Page 81: ...tely If you suspect you have touched any battery fluid or residue wash your hands thoroughly Waste Disposal Waste from electronic equipment must be handled according to local regulations Power Supply Specification Input 100 240V 50 60 Hz 200mA max current Output 5 0V 1100mA ...

Page 82: ...L input Max 110 dB SPL HFA 105 Full on gain 50 dB SPL input HFA 26 dB Reference test gain 60 dB SPL input dB Frequency range 200 7550 Hz Total Harmonic Distortion 500Hz 800Hz 1600Hz dB SPL HFA Max 26 32 mA 2 2 1 0 9 33 Equivalent Input Noise Noise Reduction OFF Current drain battery ...

Page 83: ...78 Attack and release times BASIC attack BASIC release FAST attack FAST release REACH release 400 msec 15 000 msec 3 msec 100 msec 600 msec ...

Page 84: ...ctions may cause harmful interference to radio communications However there is no guarantee that interference will not occur in a particular installation If this equipment does cause harmful interference to radio or television reception which can be determined by turning the equipment off and on the user is encouraged to try to correct the interference by one or more of the following measures Reor...

Page 85: ...80 NOTES ...

Page 86: ...o Product adheres to requirements of Type B applied part TEMP Use between 5 C to 45 C 41 F to 113 F TEMP Store between 20 C to 50 C 4 F to 122 F Relative humidity Store between 0 to 90 relative humidity Atmospheric pressure should be 600 hPa to 1000 hPa Do not use if package is damaged Single use only Information and Explanation of Symbols Consult instructions for use ...

Page 87: ...82 Keep away from sunlight Keep dry Manufacturer Date of manufacture Catalogue number Serial number ...

Page 88: ... professional Hearing aid must only be used by intended person Use by another person may damage their hearing Do not use an instrument such as a cotton swab to push the hearing aid in the ear canal The hearing aid may be placed too deep and cause damage to the ear Do not place charger in clothing pocket while charging with the micro USB cord The charger may overheat and malfunction Users with acti...

Page 89: ...g aid to contaminants such as hair spray mousse gel lotions etc to prevent damage to the hearing aid Avoid exposure to water or long term exposure to moisture to prevent damage to hearing aid and charger Do not dry hearing aid with a hairdryer Heat may damage hearing aid Only clean hearing aid with brush and dry cloth Be careful to prevent any damage to the hearing aid To prevent damage and or mal...

Page 90: ... devices internal components charger cord and plug within the limited warranty period listed below This warranty is guaranteed by Eargo Inc What you get with your repair For valid repairs Eargo pledges to secure functionality at least equivalent to the original hearing device At the discretion of Eargo hearing devices may be replaced by new products or products manufactured from new or serviceable...

Page 91: ...s Damage Eargo offers a one time 1x replacement for each device that is lost or damaged during the warranty period for a fee stated and updated at eargo com warranty Devices damaged from improper use or care will not be replaced How to submit request for repair Call 1 800 261 0702 and we will be happy to assist ...

Page 92: ...87 How to submit request for repair Call 1 800 261 0702 and we will be happy to assist Eargo Inc 295 North Bernardo Ave Suite 100 Mountain View CA 94043 Serial Number ...

Page 93: ...omer service reps who will request a return kit and begin your refund process STEP 5 Drop off the prepaid return envelope to the carrier indicated on the prepaid return label STEP 4 Place the box in the shipper envelope Peel the adhesive strip and close the self sealing prepaid return envelope STEP 3 Place all of the Eargo system contents back in the original box Be sure to include both devices an...

Page 94: ...rademarks of Eargo Inc The Eargo and Eargo Max wordmarks as well as the Eargo Logo are trademark of Eargo Inc 2017 Eargo Inc User Guide LBL0153 Rev A 12 17 Support 1 800 261 0702 www EARGO com This is a new product not used or refurbished ...

Reviews: