background image

This would allow the UART2 as the console port and USB and UART1 are bridged together (not 
console).  This configuration can be used to program an Arduino or Basic Stamp in circuit.  You must 
also enable DTR and RTS to reset those products during programming.  Appnote to follow.

31

Summary of Contents for ezLED-3 Series

Page 1: ...User Manual ezLCD 3xx Product Family Version 1 4 June 20 2012 Requires Firmware Version 1 40 or Later 1 ...

Page 2: ...LCD 30x Grammar 11 5 2 Creating and Saving Macros 12 5 3 Always Comment 12 6 0 EarthSEMPL Macros 13 6 1 STARTUP EZM Your Most Important Macro 14 7 0 Images 15 7 1 Resizing an Image in Photoshop 15 7 2 Resizing an Image in Windows Paint 16 8 0 Colors 17 8 1 Set Current Color 17 8 2 Set Custom Color 17 9 0 Drawing 18 9 1 Drawing a single pixel 18 9 2 Drawing a line 18 9 3 Drawing a box 18 9 4 Drawin...

Page 3: ...e 56 15 0 Ports Embedding the ezLCD 3xx 57 15 1 The ezLCD 3xx Command Port 57 15 2 Command Port Management 58 16 0 Start Something with your ezLCD 3xx 59 17 0 Warnings Errata and Gotchas 60 18 0 Gratis a note from Randy Schafer 61 Appendix A ezLCD 30x Connector Pinout 62 Appendix B ezLCD 30x Model Descriptions and Drawings 63 Appendix C EarthSEMPL Colors 65 Appendix D EarthSEMPL Command Reference ...

Page 4: ...r He started this product line in 2003 with his winning of a Circuit Cellar Design contest submitting a design that used an 8 bit micro to drive a color TFT display Michal passed on to the big lab in the sky in the spring of 2011 I know he s probably smiling down at us as he adapts the ezLCD 3xx into that CNC mill he was always tinkering with in his garage We hope that you enjoy using your ezLCD 3...

Page 5: ...Lion see Appendix F For Linux visit www EarthLCD com ezLCD 30x for more information We ve written this manual to introduce a whole new generation of ezLCD products not just to our existing customer base but also to the Arduino enthusiast the Maker crowd and engineering students who are excited about making their projects as dynamic and exciting as the smart phone they carry in their pocket Advance...

Page 6: ...ontroller chip or board PIC ARM AVR Arduino BASIC Stamp SBC to do their control functions The microcontroller would typically communicate to the ezLCD 3xx through a serial port The ezLCD 3xx is designed to require the least amount of system dependent software in order to develop programs as quickly as possible ASCII commands allow any standard terminal program to talk to the ezLCD for demonstratin...

Page 7: ...D 3xx USB Flash Drive Operation 4 3 Install the USB CDC Driver 4 4 Run the Terminal Program 4 5 Verify Connection 4 6 Flash Drive Access 4 7 Hello Earth Your First ezLCD Program 4 1 Connect the ezLCD USB to Your PC Connect the USB cable to the ezLCD 30x and then to your PC The ezLCD 30x will power up and display the splash screen Figure 1 The splash screen appearance will vary depending on your fi...

Page 8: ...ext click the Browse button and select the flash drive labeled ezLCD 30x that was automatically installed earlier Click the OK button and click the Next button This will begin installing the software Windows Security may prompt you that Windows can t verify the publisher of this driver software Select the Install this driver software anyway option After a moment the device should be installed succ...

Page 9: ...dows XP Click the Continue Anyway button After a moment the device should be installed successfully When you click the Finish button the device manager will display your device with a COM port in parenthesis next to it Figure 3 Make a note of this COM Port number to use in configuring the Termie Terminal program in Chapter 4 4 4 4 Run the Termie Terminal Program Locate the TERMIE EXE serial termin...

Page 10: ... are modifying the contents with serial commands 2 When you finish updating the flash drive contents on the PC make sure you eject the drive The drive may be ejected from the PC by right clicking the ezLCD drive letter and clicking EJECT in Windows Explorer 3 The flash drive file system uses DOS 8 3 format that allows filenames up to 8 characters followed by a period and a 3 character extension If...

Page 11: ...AMETER can be a number string index or comment Between every COMMAND and PARAMETER you must leave a space comma or tab a Numbers and indexes inputs are 16 bits and can be decimal Binary 0b100110111 or Hex 0x3456 or 0h7E54 Any number over 16 bits will be truncated b Strings can be any combination of ASCII characters and should be enclosed by a double quote String 1 A string may also use the back sl...

Page 12: ...e the commands into an editor on your PC and save as an ezm file on the ezLCD Flash drive in the EZUSER MACROS directory See Section 6 0 for detailed information on writing macros 5 3 Always Comment While the Hello Earth program may be simple to read and understand for an experienced programmer courteous programmers put a comment on every line A single quote in a command line tells the ezLCD 30x c...

Page 13: ... it Calling it Hello ezm is a good choice since the word Hello has only 5 characters To run the macro go back to your terminal program and type PLAY HELLO HELLO EARTH will appear on your screen exactly as it did when you typed the program in line by line To run other macros just type PLAY and the macro name One benefit of creating macros with a text editor is that it gives you the opportunity to t...

Page 14: ... for your application For images fonts and macros including startup ezm files the ezLCD 30x will check the EZUSER MACROS directory first If it does not find it there it will then look in the EZUSER directory In rare cases you may make your ezLCD inoperable by what you put in startup ezm so we highly suggest that when you make a copy of it in the EZUSER MACROS directory and name it to test ezm and ...

Page 15: ... would be slightly different Open the image in Photoshop and select the crop tool from the toolbar With the crop tool selected set the width and height ratio of your crop At the top of the screen are two boxes labeled width and height Set the width value to 4 and the height value to 2 4 Drag the crop tool across your photo diagonally and resize the crop window by grabbing the corner handles When y...

Page 16: ...o achieve a ratio of 4 2 4 Once you ve achieved the desired size select the Crop button Next select the Resize button A dialog box will appear entitled Resize and Skew Figure 6 Select Pixels and uncheck the Maintain aspect ratio box Enter 400 as the horizontal value and 240 as the vertical value Select OK Figure 6 To confirm that your image has been sized properly open the Image Properties dialog ...

Page 17: ...current color will remain active until you change it 8 2 Set Custom Color The COLORID command allows you to set custom colors by entering their RGB values The first 16 COLORIDs are not changeable COLORID id R G B To set a custom color an index number id and RGB values R G B must be assigned Use IBM blue as an example We know that the RGB values of IBM blue are Red 83 Green 120 and Blue 179 on the ...

Page 18: ...us command Default is 0 0 upper left corner after CLS 9 1 Drawing a single pixel Typing the command PLOT will modify the pixel at the current position to the current color Typing the command PLOT x y will modify the pixel at the x y position to the current color 9 2 Drawing a line Typing the command LINE x y draws a line from the current xy position to x y using the current color and line type The...

Page 19: ...start Replace e with the end angle at which you want the section to end 9 6 Drawing an arc Typing the command ARC R S E F draws an arc at current XY position Replace R with the desired radius of the arc in pixels Replace S with the start angle at which you want the arc to start Replace E with the end angle at which you want the arc to end Replace F with either a 0 1 or F 0 or no value dictates an ...

Page 20: ...your font file to use PRINT HELLO display the string to screen The word HELLO will appear in the center of the screen and display in the NEURO font 72 pixels tall The PRINT command always displays text on the screen of the ezLCD 30x at the current XY position When using the PRINT command be sure to place double quotes around the text you want to appear In addition to printing at the current XY pos...

Page 21: ...ghts and widths To see a macro that demonstrates this type PLAY ALIGN in your terminal program The command fonto option will change the orientation or direction the text prints option 0 horizontal orientation 1 vertical orientation Since the vertical orientation is relatively uncommon it is a good idea to set the orientation back to horizontal when exiting a macro else other macros might behave in...

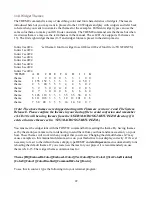
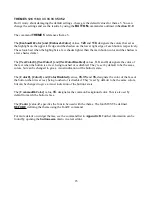
Page 22: ... 106 3 3 3 12 12 101 0 6 theme 7 58 48 3 3 3 14 14 54 0 7 Note The above themes were shipped starting with Firmware version 1 1 and File System Release E Please confirm the themes in your startup file to avoid confusion and remember ezLCD 30x will be using themes from the USER MACROS STARTUP EZM directory if it exists otherwise themes set in SYS MACROS STARTUP EZM You must set the widget font with...

Page 23: ...color of the text when the button is at rest being touched or is disabled They re set by default to be the same colors but can be changed to give a visual indication of the button s state The Color0 Color1 and ColorDisabled values 35 35 and 35 designate the color of the face of the button when it is at rest being touched or is disabled They re set by default to be the same colors but can be change...

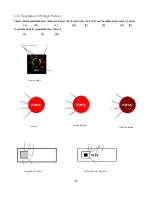
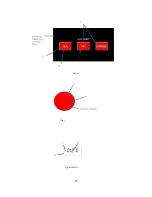
Page 24: ... ID EmbossDkColor EmbossLtColor TextColor0 TextColor1 TextColorDisabled Color0 Color1 A B C D E F G H ColorDisabled CommonBkColor Fontw I J K 24 Analog Meter Button Pressed Button Disabled Button Disabled Checkbox Filled Checked Checkbox ...

Page 25: ...25 Dial Choice Digital Meter ...

Page 26: ...26 Progress Bar Radio Button Slider Slider scroll bar option ...

Page 27: ...27 Static Box Framed Static Box ...

Page 28: ... option stops a macro and waits for an event to happen options are T touch T No touch TR Touch and Release IO 1 9 wait for 1 IO 1 9 wait for 0 For options IO 1 9 or IO 1 9 you can assign the IOs to a button or such for the wait command Then once the event happens the macro will continue to run Ios 10 33 can be used with the expander board SECURITY option password allows you to to lock the flash dr...

Page 29: ...or ERASE name is used to delete or erase files that are in a directory without having to locate them in the flash drive name needs to be in double quotes You will also need to make sure you change to the directory the file is in Also include the file type extension REN original new changes the file s original name to new name It names to be in double quotes as well as have file extension type at t...

Page 30: ...IO improperly The CFGIO command should be used to assign port pins to the peripherals as needed Example1 CMD CDC Configure Command Port to USB CDC cfgio 4 serial2_tx 115200 N81 Configure Command Port to SERIAL2 cfgio 3 serial2_rx 115200 N81 BRIDGE DEBUGSERIAL2 This configuration will allow you to use either the USB or UART2 as command port It is most useful when debugging a connection to a micropr...

Page 31: ...nsole port and USB and UART1 are bridged together not console This configuration can be used to program an Arduino or Basic Stamp in circuit You must also enable DTR and RTS to reset those products during programming Appnote to follow 31 ...

Page 32: ...urrent widget references Widgets are powerful in that they can be drawn typically by just issuing the command followed by the parameters and this can take as little as 11 bytes Widgets use preset but customizable themes Widgets that have values like progress bar and meters can be updated by sending the appropriate widget value command Every widget has a unique ID and this value should be different...

Page 33: ... width height options value min max theme stringID type ameter_value ID value ameter_color ID color1 color2 color3 color4 color5 color6 EXAMPLE cls white clears the screen to white string 1 testing the word will appear at the bottom of the widget fontw 0 sans24 widget font needs to be set before the theme theme 0 0 1 2 3 4 5 6 7 8 0 colors are to distinguish different parts of widget ameter_color ...

Page 34: ...f the widget in pixels The options 1 designates the DRAW option of the analog meter To delete the widget use command CLS For Option 2 disabled the widget looks as it does for Option 1 Option choices 1 draw 2 disabled 3 ring 4 accuracy Draw prints the widget to screen Disabled draws a widget that can no be affected or changed Ring draws the widget with an arc ed bar around numbers Accuracy allows y...

Page 35: ...ors of the 6 zones of indicating lines and numbers of the meter arc The zones starts at 1 at the left end of the arc and 6 being the right end of the arc For half meter type only colors 3 6 are used For quarter meter type only colors 5 and 6 are used The type is the meter type style you want to use By default the meter type is set to full For the half sized ameter you will need to adjust width to ...

Page 36: ...ation Your ezLCD 3xx has the ability to display custom themed buttons button ID x y width height options align radius theme stringID Example cls white clears the screen to white string 1 testing the word will appear at the center of the widget fontw 0 sans24 widget font needs to be set before the theme theme 0 0 1 2 3 4 5 6 7 8 0 colors are to distinguish different parts of widget button 1 10 10 1...

Page 37: ... pressed disabled 6 toggle not pressed disabled The align value designates the alignment of the text as it appears on the button Alignment choices 0 centered 1 right 2 left 3 bottom 4 top The radius value designates the corner radius of the button corners in pixels A value of 0 achieves a square corner while a value that is half the length of one side will give a round button To see some different...

Page 38: ...To write a text string type the following STRING 0 HELLO and the word HELLO will appear on any button that designates text string 0 Note To create multi line text on buttons use n in the string contents Example string 5 Wrap nText will appear on 2 lines 38 ...

Page 39: ...ing it will send TZR1 to the Command Port Moving off the touchzone before releasing will generate TZC1 The touchzone command contains six different values The ID value 1 99 is the id number of this particular touchzone You can create many different touchzones but they should not over lap The x and y values designate the location of the touchzone on the screen as the XY coordinate of the upper left...

Page 40: ...checkbox ID x y width height options theme stringID Example cls white clears the screen to white string 1 testing the word will appear at the bottom of the widget fontw 0 sans24 widget font needs to be set before the theme theme 0 0 1 2 3 4 5 6 7 8 0 colors are to distinguish different parts of widget checkbox 1 30 30 225 50 1 0 1 draws unchecked initially checked when pressed Images of Widget Opt...

Page 41: ... The options designates the initial state of the checkboxes Option choices 1 draw unchecked 2 draw disabled 3 draw checked 4 redraw The theme changes the colors on the widget The stringID designates the id number of the text string that you d like displayed next to the text string 41 ...

Page 42: ...ice string theme Example fontw 0 sans24 widget font needs to be set before the theme theme 0 0 1 2 3 4 5 6 7 8 0 theme for buttons has no affect on bacground CHOICE Got Milk 0 quotes around string Images of Widget Options Pressing the YES NO or CANCEL button will output a 1 0 or 1 respectively to the Command Port The CHOICE command contains two different values string Got Milk will be printed abov...

Page 43: ...ing it will move the DIAL in increments of VALUE and output the VALUE to the Command Port The DIAL command contains nine different parameters The ID value 1 99 is the id number of this particular widget You can create many different widgets as long as each ID is unique regardless of widget type The x and y values designate the location of the widget on the screen as the XY coordinate of the center...

Page 44: ...The value designates the initial dial value The max value designates the largest value of the dial s input The theme value sets widget theme Note Themes 0 7 are predefined in the STARTUP EZM macro 44 ...

Page 45: ... x y width height option value digits dp theme dmeter_value ID value Example cls white clears the screen to white fontw 0 sans24 widget font needs to be set before the theme theme 0 0 1 2 3 4 5 6 7 8 0 colors are to distinguish different parts of widget dmeter 1 50 50 200 160 14 0120 4 1 0 background is green with a thin yellow frame pause 2000 pauses for 2 seconds dmeter_value 1 123 changes value...

Page 46: ...e widget in pixels The option determines the alignment of the digits and whether the box is framed Option choices 1 left 2 disabled 3 right 4 center 11 left framed 12 disable framed 13 right framed 14 center framed 6 redraw The value designates and displays the initial setting of the readout as it appears on the meter The digits value designates the number of digits displayed on the meter The dp v...

Page 47: ...me theme 0 0 1 2 3 4 5 6 7 8 0 colors are to distinguish different parts of widget gbox 1 20 30 300 200 1 0 1 Images of Widget Options The GBOX command contains eight different values The ID is the id number 1 99 of this particular widget You can create many different widgets as long as each ID is unique regardless of widget type The x and y values designate the location of the widget on the scree...

Page 48: ...the ability to display custom themed progress bars Changing the PROGRESS_VALUE setting 25 will update the BAR and PERCENT without having to redraw the whole widget progress ID x y width height option value max theme progress_value ID value Example cls white clears the screen to white fontw 0 sans24 widget font needs to be set before the theme theme 0 0 1 2 3 4 5 6 7 8 0 colors are to distinguish d...

Page 49: ... the widget on the screen as the XY coordinate of the upper left corner The width height values designate the width and height of the widget in pixels The option designates the option of the progress bar Option choices 1 draw horizontal 2 horizontal disabled 3 vertical 4 vertical disabled 5 redraw horizontal 6 redraw horizontal disabled 7 redraw vertical 8 redraw vertical disabled The value value ...

Page 50: ...ringID Example cls white clears the screen to white string 1 testing the word will appear at the bottom of the widget fontw 0 sans24 widget font needs to be set before the theme theme 0 0 1 2 3 4 5 6 7 8 0 colors are to distinguish different parts of widget radio 1 25 50 230 35 5 0 1 radio 2 25 95 230 35 1 0 1 Images of Widget Options Pressing high medium or low will send either a RB0 RB1 or RB2 r...

Page 51: ...rst button in a group Options 4 5 therefore allows you to have more than one group of buttons occupying the screen at the same time When Options 4 or 5 are specified in a button command the following buttons are in the same group as the first until another first button is defined Then the buttons created after will be in the second group If you make a button first unchecked remember to draw one bu...

Page 52: ...ite fontw 0 sans24 widget font needs to be set before the theme theme 0 0 1 2 3 4 5 6 7 8 0 colors are to distinguish different parts of widget slider 1 20 30 100 50 1 75 5 25 0 Images of Widget Options Pressing and sliding the slider thumb handle will update the slider value and image without redrawing the whole widget and output the setting to the Command Port The SLIDER command contains ten dif...

Page 53: ...orizontal disabled 3 vertical 4 vertical disabled 5 horizontal slider 6 horizontal slider disabled 7 vertical slider 8 vertical slider disabled The range value designates that the minimum and maximum value is 0 75 The resolution value designates the increments in the range So the indicator or the thumb will be a value of every other 5 numbers such as 10 15 20 25 30 35 75 The value value designates...

Page 54: ... width height option theme stringID static_value ID string Example cls white clears the screen to white string 1 testing the word will appear at the bottom of the widget fontw 0 sans24 widget font needs to be set before the theme theme 0 0 1 2 3 4 5 6 7 8 0 colors are to distinguish different parts of widget static 1 10 25 220 25 5 0 1 static box w green background yellow frame Images of Widget Op...

Page 55: ...Y coordinate of the upper left corner The width and height values designate the width and height of the widget in pixels The option designates the mostly the alignments of the STATIC widget Redraw clears the background of the assigned area then rewrites the text Option choices 1 left 2 disabled 3 right 4 center 5 left framed 6 disabled framed 7 right framed 8 center framed 9 redraw The theme is th...

Page 56: ... this cycle however needed snapshot x y width height filename Example PLAY FACE SNAPSHOT 0 0 400 240 PIC A file named PIC BMP is saved in the EZUSER IMAGES directory of the ezLCD flash drive The SNAPSHOT command has five different values The x and y values designate the starting XY coordinate at the upper left corner The width and height values designate the area of the screen for SNAPSHOT to capt...

Page 57: ...dget This option will disable a previously created widget that is enabled The Widget is redrawn with the disable colors in the Theme 3 Redraw the widget This option will redraw a previously created widget This is useful if the widget has been over written by other text or if the string has been modified and needs to be redrawn on the widget Examples cls white clears the screen to white string 1 te...

Page 58: ...er s custom fonts images and macros Note It is recommended to make a copy of the EZSYS directory on your PC hard drive in case of accidental alteration of that directory on your flash drive The EZSYS default directory is also available for download on the EarthLCD website EZSYS FONTS default font files ezf EZSYS IMAGES default image files gif jpg bmp EZSYS MACRO demonstration EarthSEMPL macro file...

Page 59: ...us generations of the ezLCD most customers will use the provided tools and their PC to develop their user interface In a typical application the ezLCD is connected to a micro controller through one of its ports The CMD command will let you set the command port to another besides the factory default USB Most ezLCD application notes will use serial port 2 which is set by the following command First ...

Page 60: ... you have the terminal program hooked to the USB port when your ezLCD is plugged into a PC you can simply type the appropriate CMD command shown above to switch back and forth For testing without USB hooked up just create a startup ezm file with the CMD to switch the command port to your micro controller host in the EZUSER MACROS directory The EZUSER MACRO directory will be searched at power up or...

Page 61: ...y and then rename and modify them We went through extra effort to document them as examples to learn from The possibilities and applications for the ezLCD 3xx are well beyond the scope of this manual However in the coming months the staff consultants customers and maybe even you will develop application notes that will be available on the product web page at www earthlcd com ezLCD 30x File updates...

Page 62: ...rthlcd com and it will be addressed ASAP Do not play a macro of the same name within itself When modifying the startup file copy it from the SYS MACRO directory to the USER MACRO directory and name it something like TEST ezm Modify this file as you want Then run the macro with PLAY TEST After your changes are confirmed working like you want then rename the macro to STARTUP ezm Debugging a live sta...

Page 63: ... come to Earth and make one more great product because I guaranteed him it would be fun Also my wife Kate and Rich s wife Phyllis are to be commended for having patience with their geek husbands absence while this product was developed To all the employees consultants and interns that help wring out the bugs on the prototypes thank you And last but not least the customers of the last two generatio...

Page 64: ...owing command to set the command port to serial port 2 on IO3 IO4 CMD SERIAL2 115200 1 N81 For firmware 1 4 on use cfgio 4 serial2_tx 115200 N81 Configure Command Port to SERIAL2 cfgio 3 serial2_rx 115200 N81 cmd serial2 115200 BAUD No Parity 8 bits 1 Stop Bit Sets command port IO3 Pin 8 to RX and IO4 Pin 7 to TX Note RX is receive Input signal and TX is Transmit Output signal and the signals are ...

Page 65: ...escriptions and Drawings ezLCD 301 400 x 240 Wide 10 6 65 536 Transmissive Color TFT with Resistive TouchScreen Connector Drawing See 16 Pin http www hirose co jp cataloge_hp e54305002 pdf Connector Placement Mechanical Drawing 65 ...

Page 66: ...ezLCD 302 240 x 160 4 3 4096 Reflective Color TFT Sunlight Readable NO Touchscreen 66 ...

Page 67: ...Appendix C EarthSEMPL Colors 67 ...

Page 68: ...68 ...

Page 69: ...69 ...

Page 70: ...70 ...

Page 71: ...71 ...

Page 72: ... 42 papaya whip 43 moccasin 44 peach puff 45 pale golden rod 46 khaki 47 dark khaki 48 lavendar 49 thistle 50 plum 51 violet 52 orchid 53 fuchsia 54 medium orchid 55 medium purple 56 blue violet 57 dark violet 58 dark orchid 59 dark magenta 60 purple 61 indigo 62 dark slate blue 63 slate blue 64 medium slate blue 65 green yellow 66 chartreuse 67 lawn green 68 lime 69 lime green 70 pale green 71 li...

Page 73: ...00 light blue 101 sky blue 102 light sky blue 103 deep sky blue 104 dodger blue 105 cornflower blue 106 royal blue 107 blue 108 medium blue 109 dark blue 110 navy 111 midnight blue 112 corn silk 113 blanched almond 114 bisque 115 navajo white 116 wheat 117 burly wood 118 tan 119 rosy brown 120 sandy brown 121 golden rod 122 dark golden rod 123 peru 124 chocolate 126 saddle brown 127 sienna 128 bro...

Page 74: ...x are listed below Input values can be an integer between 32768 and 32767 Strings can be up to 64 characters Examples and descriptions are provided for each command in the table Note that this command list is updated from time to time and you should check the ezLCD 30x product page at EarthLCD com for the latest documentation 74 ...

Page 75: ... B COLORID 1 45 56 64 R G B can be values of 0 255 7 COLORID ID COLORID 1 COMMENT 50 COMMENT COMMENT Anything Same as remark COPY 56 COPY name1 name2 Copy file name1 to file name2 CWD 51 CWD CWD Display current w orking directory SHORT FORM Draw ARC w ith Radius Start angle and End angle Fill 1 or F to fill arc Angle of 0 is on the right Place a box from current XY w ith specified w idth and heigh...

Page 76: ... in Use internal font factory Currently 0 and 2 default medium font Use programmable font ezf file from flash drive Set font orientation 0 horizontal 1 vertical Use programmable w idget font ezf file from flash drive for each of 16 Themes FORMAT passw ord volume_label Formats by removing files in flash drive Type the command exactly as it is show n in example Prints command s syntax and some infor...

Page 77: ...name Looks in directory EZUSER MACROS first and if not found it looks in EZSYS MACROS Place a pixel at current XY w ith current color Place a pixel at X Y w ith current color Print string in String Array pointed to by index to the display 9 font justifications LT CT RT LC CC RC LB CB RB Print string to the display at current X Y 9 font justifications LT CT RT LC CC RC LB CB RB Record macro name to...

Page 78: ...78 ...

Page 79: ... 1 draw 2 disabled 3 ring 4 accuracy AMETER_COLOR ID color1 color2 color3 color4 color5 color6 AMETER_COLOR 1 4 5 6 blue green yellow Change the colors used for the 6 analog meter quadrants Update the value of an Analog Meter and redraw it BUTTON ID x y w idth height options align radius theme stringID BUTTON 1 25 25 75 75 1 0 0 2 1 Options 1 draw 2 disabled 3 pressed 4 toggle Align 0 centered 1 r...

Page 80: ...TIC_VALUE ID string STATIC_VALUE 1 Hello THEME 90 THEME 0 1 2 3 4 5 6 7 9 10 WSTATE 92 WSTATE ID options WSTATE 1 3 RADIO ID x y w idth height option theme stringID Options 1 draw 2 disabled 3 checked 4 first 5 first and checked SLIDER ID x y w idth height options range resolution value theme SLIDER 1 20 30 100 50 1 75 5 25 1 Options 1 draw hori 2 hori disabled 3 vert 4 vert disabled 5 hori scroll...

Page 81: ...hown in the ezLCD 30x Getting Started section of this manual NOTE Once you put the ezLCD in firmware upgrade mode it cannot come out of this state until new firmware is programmed using the provided program even if you unplug it Step 1 Put the ezLCD in Firmware Upgrade Mode Type in the following command line Upgrade ezLCD The command must be typed exactly and is case sensitive You should receive t...

Page 82: ...f you get the FSINIT FAILED instead of the splash screen you will need to reformat the ezLCD flash drive Format the ezLCD using quick format by right clicking the drive in file manager and selecting the button Restore Device Defaults Step 10 Load the new file system if you re formatted or downloaded a new file system from the EarthLCD website Step 11 Reconnect your terminal program and enjoy your ...

Page 83: ...ty usbmodemfa132 for example If you see more then one USB device you can unplug your ezLCD 30x to see which one goes away and then plug it back in to get the device name Step 3 Set the terminal mode to serial port mode using the screen command usbmodemfa132 should be replaced with the result of Step 2 screen dev tty usbmodemfa132 Step 4 Type CLS and the ezLCD 30x screen should clear and you can go...

Reviews: