14
Owner’s Manual
MC33 2-CYCLE CULTIVATOR
Get parts online at
www.GetEarthquake.com
or Call
800-345-6007
M-F 8-5 CST
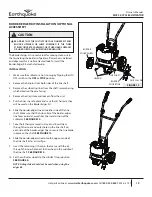
FIGURE 9
MAINTENANCE AND STORAGE
STEPS FOR WORKING ON EQUIPMENT
1. Turn engine switch to the OFF position.
2. Disconnect the spark plug wire from the spark plug. SEE
FIGURE 9.
3. Securely place the disconnected spark plug wire away
from the spark plug and any metal parts. This must always
be done or arcing may occur between spark plug wire and
metal parts.
4. Replace or repair the part on the cultivator.
5. Check all parts that were repaired, or removed during
repair, that they are secure and fit correctly.
NOTE: All repair parts must come from the factory.
Never replace parts that are not specifically designed
for the cultivator.
6. Reconnect the spark plug wire.
CULTIVATOR MAINTENANCE
1. The transmission case has grease installed at the factory. It
is recommended to check grease level once a year. Add a
molylithium type grease into the lower grease port only if
the grease is below the level of the upper grease port. DO
NOT OVERFILL. SEE FIGURE 10.
SPARK PLUG
WIRE
ADJUSTING WHEELS AND DRAG STAKE
The wheels on the tiller cultivator can be adjusted to one of
three positions. The LOW wheel position is used for transport-
ing the tiller cultivator across a smooth level surface while the
engine is not running. The MIDDLE and HIGH wheel positions
are used when tilling in soil and help stabilize the unit when
tilling at different depths. SEE FIGURE 6.
TO ADJUST WHEELS UP OR DOWN DO AS FOLLOWS:
SEE FIGURES 6 AND 7.
1. Pull the locking metal sleeve against the spring, away from
the vertical guide until it releases from one of the three
notched positions in the vertical guide.
2. Slide the wheel set up or down to the desired position,
and release the locking metal sleeve until it locks into
desired notch in the vertical guide.
TO ADJUST THE DRAG STAKE DO AS FOLLOWS: SEE
FIGURE 8.
The drag stake is used to help regulate tilling depth and con-
trol the tiller cultivator from leaping forward during operation.
Resistance to forward motion is greatest when the drag stake
is set in its lowest position allowing for deeper cultivation.
1. Pull the lock pin out of the drag stake mount hole.
2. Position drag stake so the pointed tip is directed downward.
3. Insert lock pin into the hole that achieves desired depth.
FIGURE 8
LOCK PIN
FIGURE 6
HIGH POSITION
FIGURE 7
MIDDLE POSITION
UNLOCKED POSITION
LOCKED POSITION
LOW POSITION
LOCKING METAL
SLEEVE
EXPANDED
SPRING
COMPRESSED
SPRING
DRAG
STAKE


