background image

American Lawn Mower Company  

The Great States Corporation 

7444 Shadeland Station Way

, 

Indianapolis, IN 46256


Phone 1-800-633-1501 

www.americanlawnmower.com 

In a continued commitment to improve quality, the Manufacturer reserves the right to 

make component changes or design changes when necessary.  

OWNER’S MANUAL 

SN75018 18-IN Snow Thrower 


Copyright All Rights Reserved. 

Rev. 04

/

13

/

2021 

WARRANTY POLICY 

Two (2) year limited warranty on Earthwise outdoor power equipment.


Earthwise 

warrants to the original owner that each new product and service part is free from defects in 

materials and workmanship and agrees to repair or replace any defective product or part for the warranty  period 

as stated above from the original date of purchase except for the conditions and circumstances listed below: 

This warranty applies only to the original purchaser at   

retail and may not be transferred. 

Warranty applies if the product is used for personal, 

household or family use. Warranty is void if product is 

used for commercial, industrial or rental purposes. 

Warranty does not include repairs necessary due to       

operator’s abuse or negligence (including overloading 

the product beyond capacity or immersion in water), or 

the failure to assemble, operate, maintain or store the 

product according to the instructions in the owner’s 

manual. 

This warranty is not transferable and 

only applies to product sold directly 

from an authorized retailer. 

This warranty 

does not apply to any product, new or used,  purchased 

through unauthorized third-party channels. 

ANY INCIDENTAL, INDIRECT OR CONSEQUENTIAL 

LOSS, DAMAGE, OR EXPENSE THAT MAY RESULT 

FROM ANY DEFECT, FAILURE OR MALFUNCTION 

OF THE PRODUCT IS NOT COVERED BY THE              

WARRANTY. Some states do not allow the exclusion or 

limitation on how long an implied warranty lasts, so the 

above limitation may not apply to you. 

Products sold damaged or incomplete, sold “as is”, or 

sold as reconditioned are not covered under the warranty. 

Damage or liability caused by shipping, improper         

handling, improper assembly, incorrect voltage, improper 

wiring, improper maintenance, improper modification or 

the use of accessories and/or attachments not specifically 

recommended is not covered by this warranty. 

Expendable items that become worn during normal use 

are not covered by the warranty. 

Warranty does not cover damage caused by cold, heat, 

rain, excessive humidity, corrosive environments and 

materials, or other contaminants. 

Warranty does not include installation, assembly or     

normal adjustments explained in the owner’s manual. 

The expense of delivering the product to the vendor and 

the expense of returning the product or replacement parts 

to the owner is not covered by the warranty. 

The warranty does not cover normal deterioration of the     

exterior finish, including but not limited to scratches, 

dents, paint chips or any corrosion or discoloration 

caused by heat, abrasive and chemical cleaners. 

Proof of purchase, original dated sales receipt, must accompany all 

warranty claims. 

Summary of Contents for SN75018

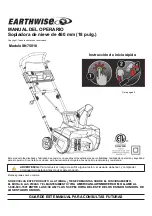
Page 1: ...TWEEN 8 AM 5 PM EST MONDAY FRIDAY FOR ASSISTANCE SAVE THIS MANUAL FOR FUTURE REFERENCE This product has been engineered and manufactured to our high standard for dependability ease of operation and op...

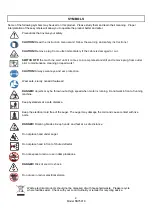
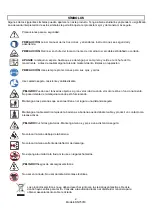
Page 2: ...DANGER Rotating blades Keep hands and feet at a safe distance Do not place hand under auger Keep the electrical cord free of the auger The auger may damage the cord and cause contact with live parts...

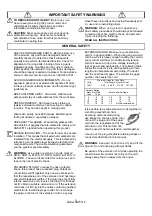
Page 3: ...The double insulation guarantees you the greatest possible safety WARNING Use outdoor extension cords marked SW A SOW A STW A STOW A SJW A SJTW A or SJTOWA These cords are rated for outdoor use and r...

Page 4: ...IT INTERRUPTER GFCI protection should be provided on the circuit or outlet to be used for the snow thrower Receptacles are available having built in GFCI protection and may be used WARNING Never put y...

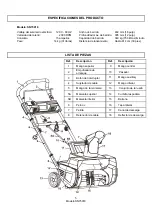
Page 5: ...ds minute Weight 31 pounds Throwing distance Up to 30 feet 5 Model SN75018 PARTS LIST No Description 1 Upper handle 2 Bail wire 3 Switch button 4 Cable clip 5 Crank handle 5A Upper crank 5B Lower cran...

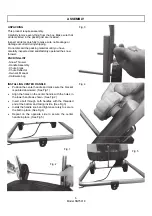
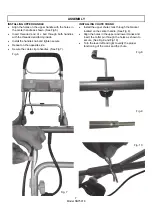
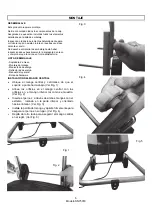
Page 6: ...LIST Snow Thrower Handle Assembly Chute Crank Chute Deflector Owner s Manual Hardware bag INSTALLING CENTER HANDLE Position the center handle and make sure the bracket is pointed downward See Fig 1 A...

Page 7: ...ever left and right to verify the proper functioning of the crank and the chute ASSEMBLY 7 Model SN75018 INSTALLING UPPER HANDLE Align the holes on the upper handle with the holes in the center handle...

Page 8: ...washer onto the discharge chute See Fig 12 Position the chute deflector over the discharge chute Align the holes and place the washer between the deflector and chute See Fig 13 Secure tightening the...

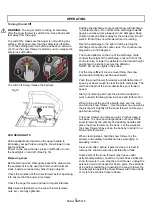
Page 9: ...on When clearing steps hold the snow thrower by the primary and auxiliary handles and use a swinging or sweeping motion Clear snow often before it gets too deep It is best to remove the snow as soon a...

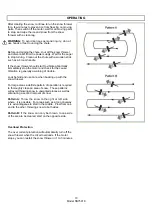
Page 10: ...se Vibration is generally a warning of trouble Look behind and use care when backing up with the snow thrower For large areas a definite pattern of operation is required to thoroughly clean an area of...

Page 11: ...soaked with hot water and a soft brush to clean the snow thrower Never wet or spray water on the machine Do not use detergents or solvents as these could cause irreparable damage to the snow thrower C...

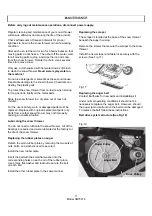
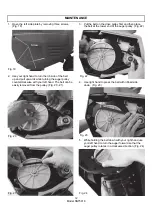
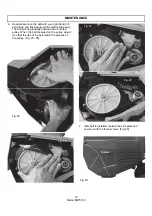
Page 12: ...y removed from the pulley Fig 20 21 12 Model SN75018 3 Put the belt on the drive pulley first and then place the belt at the lower end of the auger pulley Fig 22 4 Use right hand to press the belt wit...

Page 13: ...belt will be gradually pushed down onto the pulley When the belt is seated on the pulley adjust it so that the ribs of the belt match the grooves on the pulley Fig 25 28 Fig 25 13 Model SN75018 7 Afte...

Page 14: ...cable Plug in the unit Check power supply Check cable Repair or replace if required Poor results Drive belt worn or damaged Auger worn or damaged Discharge chute blocked Replace the drive belt Replac...

Page 15: ...TS The model number of this tool is found on a plate or label attached to the housing Please record the serial number in the space provided below NAME OF ITEM Snow Thrower MODEL NUMBER SN75018 SERIAL...

Page 16: ...ctly from an authorized retailer This warranty does not apply to any product new or used purchased through unauthorized third party channels ANY INCIDENTAL INDIRECT OR CONSEQUENTIAL LOSS DAMAGE OR EXP...

Page 17: ...5 00 PM HORA DEL ESTE DE LOS ESTADOS UNIDOS DE LOS ESTADOS UNIDOS GUARDE ESTE MANUAL PARA CONSULTAS FUTURAS Este producto fue dise ado y fabricado de acuerdo con nuestros altos est ndares de confiabil...

Page 18: ...asta que se detenga por completo y retire el enchufe del to macorriente antes de realizar alguna tarea de mantenimiento limpieza o reparaci n PRECAUCI N Use siempre protecciones para sus ojos y o dos...

Page 19: ...ento entre las piezas el ctricas y las mec nicas El doble aislamiento garantiza la mayor seguridad posible ADVERTENCIA Use cables de extensi n para exteriores rotulados con las siguientes inscripcione...

Page 20: ...sopladora de nieve deben contar con esta protecci n Se pueden utilizar recept culos que tengan la protecci n de ICFT incorporada ADVERTENCIA Nunca coloque las manos cerca de la barrena para quitar nie...

Page 21: ...tancia de lanzamiento Hasta 914 cm 30 pies 5 Modelo SN75018 LISTA DE PIEZAS Ref Descripci n 1 Mango superior 2 Empu adura de arranque 3 Bot n del interruptor 4 Sujetador de cable 5 Mango de la manivel...

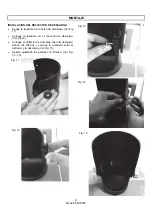
Page 22: ...A DE EMBALAJE Sopladora de nieve Montaje del mango Manivela de descarga Deflector de descarga Manual del operario Bolsa de hardware INSTALACI N DEL MANGO CENTRAL Ubique el mango central y cerci rese d...

Page 23: ...a y hacia la derecha para verificar el funcionamiento adecuado de la manivela y la descarga MONTAJE 7 Modelo SN75018 INSTALACI N DEL MANGO SUPERIOR Alinee los orificios en el mango superior con los or...

Page 24: ...lavadora en el conducto de descarga Ver Fig 12 Coloque el deflector de descarga sobre la descarga Alinee los orificios y coloque la arandela entre el deflector y la descarga Ver Fig 13 Apriete ajustan...

Page 25: ...n movimiento deslizante o de barrido Limpie la nieve con frecuencia antes de que sea demasiado profunda Es mejor quitar la nieve apenas cae Algunas piezas de la sopladora de nieve pueden congelarse en...

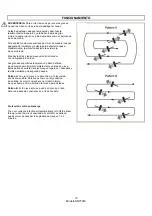
Page 26: ...sopladora de nieve Las grandes superficies requieren un patr n definido de operaci n para limpiar completamente un rea de nieve Estos patrones evitar n arrojar nieve en lugares no deseados y tambi n...

Page 27: ...agua caliente y un cepillo suave para limpiar la sopladora de nieve Nunca moje o roc e agua en la m quina No utilice detergentes ni solventes ya que podr an ocasionar da os irreversibles a la soplado...

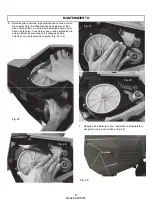
Page 28: ...ea de la polea Fig 20 21 3 Coloque primero la correa en la polea de mando y enseguida coloque la correa en el extremo inferior de la polea de la barrena Fig 22 4 Utilice la mano derecha para presionar...

Page 29: ...correa ser empujada poco a poco dentro de la polea Cuando la correa quede asentada en la polea aj stela de manera que los pliegues de sta coincidan con las ranuras de la polea Fig 25 28 Fig 25 13 Mod...

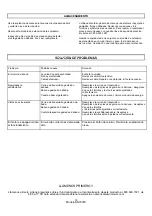
Page 30: ...vise el cable Repare o reempl celo si fuera necesario Resultados no satisfactorios Correa de transmisi n gastada o da ada Barrena gastada o da ada Canal de descarga tapado Reemplace la correa de trans...

Page 31: ...O SN75018 N MERO DE SERIE 15 Modelo SN75018 LL MENOS PRIMERO Ll menos primero si tiene preguntas sobre el funcionamiento o el mantenimiento de este producto a l 800 633 1501 de 8 00 a 17 00 hora est n...

Page 32: ...irectamente por un distribuidor minorista autorizado Esta garant a no se aplica a cualquier producto nuevo o usado adquirido a trav s de canales de terceros no autorizados CUALQUIER P RDIDA ACCIDENTAL...

Page 33: ...3 1501 E 8 h 00 17 h 00 HEURE DE L EST POUR TOUTE ASSISTANCE CONSERVEZ CE MANUEL POUR POUVOIR LE CONSULTER ULT RIEUREMENT Ce produit a t con u et fabriqu selon nos normes lev es de fiabilit de facilit...

Page 34: ...LA MACHINE Attendez qu elle soit compl tement arr t e et d branchez la fiche du secteur avant tout entretien nettoyage ou r paration ATTENTION Portez toujours une protection oculaire et auditive Porte...

Page 35: ...r alis en introduisant une couche d isolation entre les pi ces lectriques et m caniques Cette double isolation vous garantit la meilleure s curit possible AVERTISSEMENT utilisez des rallonges ext rieu...

Page 36: ...la souffleuse Des prises avec une protection GFCI int gr e sont disponibles et peuvent tre utilis es AVERTISSEMENT n approchez jamais les mains de la vis sans fin pour en retirer de la neige des brind...

Page 37: ...Distance de projection Jusqu 9 m 5 Mod le SN75018 LISTE DES PI CES N Description 1 Poign e sup rieure 2 Fil de contr le 3 Contacteur 4 Serre c ble 5 Poign e de la manivelle 5A Manivelle sup rieure 5B...

Page 38: ...e Poign e Manivelle de goulotte D flecteur de goulotte Manuel de l utilisateur Sac de mat riel INSTALLER LA POIGN E CENTRALE Positionnez la poign e centrale et assurez vous que le support pointe vers...

Page 39: ...vier vers la gauche et vers la droite pour v rifier le bon fonctionnement de la manivelle et du toboggan ASSEMBLAGE 7 Mod le SN75018 INSTALLER LA POIGN E SUP RIEURE Alignez les trous sur la poign e su...

Page 40: ...sitionnez la laveuse sur la goulotte de d charge Voir Fig 12 Positionnez le d flecteur du toboggan sur le toboggan de d chargement Alignez les trous et placez la rondelle entre le d flecteur et le tob...

Page 41: ...eure Suivez un mouvement de balancement ou de balayage Nettoyez la neige souvent avant qu elle ne devienne trop profonde Il est pr f rable de d neiger d s que possible apr s la fin de la chute de neig...

Page 42: ...r compl tement la neige Les trajets sugg r s permettent d viter de projeter de la neige dans les endroits non voulus et d avoir repasser une seconde fois Trajet A projetez la neige vers la droite ou v...

Page 43: ...pour vider celle ci Utilisez uniquement un chiffon imbib d eau chaude et une brosse poils doux Ne mouillez pas la machine et ne la lavez jamais au jet N utilisez pas de d tergents ou de solvants car...

Page 44: ...facilement retir e de la poulie Fig 20 21 3 Mettez la courroie sur la poulie motrice d abord puis en bas de la poulie de la vis sans fin Fig 22 4 Avec la main droite appuyez sur la courroie c t crant...

Page 45: ...rroie sera graduellement enfonc e dans la poulie Lorsque la courroie est en place sur la poulie r glez la de fa on que les crans de la courroie correspondent aux rainures de la poulie Fig 25 28 13 Mod...

Page 46: ...ou remplacez si n cessaire Mauvais r sultats Courroie d entra nement us e ou endommag e Vis sans fin us e ou endommag e Goulotte d vacuation bouch e Remplacez la courroie d entra nement Replacer les...

Page 47: ...RO DE S RIE 15 Mod le SN75018 APPELEZ NOUS D ABORD Appelez nous d abord pour toute question concernant le fonctionnement ou la maintenance de votre tron onneuse au 1 800 633 1501 entre 8h00 et 17h00 h...

Page 48: ...it vendu directement d un fournisseur autoris Cette garantie ne s applique pas tout produit neuf ou usag achet par le biais de canaux tiers non autoris s TOUT DOMMAGE PERTE OU FRAIS CONS CUTIF INDIREC...

Reviews: