background image

RECOMENDACIONES Y SUGERENCIAS

        Las  instrucciones  de  uso  se  aplican  a 

varias  versiones  de  este  dispositivo.  En 

consecuencia,  puede  encontrar  descripciones 

de  características  individuales  que  no  se 

aplican a su dispositivo específico.
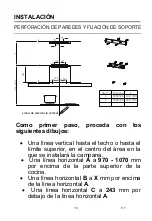
INSTALACIÓN

El  fabricante  no  será  responsable  de los 

daños  que  resulten  de  una instalación 

incorrecta o incorrecta.

La distancia mínima de seguridad entre el 

tope y la campana extractora es de 650 mm 

(algunos modelos pueden ser instalados a 

una altura más baja, favor consulte en los 

párrafos sobre las dimensiones de trabajo e 

instalación).

Compruebe  que  la  tensión  de  red 

corresponde  a  la  indicada  en  la  placa  de 

características  fijada  a  la  campana.

Para los aparatos de Clase I, verifique 

que la fuente de alimentación doméstica 

garantice una conexión a tierra adecuada.

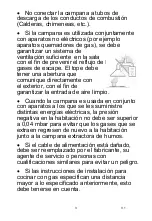
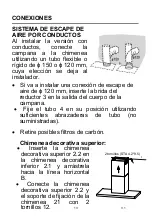
Conecte el extractor al tubo de escape a 

través de un tubo de 120 mm de diámetro 

mínimo. La ruta de la chimenea debe ser lo 

más corta posible.

2

V.1

Summary of Contents for EMRH908TX

Page 1: ...EXTRACTORA COOKER HOOD Lea este manual de Instrucciones antes de usar el aparato y consérvelo para futuras consultas Before use the appliance please read this manual carefully and keep it for future reference EMRH908TX MANUAL V 1 ...

Page 2: ...uridad entre el tope y la campana extractora es de 650 mm algunos modelos pueden ser instalados a una altura más baja favor consulte en los párrafos sobre las dimensiones de trabajo e instalación Compruebe que la tensión de red corresponde a la indicada en la placa de características fijada a la campana Para los aparatos de Clase I verifique que la fuente de alimentación doméstica garantice una co...

Page 3: ...ntrada de aire limpio Cuando la campana es usada en conjunto con aparatos a los que se les suministre distintas energías eléctricas la presión negativa en la habitación no debe ser superior a 0 04 mbar para evitar que los gases que se extraen regresen de nuevo a la habitación junto a la campana extractora de humos Si el cable de alimentación está dañado debe ser reemplazado por el fabricante su ag...

Page 4: ...la llama para dirigirla solo al fondo de la sartén asegurándose de que no sobresalga por los lados Las freidoras deben controlarse continuamente durante el uso el aceite sobrecalentado puede incendiarse No flamee debajo de la campana extractora riesgo de incendio Este aparato puede ser utilizado por niños a partir de 8 años y personas con capacidades físicas sensoriales o mentales reducidas o falt...

Page 5: ...tos de cocina MANTENIMIENTO La campana de cocina y su filtro deben limpiarse regularmente de acuerdo con las instrucciones Apague o desenchufe el aparato de la red eléctrica antes de realizar cualquier trabajo de mantenimiento Limpie y o reemplace los filtros después del período especificado riesgo de incendio Limpie la campana con un paño húmedo y un detergente líquido neutro El aparato utiliza c...

Page 6: ...recuperación y reciclado de los componentes y materiales que los constituyan y reducir el impacto en la salud humana y el medio ambiente El símbolo del cubo de basura tachado se marca sobre todos los productos para recordar al consumidor la obligación de separarlos para la recogida selectiva El consumidor debe contactar con la autoridad local o con el vendedor para informarse en relación a la corr...

Page 7: ...troles Luz Soplador Filtro 1 Interior de la chimenea decorativa 2 2 1 Exterior Chimenea decorativa 3 1 4 Cubierta opcional 1 Tubo de escape 5 2 Filtro de carbón activo opcional Componentes del producto 1 2 1 2 2 3 4 5 1 Manual de instrucciones Ud Documentación 7 V 1 ...

Page 8: ... 7 20 Tornillos 5 x 50 Soporte de fijación de la campana 7 Tapones de pared 12 21 6 Tornillos 4 2 x 9 5 1 2 Soporte de fijación para chimenea Ref Ud Componentes opcionales de instalación 11 12 10 20 21 8 V 1 ...

Page 9: ...DIMENSIONES UNIDAD mm 9 V 1 300 286 500 Opción A B 1 390 425 760 2 490 525 960 Min 650mm Min 650mm 240 286 40 60 500 A B 280 300 304 306 898 287 289 5 0 0 Chimenea 400 390 500 490 ...

Page 10: ...el centro del área en la que se instalará la campana Una línea horizontal A a 970 1070 mm por encima de la parte superior de la cocina Una línea horizontal B a X mm por encima de la línea horizontal A Una línea horizontal C a 243 mm por debajo de la línea horizontal A 10 V 1 3 Opción Chimenea X 1 400X390 160 500 2 500X490 260 700 Línea de referencia vertical C 243 100 100 ...

Page 11: ...que las dos marcas estén en la misma línea horizontal Marque un punto 3 en la línea horizontal C 100 mm a la línea de referencia vertical Repita esta operación en el otro lado verificando que las dos marcas estén niveladas Fijar los soportes Perfore orificios en los puntos marcados con una broca de ɸ10 mm Inserte los tapones de Pared 11 en los orificios Fije el soporte de fijación de la campana 20...

Page 12: ...rte de fijación de la chimenea y la chimenea con 2 tornillos 12 4 tornillos STA 4 2 9 5 Enganche del cuerpo de la campana Enganche el cuerpo de la campana al soporte 20 Nivele el cuerpo de la campana Retire el filtro del interior del cuerpo de la camapana fije los tornillos 10 a los Tapones de pared 11 en los puntos 3 Posición errónea Posición correcta 12 V 1 ...

Page 13: ...te la brida del reductor 3 en la salida del cuerpo de la campana Fije el tubo 4 en su posición utilizando suficientes abrazaderas de tubo no suministradas Retire posibles filtros de carbón Chimenea decorativa superior Inserte la chimenea decorativa superior 2 2 en la chimenea decorativa inferior 2 1 y arrástrela hacia la línea horizontal B Conecte la chimenea decorativa superior 2 2 y el soporte d...

Page 14: ...be estar apagada Cuando el tiempo de trabajo del aparato alcanza las 150 horas le recuerda al usuario que limpie el filtro pulse para reestablecer el tiempo Funciones de los botones Botón encendido están encendidos Observaciones Enciende el motor y las luces Enciende el motor Apagado automático tras 3 minutos Apaga el motor está apagado Cambia la velocidad del motor circularmente Ingresa al modo d...

Page 15: ... hacia la parte posterior de la unidad de la campana y simultáneamente tirando hacia abajo Debe evitarse cualquier tipo de doblado de los filtros al lavarlos Antes de volver a colocarlos en la campana asegúrese de que estén completamente secos El color de la superficie del filtro puede cambiar a lo largo del tiempo pero esto no influye en la eficiencia del filtro Cuando instale los filtros en la c...

Page 16: ...CARBÓN ACTIVO Retire los filtros de grasa metálicos Retire el filtro de carbón activo saturado Monte los nuevos filtros Reemplace los filtros de grasa de metal RETIRAR RETIRAR FIJAR FIJAR 16 V 1 ILUMINACIÓN SUSTITUCIÓN DE LA ILUMINACIÓN A realizar por profesionales Sustitución de los módulos de luz No se pueden reemplazar las bombillas se debe reemplazar todo el módulo de luces Al cambiar los módu...

Page 17: ...al de luz LED Presione la luz LED en la parte posterior de la placa frontal retire la luz LED Reemplace la lámpara lámpara LED disponible en el mercado max 1 5w 17 V 1 Potencia max Voltaje Imagen Tapa ILCOS D código Cuadrado Diámetro 33 2mm x 120mm 1 5W DC 12 V DSS 1 5 S 33 2 120 Presione la luz LED en la parte frontal de la placa frontal instale la luz LED en la placa frontal Conecte el terminal ...

Page 18: ...ela con pegamento Vibración Sustituya las aspas Succión insuficiente Reajuste la distancia La distancia entre la campana y la cocina es demasiado grande Los tornillos de fijación no están lo suficientemente apretados Los tornillos colgantes no están lo suficientemente apretados Compruebe las aspas Las luces están encendidas pero el motor no funciona El aspa si está dañada puede provocar vibracione...

Page 19: ...IONES DE LA GARANTÍA Los aparatos utilizados para uso profesional o no exclusivamente doméstico en establecimientos industriales o comerciales Los aparatos utilizados indebidamente de manera no conforme a las instrucciones de uso Los aparatos desmontados o manipulados por personas ajenas a los Servicios Técnicos autorizados Las averías producidas por causas fortuitas siniestros de fuerza mayor o d...

Page 20: ...ace for the cooking vessels on the hob and the lowest part of the range hood When the range hood is located above agas appliance this distance shall be at least 65 cm If the instructions for installation forthe gas hob specify a greater distance this has to be taken into account The distance of 65 cm can be reduced for non combustible parts of range hoods and parts operating atsafety extra low vol...

Page 21: ...rning appliances a sufficient degree of aeration must be guaranteed in the room in order toprevent the backflow of exhaust gas The kitchen must have an opening communicating directly with the open air in order to guarantee the entry of clean air When the cooker hood is used in conjunction with appliances supplied with energy other than electric the negative pressure in the room must not exceed 0 0...

Page 22: ...ty to direct it onto the bottom of the pan only making sure that it does not engulf the sides Deep fat fryers must be continuously monitored during use overheated oil can burst into flames Do not flame under the range hood risk of fire This appliance can be used by children aged from 8 years and above and persons with reduced physical sensory or mental capabilities or lack of experience and knowle...

Page 23: ...sed with cooking appliances MAINTENANCE The cooker hood and its filter should be cleaned regularly according to the instruction Switch off or unplug the appliance from the mains supply before carrying out anymaintenance work Clean and or repace the Filters after the specified period Fire hazard Clean the hood using a damp cloth and a neutral liquid detergent The appliance uses 4 hob elements at mo...

Page 24: ...eparately in order to optimize the recovery and recycling of the materials they contain and reduce the impact on human health and the environment The crossed out wheeled bin symbol on the product reminds you of your obligation that when you disposed of the appliances it must be separately collected Consumers should contact their local authority or retailer for information concerning the correct di...

Page 25: ... with Controls Light 1 Lower Decorative Chimney 2 2 1 Upper Decorative Chimney 3 1 4 Flange optional 1 Exhaust Pipe 5 2 The Activated Charcoal filter optional COMPONENTS Product Components 1 2 1 2 2 3 4 5 1 Instruction Manual Qty Documentation 25 V 1 ...

Page 26: ...10 11 7 20 Screws 5 x 50 Hood fixing bracket 7 Wall Plugs 12 21 6 Screws 4 2 x 9 5 1 2 Chimney fixing bracket Ref Qty Optional Installation Components 11 12 10 20 21 26 V 1 ...

Page 27: ...DIMENSIONS 27 V 1 300 286 500 Min Min 240 286 40 60 500 A B 280 300 304 306 898 287 289 5 0 0 Option A B 1 390 425 760 2 490 525 960 650mm 650mm Chimney mm 400 390 500 490 ...

Page 28: ...the ceiling or up to the upper limit at the center of the area in which the hood is to be fitted A horizontal line A at 970 1070 mm above the cooker top A horizontal line B at a X mm above the horizontal line A A horizontal line C at a 243 mm below the horizontal line A 28 V 1 100 100 C 3 Option Chimney X 1 400X390 160 500 2 500X490 260 700 243 ...

Page 29: ...he other side checking that the two marks are on the same horizontal line Mark a point 3 on the horizontal line C 100 mm to the vertical reference line Repeat this operation on the other side checking that the two marks are leveled Fix the brackets Drill holes at the marked points with a ɸ10 mm drill bit Insert the Wall Plugs 11 into the holes Fix the hood fixing bracket 20 with 3 screws 10 5 x 50...

Page 30: ...h 2 screws 12 connect chimney fixing bracket and chimney with 2 screws 12 4 screws STA 4 2 9 5 Hook the hood body Hook the hood body to the bracket 20 Level the hood body itself Remove the filter from the inside of the hood body fix the screws 10 to Wall Plugs 11 at the points 3 Wrong Right 30 V 1 ...

Page 31: ... mm air exhaust connection insert the reducer flange 3 on the hood body outlet Fix the pipe 4 in position using sufficient pipe clamps not supplied Remove possible charcoal filters Insert the upper decorative chimney 2 2 into the lower decorative chimney 2 1 and drag it up to the horizontal line B Connect upper decorative chimney 2 2 and chimney fixing bracket 21 with 2 screws 12 B 2 screws STA 4 ...

Page 32: ... wants to use the cooker hood the function must be turned off When the working time of the machine reaches 150 hours the function reminds the user to clean the filter press to reset time Button Function Button on is on Remarks Turn the Motor and Lights ON Turn the Motor ON Automatic shutdown after 3 minutes Turn the Motor OFF Change the motor speed circularly Turn the Motor and Lights OFF Enter de...

Page 33: ... towards the back side of the hood unit and simultaneously pulling downwards Any kind of bending of the filters has to be avoided when washing them Before fitting them again into the hood make sure that they are completely dry The color of the filter surface may change throughout the time but this has no influence to the filter efficiency When fitting the filters into the hood pay attention that t...

Page 34: ...y usage REPLACING THE ACTIVATED CHARCOAL FILTER Remove the metal grease filters Remove the saturated activated charcoal filter Fit the new filters Replace the metal grease filters 34 V 1 LIGHTING LIGHT REPLACEMENT Completed by professionals Replacing the light modules Cannot replaced the light bulbs the entire light module has to be replaced When changing the light modules the contacts are live ...

Page 35: ... the front plate reinstall the grease filter 35 V 1 Before changing the light module s unplug the appliance from the mains or switch off the circuit breaker in the fuse box Remove the grease filter and carefully remove the 2 screws from the front plate a cross headed screwdriver will be needed to remove the screws Disconnect the terminal of LED light Press LED light on the back of the front plate ...

Page 36: ...ot tightly sealed Take down the outlet and seal with glue Vibration The blade if damaged can cause vibrating Replace the blade The motor is not tightly fastened Fasten the motor tightly The cooker hood is not tightly fixed Fixed the cooker hood tightly Insufficient suction Readjust the distance The distance between the cooker hood and the cooker top is too large Too much ventilation from open door...

Page 37: ...RRANTY EXCLUSIONS The appliances for professional use in industrial or commercial establishments The devices improperly used so not in accordance with instructions The devices dismantled or manipulated by people outside Technical Services authorized Periodic maintenance of the product Malfunctions caused by acts of God force majeure or accidents resulting from improper installation Broken or damag...

Reviews: