background image


9

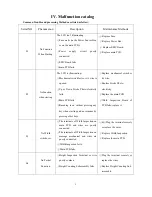
2. No width switchover. 

                                                                                                              N 


          Y 

                                                                                                              Y 


 N 


3. No function

fixed-spot or partial


N


    Y 


Y


                                          N 


4. No rolling   


      Y                                        Y 


                                                          N

                                                  Y


N                                                          Y


N


Are the terminals of Width Inspection Board and main 

PCB connected securely? 

Connect securely. 

Width Inspection Board fails or not? 

Replace it. 

Replace main PCB. 

Are the terminals of Height Inspection Board 

and main PCB connected securely? 

Connect securely. 

Height Inspection Subassembly fails or not? 

Replace it. 

Replace Main PCB. 

Are the terminals of rolling motor wire and 

main PCB connected securely? 

Connect securely 

Rolling motor fails or not 

Replace the motor 

Up stroke Photo-electricity subassembly fails or not 

Replace it 

Down stroke Photo-electricity subassembly fails or not     

Replace it 

Replace main PCB 

Summary of Contents for EC-570

Page 1: ...中国 厦门蒙发利科技有限公司 Xiamen Comfort Science Technology Group Co Ltd EC 570 Maintenance Service Manual Model EC 570 Sereies Voltage 220 240VAC By Customer Service Department ...

Page 2: ... components remote controller 4 IV Malfunction catalog 5 V Troubleshooting flow chart 8 VI Terminals on the main PCB 13 VII Maintenance of the back rest 14 VIII Maintenance of the seat part 27 IX Maintenance of the foot rest 36 X Electrical wiring diagram 39 XI Schematic diagram of the main PCB 40 XII Contact us 41 Model EC 570 ...

Page 3: ...15 minutes Total time 60 minutes When packing 1205 780 840 mm When reclined 2000 750 700 mm Dimensions Length width height When not reclined 1360 750 1150 mm N W 65kg Weight G W 83kg Remote controller 1 m Line length Power cord 2 2 m Temperature 10 40 Usage condition Humidity 30 85 RH Temperature 20 60 Storage condition Humidity 30 85 RH Safeguard Over current protector ...

Page 4: ...he chair Remote controller Arm rest Foot rest Wrench for extending foot rest Side board Seat pad Holder of remote controller Pillow Back pad Rear cover under the seat Front cover of back rest Rear cover of back rest Castor ...

Page 5: ...vibrators and charging gas bags in the calves rest Intensity can be adjusted at 3 levels FEET key Allows charging gas bags in the foot rest Intensity can be adjusted at 3 levels PAUSE key All the action will be broken off by this key SPOT key Allows starting spot massage just in the current position Position can be adjusted by UP and DOWN PARTIAL key Partial massage taking the current position as ...

Page 6: ...eading is on without pressing any key when starting and no response by pressing other keys Replace mechanical switch or it s wire Replace Stroke Photo electricity Replace the main PCB Width Inspection Board of PCB fails replace it 03 No Width switchover The terminals of Width Inspection on main PCB and wires are poorly connected The terminals of Width Inspection on massage mechanical and wires are...

Page 7: ...ly connected Tapping motor fails Main PCB fails Plug the terminal securely Replace the tapping motor Replace main PCB 08 No response when pressing the keys on the remote controller The terminals and wires are poorly connected The PCB in the remote controller fails Plug the terminal securely or replace the wires Replace the remote controller 09 Back rest cannot be reclined or raised The terminals o...

Page 8: ...inal securely Replace the snuffle valves Replace the inflator pump Replace main PCB 14 No gas charging in the foot rest The terminal of the snuffle valves and wires are poorly connected The snuffle valves fail The inflator pump fails Main PCB fails Plug the terminal securely Replace the snuffle valves Replace the inflator pump Replace main PCB 15 No heating in the back pad The terminal of the heat...

Page 9: ...ctrical appliances putting to earth such as fridges washers and so on to release all static of the body 1 No function when starting N Y Y N Y 否 是 N N Y Y Y N N N Y 否 N Is the LCD illuminating Is the fuse melted Replace fuse Are the terminals of Up and Down Stroke Subassembly connected securely Is the power cord open circuit The switches of Up and Down Stroke Subassembly fail or not The EMC Board f...

Page 10: ...main PCB Are the terminals of Height Inspection Board and main PCB connected securely Connect securely Height Inspection Subassembly fails or not Replace it Replace Main PCB Are the terminals of rolling motor wire and main PCB connected securely Connect securely Rolling motor fails or not Replace the motor Up stroke Photo electricity subassembly fails or not Replace it Down stroke Photo electricit...

Page 11: ... not Width Inspection Board fails or not Replace main PCB Replace the motor Replace it Are the terminals of tapping motor wire and main PCB connected securely Connect securely Tapping motor fails or not Replace the motor Replace main PCB Are the terminals of remote controller wire and main PCB connected securely Connect securely The conductive rubber fails or not Replace it Replace the remote cont...

Page 12: ...e foot rest actuator fails or not Replace it Replace main PCB Are the terminals of print motors in the seat pad and main PCB connected securely Are the connectors in the middle of the wire connected securely Are the terminals of print motors in the calves rest and main PCB connected securely Are the connectors in the middle of the wire connected securely Replace main PCB Connect securely Connect s...

Page 13: ... Snuffle valve fails or not Connect securely Connect securely Are the terminals of inflator pump and main PCB connected securely Replace Replace it Replace it Replace it Are the terminals of inflator pump and main PCB connected securely Connect securely Connect securely Inflator pump fails or not Inflator pump fails or not Replace main PCB The power is supplied to the heating leaf or not The conne...

Page 14: ...ing actuator Terminal of up and down stroke photo electricity Terminal of Height Inspection Terminal of width inspection Terminal of remote controller 24VDC voltage input terminal 23VAC voltage input terminal Terminal of inflator pump Terminal of snuffle valves Terminal of vibrators Terminal of snuffle valves 12VDC voltage input terminal ...

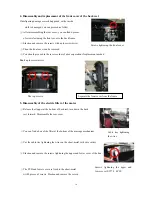
Page 15: ...If the heating leaf fails you can replace it too Proceed in the reverse order of disassembly when replacing a new one 2 Disassembly and replacement the rear cover of the back rest If disfiguring damage or crack happened you can proceed as follow Find 4 pieces of screws fixing the rear cover Slacken and remove them with a plus screwdriver Then the rear cover can be removed If it s damaged a new one...

Page 16: ...nd remove the screw fix the ground wire Remove split pin draw out flat head rivet securing the link rod and Y type joint with nipper pliers to separate the reclining actuator from the back rest Raise the back rest to the upright position then pull it up to separate the back rest Tool nipper pliers Screws fixing the rear cover of seat part Turn down the back rest forward Flat head rivet securing th...

Page 17: ...ver 5 Disassembly of the electric filter of the motor Release the stopper at the bottom of back rest turn down the back rest forward Disassemble the rear cover You can find a box of the filter at the bottom of the massage mechanism Cut the cable ties tightening the wires on the sheet metal with wire cutters Slacken and remove the screws tightening the upper and lower cover of the box The PCB and l...

Page 18: ...tors with nipper pliers disconnect the wires Bear in mind the connection of the wires to avoid confusion The wires with blue sleeve is connecting to kneading motor and the red to rolling motor Pull out the terminal of the width inspection cut the cable ties tightening the wire Cut the wire leading to the electric filter with wire cutters Find the wires of the rolling motor connect to the wiring te...

Page 19: ...e a new one if it does work Proceed in the reverse order of disassembly when replacing a new one Tools a plus screwdriver nipper pliers 7 2 Rolling motor DC 24V If the power of rolling motor is supplied from main PCB and the wires between main PCB and the rolling motor are OK but the rolling motor doesn t run In this situation there must be something wrong with the rolling motor or reduction box Y...

Page 20: ...ting to kneading motor and the red to rolling motor Pull out the terminal of the width inspection cut the cable ties tightening the wires Cut the wire leading to the electric filter with wire cutters Make sure that there is no resistance when we pull out the mechanical main unit with wheels 5 Slacken and remove the screw bolts fixing the cover of the rolling motor on the reduction box with a inner...

Page 21: ...n put it on 8 After taking out the mechanism main unit pull out the wheel on the rolling motor side 9 Slacken and remove the screw bolts fixing the reduction box on the sheet metal with a screwdriver If they are so tight that can not be slackened you can follow the second picture below to increase the lever of force Rolling motor without cover Mechanism main unit Pull out the wheel Screw bolts fix...

Page 22: ...cture 12 Slacken and remove the screw bolt and nut fixing the pinion on the shaft with a screwdriver and nipper pliers 13 Pull the pinion out of the shaft Slacken and remove the screws fixing the inner side cover on the outer side cover with a screwdriver Screws fixing the upper cover Screws fixing the lower cover Pull out the shaft subassembly Disassemble the pinion Pull out the pinion Screws fix...

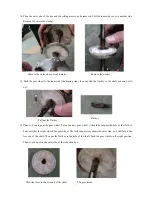
Page 23: ...l Put on the new gear wheel it should be surpass the hole of the flat key Take care that the right side of the gear wheel The following picture shows the outer side so it will face to the free end of the shaft Then put the flat key in the hole of the shaft Push the gear wheel on the right position Then you can put on the outer side of the reduction box Remove the outer side cover and motor Remove ...

Page 24: ...nnecting to power supply 7 3 Tapping motor DC 24V Disassemble the rear cover you can find the tapping belt at the bottom of the massage mechanism Loosen the tapping belt Cut the wire connecting the tapping motor and the electric filter Slacken and remove the screws fixing the tapping motor Then the motor can be removed a new one can be replaced if needed Proceed in the reverse order of disassembly...

Page 25: ...ing arm to eccentric shaft with a hexagonal socket wrench 1 2 Remove the hexagon check nut and washer Slacken the hexagon check nut tightening the universal rod assembly to eccentric shaft with a hexagonal socket wrench 1 2 Remove the hexagon check nut and washer so you can separate the swinging arm and universal rod from the massage mechanism Remove the tension spring and further disassembly can ...

Page 26: ... holder of knead ball It is unnecessary to disassemble the massage mechanism to disassemble the holder of knead ball just disassemble the rear cover of the back rest Slacken the screw bolt tightening the holder to the swinging arm with a hexagonal socket wrench 10 mm and a shifting spanner Pull the screw bolt out and the holder can be removed Remove the tension spring and a new holder can be repla...

Page 27: ...In order to operate conveniently you can disassemble the massage mechanism first then the width inspection board 9 Replacement of up or down stroke photo electricity assembly Disassemble the rear cover of the back rest Pull out the terminal of the wire Slacken and remove the screw bolts tightening the PCB of up or down stroke photo electricity assembly to the sheet metal with a plus screwdriver an...

Page 28: ...switch with wire cutters if the panel switch needs replacement Take a new one connect the wires and cover them with close end wire connector At last tighten the screws 3 Replacement of power supply fuse Turn OFF the power supply and remove the power cord plug Turn the fuse holder in the counterclockwise direction with a finger nail or a minus screwdriver Take out the fuse from the fuse holder and ...

Page 29: ...ast tighten the screws 5 Replacement of the pinboard After taking off the cover slacken and remove the screws fixing pinboard on the base plate with a plus screwdriver Pull out the teminals on the PCB bear in mind the connection of the teminals to avoid confusion You can connect one teminal to a new PCB just when it s disconneted from the failed one At late don t forget to tighten the screws Screw...

Page 30: ...ace all the parts concerned when on part fails although it will have the job done But lots of manpower and material resources will be wasted You should learn the principle of the chair then will find the reason more quickly Pull out the power cord connector release the stopper at the bottom of back rest turn down the back rest forward Slacken and remove the screws 6 pieces fixing the rear cover un...

Page 31: ...r hoses Then take it away There is a rubber pad between the panel and upper cover of the air feeding box Slacken and remove the screws 11 pieces fixing the upper cover on the lower cover of the air feeding box Then you can take way the upper cover Disassemble the black belt fixing the air pump Pull out the rubber supporters fixing the air pump on the base plate with nipper pliers Pull out the conn...

Page 32: ...the cable ties tightening the wire of snuffle valves Disconnect all the R clamps tightening the air hoses pull out the air hoses You had better pull out one hose then put it on the new snuffle valves immediately to avoid confusion Then assemble the R clamps Then you should take out the rubber supporters and assemble them on the new snuffle valves subassembly If just one of the snuffle valves needs...

Page 33: ...e followed A Cut the wire of the actuator take a new one and cut the wire too Then connect the wire of the new one turn on the power to check the connection is right or not If not exchange it Then put on a line insulator and tighten it This method is faster it is suitable for skillful maintenance men B Remove the seat pad and wooden plate under it cut the cable ties fixing the wire of the actuator...

Page 34: ...et Take care not forget the bush ring Then two methods can be followed A Cut the wire of the actuator take a new one and cut the wire too Then connect the wire of the new one turn on the power to check the connection is right or not If not exchange the wires Then put on a line insulator and tighten it This method is faster it is suitable for the skillful maintenance men B Cut the cable ties fixing...

Page 35: ...p and take off the outer coating Don t forget to tighten the cable tie after putting on the new outer coating You can slacken and remove the screws fixing the wood board on the base frame if the board needs being taken away 12 Disassembly and replacement of the arm rest Find a hole in the rear side of the arm rest then slacken and remove the screw bolt inside whit a plus screwdriver Push the arm r...

Page 36: ... the screws in the holes on the inside board You can do what is needed after separating them There is a mechanical control system of the foot rest in the right side board After disassembling the whole side board a steel cable is still linking the board and seat part If one part of the control system fails you can disassemble the side board and handle the problem 14 Replacement of the remote contro...

Page 37: ... cable and gas hose are still connecting to the seat part If the outer coating needs replacement the gas hoses should be disconnected from the joints under the seat Take care not to lose the sleeves with different color Slacken and remove the screws fixing the guard pad at the bottom of foot rest with a plus screwdriver Then the guard pads can be removed Zipper Slacken and remove the screw bolts a...

Page 38: ...t then the cover can be removed 6 You can find 4 pieces of screws fixing the front cover at the back of the side air bags Slacken and remove them then the front cover can be removed 7 You can find an air cylinder fixing on the foot rest Unzip Screws fixing the front cover Ropes on the foot rest Ropes on the outer coating Screws fixing the rear cover Rear cover taken down Screw fixing the front cov...

Page 39: ...en and remove them The joints of the gas hoses are tightened with cable ties Disconnect the connector then you can replace the air bag 10 Proceed in the reverse order of disassembly when assembly Warning As the voltage specification is 220 240VAC please make sure the plug is removed from outlet before processing operations above Because of the complex structure only professional maintenance man ca...

Page 40: ...39 X Electrical wiring diagram ...

Page 41: ...40 XI Schematic diagram of the main PCB ...

Page 42: ...u have any questions The customer service department Xiamen Comfort Science Technology Co Ltd CSC Address 18 LONGSHAN SOUTH ROAD XIAMEN 361009 CHINA Tel 86 592 5511161 Fax 86 592 5564013 E mail server easepal com cn Website www easepal com cn ...

Reviews: