background image


MGI Zip X3 

User Manual


17

16

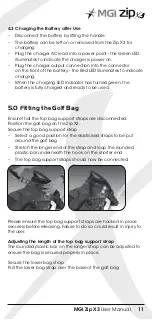
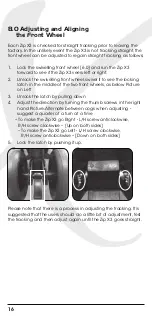
8.0 Adjusting and Aligning  

     the Front Wheel

Each Zip X3 is checked for straight tracking prior to leaving the 

factory. In the unlikely event the Zip X3 is not tracking straight, the 

front wheel can be adjusted to regain straight tracking as follows;

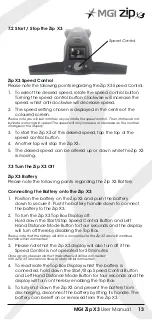
1.  Lock the swivelling front wheel [6.0] and run the Zip X3  

forward to see if the Zip X3 veers left or right. 

2.  Unlock the swivelling front wheel, swivel it to see the locking  

latch in the middle of the two front wheels, as below Picture  

on Left

3.  Unlock the latch by pulling down
4.  Adjust the direction by turning the thumb screws in the right  

hand Picture. Alternate between cogs when adjusting -  

suggest a quarter of a turn at a time

–  To make the Zip X3 go Right - L/H screw anticlockwise,   

R/H screw clockwise – [Up on both sides] 

–  To make the Zip X3 go Left - L/H screw clockwise,  

R/H screw anticlockwise – [Down on both sides]

5.  Lock the latch by pushing it up.

Please note that there is a process in adjusting the tracking. It is 

suggested that the users should do a little bit of adjustment, test 

the tracking and then adjust again until the Zip X3 goes straight.

9.0 Warranty 

9.1 Warranty Policy


The MGI Zip X3 is covered by a limited 2 year manufacturer’s 

warranty from the date of purchase. Duration of this warranty is: 

– 2 years on parts* 

– 2 years on Lithium batteries and chargers 

*MGI or an authorised service centre will repair or replace any 

parts found to be defective in materials or workmanship under 

normal use provided that:
1.  The MGI Zip X3 has been properly used, maintained and 

regularly serviced [see section 10.5]

2.  The replacement or repair is performed by an authorised MGI 

service centre or the owner with MGI approval.

3.  The Zip X3 has been registered online.

Our goods come with guarantees that cannot be excluded 

under Consumer Law. You are entitled to a replacement or 

refund for a major failure and for compensation for any other 

reasonably foreseeable loss or damage. You are also entitled 

to have the goods repaired or replaced if goods fail to be 

of acceptable quality and the failure does not amount to a 

major failure. This warranty is in addition to other rights and 

remedies available to the consumer under law. The consumer 

is responsible for expenses associated with a warranty claim. To 

make a warranty claim, cease using the goods immediately and 

contact MGI directly using the contact details on the back of this 

User Manual. Proof of purchase is mandatory.

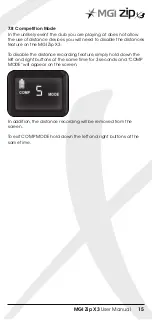
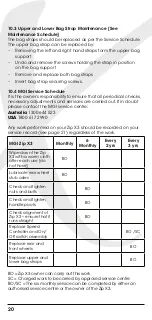
Summary of Contents for MGI zip Series

Page 1: ...User Manual VERSION 4 1 P 02 6652 8816 W EASTCOASTGOLFCARTS COM AU E INFO EASTCOASTGOLFCARTS COM AU A 2 164 PACIFIC HIGHWAY COFFS HARBOUR NSW 2450 ABN 21 613 629 146...

Page 2: ......

Page 3: ...Top Box Display 12 7 2 Start Stop the Zip X3 13 7 3 Turn the Zip X3 Off 13 7 4 Battery Level Indicator 14 7 5 Unit Measurements 14 7 6 Distances Modes 14 7 7 Control Distance Function 14 7 8 Competiti...

Page 4: ...ill need to record your MGI serial number This is found on the Zip X3 battery base or in the top box compartment Please keep this user manual on file for your own reference and a copy of your serial n...

Page 5: ...sides are determined when standing behind the Zip X3 as pictured below Step 2 On the wheel press the grey release button on the wheel hub Place the wheel onto the axle You will notice you need to mat...

Page 6: ...ttery base To do this press the grey release button on the wheel hub push the wheel on to the axle as far as possible To test for drive position try rolling the wheel backwards If you feel resistance...

Page 7: ...2 Release Fold Lever Step 4 The handle is now free to pull upwards The handle will naturally unfold as you continue to pull until the handle is completely open Step 3 Move Top Bag Support away from f...

Page 8: ...en the fold lever to release the handle Step 3 Pull up the latch at the bottom of the handle Step 4 Lower the handle down flat Step 6 Close the fold lever to lock the handle into place Step 5 Push the...

Page 9: ...on for a GPS mobile device holder Open the compartment and connect the holder into position To open the holder always press the button at the top of the holder Place the GPS into the cradle then close...

Page 10: ...the connector on the front of the battery the Red LED illuminates to indicate charging When the charging LED indicator has turned green the battery is fully charged and ready to be used Please refer t...

Page 11: ...that the top bag support straps are disconnected Position the golf bag on the Zip X3 Secure the top bag support strap Select a good position for the elasticised straps to be put around the golf bag S...

Page 12: ...assembly to the left hand side 2 Locked position is best when using the Controlled Distance function Move the knob on top of the front wheel assembly to the right hand side 7 0 Operating the Digital T...

Page 13: ...e Zip X3 1 Position the battery on the Zip X3 and push the battery down to secure it Push the battery handle down to connect the battery to the Zip X3 2 To turn the Zip X3 Top Box Display off Hold dow...

Page 14: ...the reading displays 0 Distance Total cannot be reset as it is the Odometer for the life of the Zip X3 This feature will assist with service reminders which are recommended at each 500kms 310 miles or...

Page 15: ...eed to disable the distances feature on the MGI Zip X3 To disable the distance recording feature simply hold down the left and right buttons at the same time for 3 seconds and COMP MODE will appear on...

Page 16: ...e two front wheels as below Picture on Left 3 Unlock the latch by pulling down 4 Adjust the direction by turning the thumb screws in the right hand Picture Alternate between cogs when adjusting sugges...

Page 17: ...wner with MGI approval 3 The Zip X3 has been registered online Our goods come with guarantees that cannot be excluded under Consumer Law You are entitled to a replacement or refund for a major failure...

Page 18: ...usion is permitted by law In the event of submersion in water partial or full of your Zip X3 MGI advises the complete write off of your Zip X3 The cost of replacing the water damaged components includ...

Page 19: ...are part of the maintenance schedule the owner will be charged for the parts and labour If the work to be carried out is part of warranty MGI will bear the cost 10 1 Cleaning Your Zip X3 See Maintena...

Page 20: ...e Australia 1300 644 523 USA 1800 617 2990 Any work performed on your Zip X3 should be recorded on your service record see page 21 regardless of the work MGI Zip X3 Monthly 6 Monthly Every 2 yrs Every...

Page 21: ...iced by Signature 2 year inspection Date Invoice Serviced by Signature 3 year inspection Date Invoice Serviced by Signature 3 year inspection Date Invoice Serviced by Signature 4 year inspection Date...

Page 22: ...d Accessories You are welcome to service your Zip X3 out of warranty by purchasing parts direct from MGI Please call or email to discuss the right parts and instructions 13 0 Contacting MGI www mgigol...

Page 23: ...g the front wheels Q I would like to have my MGI Zip X3 serviced Who do I call A MGI AUSTRALIA Visit www mgigolf com to find your nearest service centre using your postcode within Australian and New Z...

Page 24: ...P 02 6652 8816 W EASTCOASTGOLFCARTS COM AU E INFO EASTCOASTGOLFCARTS COM AU A 2 164 PACIFIC HIGHWAY COFFS HARBOUR NSW 2450 ABN 21 613 629 146...

Reviews: