background image

16

  SUPPORT@EASTOAK.COM

1-833-327-8625

8

7

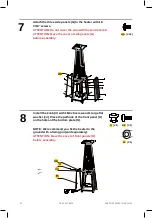
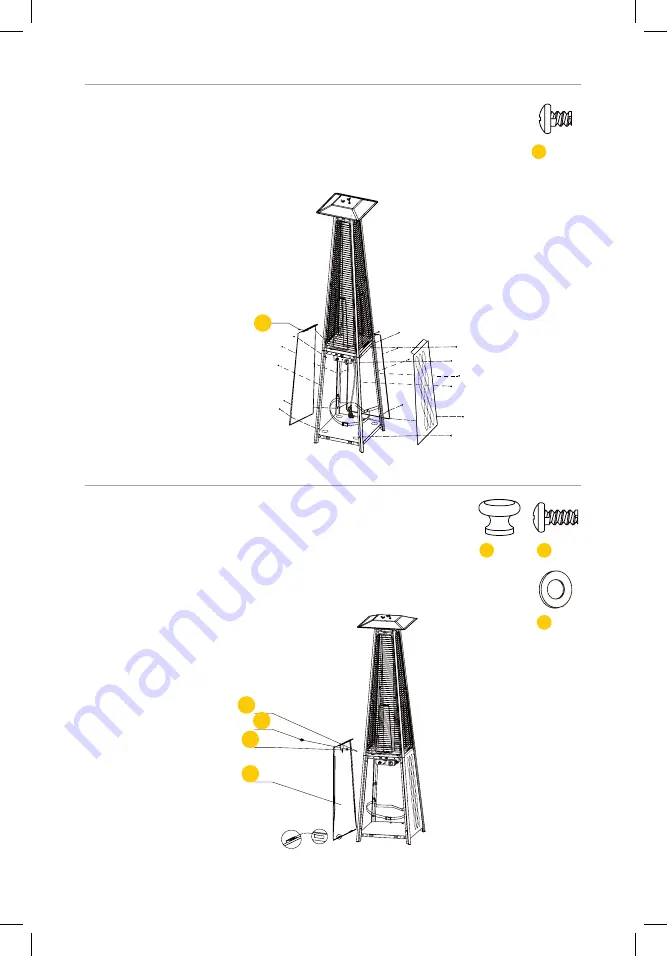
Attach the three side panels (G) to the heater with 18 

3/16” screws.

ATTENTION: Do not cover the side with the control knob. 
ATTENTION: Move the cover of side panels (G)

before assembly.

Install the knob (II) with 1 M4x8 screw and 1 large flat 

washer (JJ). Place the pothook of the front panel (H) 

on the holes of the bottom plate (N).

NOTE: We recommend you fix the heater to the 

ground with a fixing pin (sold separately).

ATTENTION: Move the cover of front panels (H)

before assembly.

HH  (X18)

KK  (X1)

JJ  (X1)

II  (X1)

HH


KK


II


JJ


Summary of Contents for PYROL EO-PH22006

Page 1: ...PYROL Pyramid Patio Heater 48000 BTU Owner s Manual MODEL EO PH22006...

Page 2: ......

Page 3: ...ID PATIO HEATER Claim 3 year warranty at eastoak com warranty Question Comments Reach out to us to get expert support support eastoak com eastoak com 1 833 EAST OAK USA 1 833 327 8625 eastoak com Foll...

Page 4: ...ater to turn off or be blown down CAUTION CARBON MONOXIDE HAZARD This appliance may produce an odorless carbon monoxide Using this appliance in an enclosed space may cause injury damage or death NEVER...

Page 5: ...to local codes or Propane Storage and Handling Code CSA B149 2 THIS APPLIANCE IS INTENDED FOR OUTDOOR USE ONLY Do not use this product in an enclosed space ONLY use this appliance with a propane gas t...

Page 6: ...lammable items away Keep a safe distance to avoid burning skin or clothing Do not sit or rest hands or feet on this heating unit Never place hands or fingers on upper portion of this unit while in use...

Page 7: ...artment of Transportation or the National Standard of Canada CAN CSA B339 LP gas tanks spheres and tubes for Transportation of Dangerous Goods and Commission For appliances designed to use a CGA No 79...

Page 8: ...e parts as needed with an appropriate amount Visually inspect the hose assembly within the appliance as needed NOTE You must follow all steps to properly assemble this heating item Make sure the gas v...

Page 9: ...soft cloth Harsh weather conditions may result in stain discoloration or rust Certain powders or solvents may cause permanent damage if used on the appliance Store the heating unit away from direct s...

Page 10: ...I J K L M N O Glass Tube Protective Guard Top Plate Assy Upper Support Black Silicone Ring Side Panel Front Panel Lower Support Control Box Assy Middle Plate Gas Hose Regulator Wheel Assembly Bottom...

Page 11: ...9 EASTOAK COM PYRAMID PATIO HEATER PARTS LIST Wing nut Screw M5x10 EE X3 CC X18 FF X6 DD X3 Flat washer Stud Bolt M6x10 AA X4 BB X4 M6 nut...

Page 12: ...10 SUPPORT EASTOAK COM 1 833 327 8625 PARTS LIST Knob II X1 JJ X1 Large flat washer Screw M4 X 8 KK X1 LL X1 Philips screwdriver Fixing Bracket GG X4 HH X30 Screw 3 16...

Page 13: ...rm all parts are present Compare parts present with the content lists including all hardware If any parts or hardware pieces are missing or damaged please contact customer service at support eastoak c...

Page 14: ...to the bottom plate N with 4 M6x10 bolts AA and 4 M6 nuts BB NOTE Move the cover of the bottom plate N before connecting the wheel assembly 2 1 Unscrew the ignition and load the AA battery 1 5 V Then...

Page 15: ...r support with 4 M5x10 screws Insert the pins of the middle plate J into the holes of the lower support L Secure the pins with 4 M5x10 screws 2 4 Connect the block belt O to the lower support L NOTE M...

Page 16: ...crews Attach the top plate B the upper support D with 8 3 16 screws Attach the reflector A to the top plate B Secure the top plate to the reflector with 3 studs DD 3 flat washers FF and 3 wing nuts EE...

Page 17: ...ure the glass tube C is positioned in the center and completely covers the center hole of the middle plate J WARNING DO NOT use the heater UNLESS the black silicone ring is placed on the bottom of the...

Page 18: ...Move the cover of side panels G before assembly Install the knob II with 1 M4x8 screw and 1 large flat washer JJ Place the pothook of the front panel H on the holes of the bottom plate N NOTE We reco...

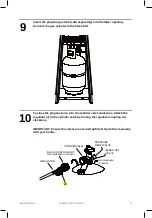
Page 19: ...EGULATOR 9 Insert the propane gas tank sold separately into the lower opening Connect the gas cylinder to the block belt To close the propane tank turn the cylinder valve clockwise Attach the regulato...

Page 20: ...s are present on any of the connection there may be a leak and you must turn off your gas valve immediately If you smell any gas turn of your gas valve immediately Disconnect the gas tank and do not u...

Page 21: ...e the pilot place sparks let go of the control knob Turn the control to knob to your desired temperature lo or hi IMPORTANT NOTE TO TURN THE HEATER OFF When lighting the heater for the first time or i...

Page 22: ...ing process This will stop after approximately 30 minutes of operation There is thick black smoke There is blockage in the burner T urn off the heater and let it cool Remove the blockage and clean the...

Page 23: ...AR WARRANTY Thank you for choosing East Oak This product is covered by our company warranty for up to 3 years from its original purchase date CLAIM WARRANTY If you d like to claim your product s warra...

Page 24: ...22 SUPPORT EASTOAK COM 1 833 327 8625 Pyrol Pyramid Patio Heater...

Page 25: ......

Page 26: ...support eastoak com eastoak com 1 833 EAST OAK USA...

Reviews: