background image

7C8299 – 15MAR99

7

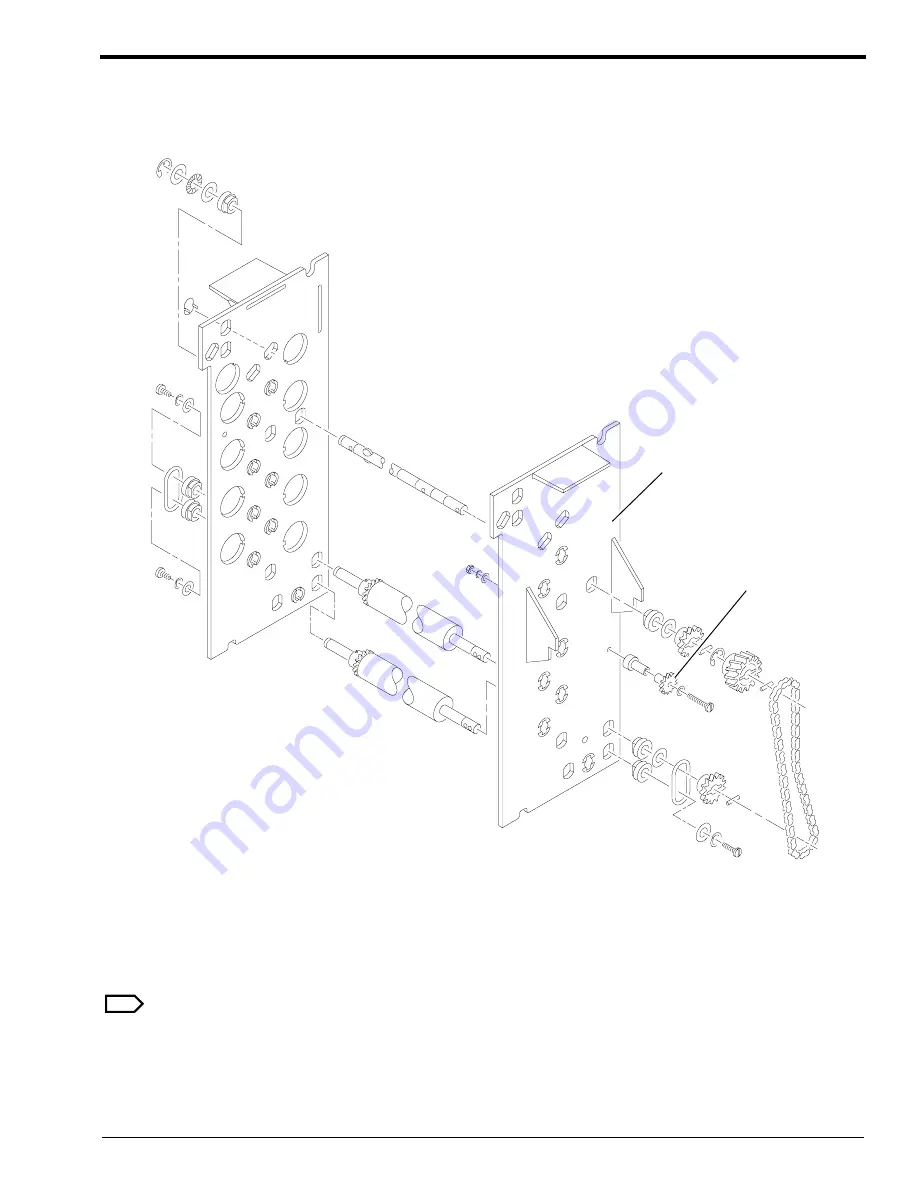
Figure 5

SIDEPLATES, DRIVE CHAIN, and SQUEEGEE ROLLERS - Drive Side View

Note

“J” and “K” ROLLERS may have E-RINGS and not SCREW FASTENERS.

J

K

L

H127_0241EA

SPROCKET

IDLER

CHAIN

2 SIDEPLATES

H127_0241ECA

Summary of Contents for 3059

Page 1: ...063 6 94 X Omat 180 LP Processor ma3227_6 pdf 6 1 Required 5B6773 28JUL95 X Omat 180 LP Processor ma305829 pdf 7 1 Selective 8B6658 29JUN96 X Omat 180 LP Processor ma305835 pdf 8 1 Selective 8B7489 10MAY97 X Omat 180 LP and 180 LPS Processors ma305837 pdf 9 1 Required 9B8929 March 1997 X Omat 180 LP and 180 LPS Processors mb305843 pdf 10 12 2 7C8299 15MAR99 X Omat 180 LP and 180 LPS Processors ma3...

Page 2: ......

Page 3: ......

Page 4: ......

Page 5: ......

Page 6: ......

Page 7: ......

Page 8: ......

Page 9: ......

Page 10: ......

Page 11: ......

Page 12: ......

Page 13: ......

Page 14: ......

Page 15: ......

Page 16: ......

Page 17: ......

Page 18: ......

Page 19: ......

Page 20: ......

Page 21: ......

Page 22: ......

Page 23: ......

Page 24: ......

Page 25: ......

Page 26: ......

Page 27: ......

Page 28: ......

Page 29: ......

Page 30: ......

Page 31: ......

Page 32: ......

Page 33: ......

Page 34: ......

Page 35: ......

Page 36: ......

Page 37: ......

Page 38: ......

Page 39: ......

Page 40: ......

Page 41: ......

Page 42: ......

Page 43: ......

Page 44: ...e more resistant to corrosion than the existing RACK SPRINGS Install a new WASH TANK CLIP to increase the volume of water around the HEAT EXCHANGER in the WASH TANK to decrease false Loss of Developer Cooling Ability errors Important Use qualified personnel to install this modification Service Effects See Page 3 for changes to Part Numbers Special Requirements None Serial Numbers See Page 3 Instal...

Page 45: ...ation even if loss or damage is caused by Kodak s negligence or other fault This equipment includes parts and assemblies sensitive to damage from electrostatic discharge Use caution to prevent damage during all service procedures Description Page Table of Contents Section 1 Serial Numbers and Parts Information 3 Serial Numbers 3 Changes to Existing Parts 3 Parts Requirements 3 Section 2 Preliminar...

Page 46: ... 2 5 and 6 only 1430 to 1476 Mod 6 was factory installed The 6 was not circled on the Mod Label Circle 6 on the MODIFICATION LABEL 1477 and above Mod 6 is factory installed None Qty Existing Part No New Part No Part Description 2 562602 or 990418 5B6156 BARBED FITTING 1 943101 5B6152 FORMED TUBING long 1 943100 5B6153 FORMED TUBING short 2 246801 246803 HOSE CLAMP B 6 459344 1C7106 RACK SPRING 6 4...

Page 47: ...ft the TOP COVER 4 Remove DRIVE SIDE PANEL WET SECTION COVER EVAPORATION COVERS 5 Disconnect CONNECTOR P J 33 6 Disconnect the YOKE from the CROSSOVERS H127_0136BA H127_0136BCA EXIT RACK P J 33 CONNECTOR DRYER RACK H104_0227BA CROSSOVER DETECTOR H104_0227BCA DRYER RACK WASH RACK CROSSOVER FIXER WASH FIXER RACK CROSSOVER DEVELOPER FIXER DEVELOPER RACK YOKE ...

Page 48: ... EXIT RACK DEVELOPER FIXER CROSSOVER FIXER WASH CROSSOVER DRYER RACK See the figure on Page 4 WASH RACK H104_0197BA H104_0197BCA WATER LINE DISCONNECT QUICK H104_0072BA CROSSOVER FIXER WASH RACK WASH DEVELOPER RACK CROSSOVER DEVELOPER FIXER FIXER RACK H104_0072BCE DETECTOR CROSSOVER COVERS EVAPORATION ...

Page 49: ... the ELECTRICAL BOX to the open position 2 See the illustration above a Install a CLAMP TL 2170 on each of the 3 FORMED TUBINGS connected to the TEE Install the CLAMPS TL 2170 close to the TEE b Disconnect the FORMED TUBING that requires draining from the TEE See the figure above Keep the HOSE CLAMP A c Remove the CLAMP TL 2170 and drain the FORMED TUBING into a container H127_0220BA Note Drain th...

Page 50: ...5 7 3 Remove and keep the other HOSE CLAMP A 4 Remove and discard Part Description Qty HOSE CLAMP B 2 FORMED TUBING 2 FITTING 2 WASHER 2 O RING SEAL 2 H127_0204HA H127_0204HCA HOSE CLAMP A FORMED TUBING HOSE CLAMP B FITTING WASHER O RING SEAL HEAT EXCHANGER ...

Page 51: ...ng the New BARBED FITTINGS 1 Place the ends of the HEAT EXCHANGER through the holes in the side of the PROCESSOR TANK 2 Place a new O RING SEAL on each end of the HEAT EXCHANGER H127_0219BA H127_0219BCA 0 RING SEAL BARBED FITTING TANK PROCESSOR HEAT EXCHANGER ...

Page 52: ...ution Do not tighten the BARBED FITTINGS more than necessary to correctly seat the O RING SEALS Incorrect installation of the BARBED FITTINGS will cause damage to the O RING SEALS and fluid leakage 5 Align the ends of the HEAT EXCHANGER flush with the ends of the BARBED FITTINGS and tighten the BARBED FITINGS H127_0206BA H127_0206BCA flush with the ends of the BARBED FITTINGS NOTE Align the ends o...

Page 53: ...and tightened especially after FORMED TUBING replacement 1 Install the new FORMED TUBING and HOSE CLAMPS and tighten the HOSE CLAMPS 2 Remove the 2 remaining CLAMPS TL 2170 3 Move the ELECTRICAL BOX back into position Qty Part No Description 1 5B6153 FORMED TUBING short 1 5B6152 FORMED TUBING long 2 From Step 3 Page 7 HOSE CLAMP A 2 246803 HOSE CLAMP B H127_0207HA TUBING TUBING FORMED short FORMED...

Page 54: ...OUGHS from the CROSSOVERS 2 Remove and discard the 2 SPRINGS from the DEVELOPER FIXER CROSSOVER and the FIXER WASH CROSSOVER 3 Install the 2 new SPRINGS Part No 1C7106 in both the DEVELOPER FIXER CROSSOVER and the FIXER WASH CROSSOVER 4 Install the TROUGHS on the CROSSOVERS H104_0553AA H104_0553ACA TROUGH H127_0200AA 2 SPRINGS H127_0200ACA ...

Page 55: ...GEARS BUSHINGS SHOULDER SCREWS Installing the New SPRINGS in the DRYER RACK 9 Remove the following parts from the UPPER SQUEEGEE ROLLER on the non drive side of the DRYER RACK SPRING and discard E RING and keep 10 For access to the GEAR PIN move the UPPER SQUEEGEE ROLLER toward the drive side of the PROCESSOR 11 Remove from the drive side of the UPPER SQUEEGEE ROLLER GEAR PIN SPROCKET WASHER SPRIN...

Page 56: ...lling the New WASH TANK CLIP 5B6773 28JUL95 13 Section5 Installingthe NewWASHTANKCLIP 1 Remove and discard the existing WASH TANK CLIP 2 Install the new WASH TANK CLIP H127_0216GA H127_0216GCA WASH TANK CLIP ...

Page 57: ...UICK DISCONNECT to the TANK 3 Connect the YOKE to the CROSSOVERS 4 Install EXIT RACK Connect CONNECTOR P J 33 EVAPORATION COVERS WET SECTION COVER DRIVE SIDE PANEL 5 Close the TOP COVER 6 Move the main wall CIRCUIT BREAKER to ON 7 Energize the PROCESSOR 8 Check for leakage from the HEAT EXCHANGER FITTINGS and FORMED TUBING 9 Check for correct operation of the PROCESSOR ...

Page 58: ... 6 on the MODIFICATION LABEL Publication Change Notice Table Print Date Pub No ECO No Affected Pages File Name Notes 28JUL95 5B6773 2592 327 All ma3227_6_28jul95 doc New Modification Instructions H127_0218AA H127_0218ACA MODIFICATION LABEL 6 ...

Page 59: ...ma3227_6_28jul95 doc Printed In USA HEALTH SCIENCES DIVISION EASTMAN KODAK COMPANY ROCHESTER N Y 14650 Kodak and X Omat are trademarks ...

Page 60: ...ed version of the WASH RACK that has these benefits More uniform washing A redesigned water MANIFOLD improves the distribution of water across the ROLLERS More corrosion resistant SCREWS now hold the SHAFTS of the ROLLERS in the WASH RACK instead of E RINGS The SPRINGS on the WASH RACK are still made of a special high quality stainless steel alloy Improved film transport A new GUIDE SHOE and an ad...

Page 61: ...is equipment includes parts and assemblies sensitive to damage from electrostatic discharge Use caution to prevent damage during all service procedures Table 1 Modification Kit 8B6612 includes Service Effects See Pages 11 15 for part numbers and configuration changes Keep these pages with the Illustrated Parts List for the PROCESSOR for future reference Special Requirements None Serial Numbers 270...

Page 62: ... main wall CIRCUIT BREAKER to OFF 3 For the 180 LP and 270 RA PROCESSORS only Lift the TOP COVER Remove the WET SECTION COVER Remove the EVAPORATION COVERS 4 For the MULTILOADER 300 only Extend the PROCESSOR from the MULTILOADER Remove the WET SECTION COVER Remove the EVAPORATION COVERS Figure 1 New WASH RACK B A A A A A A H127_0217DA ...

Page 63: ... 10 Connect YOKE WATER DISCONNECT 11 Install the EVAPORATION COVERS 12 See Step 13 to determine if Sections 2 and 3 must be done 13 Check the MODIFICATION LABEL on the PROCESSOR See Pages 7 9 for the location of the LABELS a If the Mod number below is not circled do Sections 2 3 and 4 b If the Mod number below is circled do Sections 4 only Advance to Page 7 Equipment Mod No MULTILOADER 300 25 270 ...

Page 64: ...COVER as shown in Figure 4 below b Check that the edge of the TUBING ASSEMBLY COVER is under the WET SECTION COVER See Figure 4 c Use the CENTER PUNCH to mark the holes d Use the 3 2 mm 1 8 in DRILL BIT and the ELECTRIC DRILL TL 1466 to drill the holes 4 Install the TUBING ASSEMBLY COVER by inserting the 3 FASTENERS up through the holes in the TUBING ASSEMBLY COVER and the bottom of the WET SECTIO...

Page 65: ...For a 270 RA PROCESSOR remove the NONDRIVE SIDE PANEL For a 180 LP PROCESSOR remove the DRIVE SIDE PANEL and move the ELECTRICAL BOX to the out position 2 From the WATER INLET HOSE remove 2 HOSE CLAMPS existing DOLE VALVE 3 Install the new DOLE VALVE in the correct position with the arrows in the direction of the water flow See Figures 5 and 6 Figure 5 Installing the New Dole Valve in a 270 RA PRO...

Page 66: ...e MODIFICATION LABEL c Move the main wall CIRCUIT BREAKER to ON d Energize the PROCESSOR e Check that the water flows out of the TUBING BRACKET into the center of the WATER MANIFOLD If not bend the TUBING BRACKET f Install WET SECTION COVER DRIVE SIDE and EXIT PANELS g Close the TOP COVER h Check for correct operation of the PROCESSOR Figure 7 270 RA PROCESSORS Circle the 19 H104_0554AA H104_0554A...

Page 67: ... CIRCUIT BREAKER to ON c Energize the MULTILOADER d Check that the water flows out of the TUBING BRACKET into the center of the WATER MANIFOLD If not bend the TUBING BRACKET e Install the WET SECTION COVER f Move the PROCESSOR into the MULTILOADER 300 g Check for correct operation of the PROCESSOR Figure 8 MULTILOADERS 300 with Serial No 1369 and Below Circle the 29 Figure 9 MULTILOADERS 300 with ...

Page 68: ...EAKER to ON d Energize the PROCESSOR e Check that the water flows out of the TUBING BRACKET into the center of the WATER MANIFOLD If not bend the TUBING BRACKET f Install the DRIVE SIDE and NON DRIVE SIDE PANELS g Close the TOP COVER h Check for correct operation of the PROCESSOR Figure 10 180 LP PROCESSORS Circle the 7 H127_0218AA H127_0218ACA MODIFICATION LABEL ...

Page 69: ...MODIFICATION INSTRUCTIONS TYPE1 10 29JUN96 8B6658 ...

Page 70: ...List for Wash Rack 5B6890 8B6658 29JUN96 11 Section5 IllustratedPartsListforWash Rack 5B6890 Item Part No Description 5B6890 Wash Rack Assembly A 5B6590 Roller Assembly B 8B6568 Roller Assembly B A A A A A A H127_0217DA ...

Page 71: ...MODIFICATION INSTRUCTIONS TYPE1 12 29JUN96 8B6658 Wash Rack Guide Shoe and Drive Gear H127_0212EA 16 1 2 3 6 5 4 7 7 8 9 7 7 10 10 11 6 6 10 11 14 13 12 15 14 13 12 7 7 10 15 H127_0212ECA ...

Page 72: ...3 1C7399 Yoke and Pin Assembly 4 5B6594 Side Plate Wash Rack Non Drive Side 5 5B6585 Manifold Water 6 458219 Tie Rod 7 852807 Screw 8 5B6593 Side Plate Wash Rack Drive Side 9 852682 Screw 10 544267 Screw 11 474596 Bracket Guide Shoe 12 779028 Gear 13 911725 Bushing Idler 14 5B6808 Screw Shoulder 15 852522 Screw 16 5B6565 Guide Shoe ...

Page 73: ...IONS TYPE1 14 29JUN96 8B6658 Wash Rack Miscellaneous Parts A B B C A C A A A A A A H127_0213EA 1 2 3 4 6 7 8 9 10 11 6 12 13 14 14 2 6 10 25 24 8 25 24 18 8 8 20 19 20 21 15 16 17 23 22 21 20 8 18 19 20 8 19 H127_0213ECA 6 ...

Page 74: ...587 Shaft 14 5B6590 Roller Assembly A 15 5B6594 Side Plate Wash Rack Non Drive Side 16 458219 Tie Rod 17 5B6593 Side Plate Wash Rack Drive Side 18 1C7107 Spring Extension 19 852611 Washer 20 490097 Screw 21 953828 Spacer 22 5B6817 Shaft 23 8B6568 Roller Assembly B 24 418775 Thrust Washer 25 779028 Gear Print Date Pub No ECO No Affected Pages File Name Notes 04AUG95 8B6658 2648 334 All ma3058_29 do...

Page 75: ...ma3058_29_29jun96 doc Printed In USA HEALTH IMAGING EASTMAN KODAK COMPANY ROCHESTER N Y 14650 Kodak and X Omat are trademarks ...

Page 76: ...dak X Omat 180 LP and 180 LPS PROCESSORS Service Codes 3227 3198 Modification No 8 Type 1 Selective Purpose To improve the reliability of the PROCESSOR by moving the connections for the DRYER OVER TEMPERATURE and the DRYER THERMISTOR to outside of the TANK to reduce corrosion of the CONNECTORS installing a new YOKE AND PIN ASSEMBLY to minimize the possibility of diluting the fixer installing plast...

Page 77: ...e Some of the PROCESSORS in the serial number range will already have the plastic SPROCKETS installed It is not necessary to install the new SPROCKETS from the Kit in these PROCESSORS Important Use qualified service personnel to install this modification ...

Page 78: ...ome of the existing SPROCKETS may be so corroded that you could cause damage to the SHAFT of the SQUEEGEE DRIVE ROLLER when you remove the SPROCKET To avoid another service call and lost time have a new SQUEEGEE DRIVE ROLLER with you The part numbers are 270 RA PROCESSOR or MULTILOADER 300 1C0985 180 LP or 180 LPS PROCESSOR 8B7110 NOTE When you order one of the above ROLLERS you will receive Kit N...

Page 79: ...L 270 WET SECTION COVER TOP EXIT RACK 4 For the MULTILOADER 300 only Extend the PROCESSOR from the MULTILOADER Remove front PROCESSOR PANEL NONDRIVE SIDE SAFETY SHIELD WET SECTION COVER 5 Remove the DRYER RACK Installing the New YOKE AND PIN ASSEMBLY on the WASH RACK 1 Remove the existing YOKE AND PIN ASSEMBLY from the HOSE Discard the YOKE AND PIN ASSEMBLY 2 Install the new YOKE AND PIN ASSEMBLY ...

Page 80: ... See the figure above that matches your PROCESSOR 1 Remove the BRACKET S for the DRYER THERMISTOR and the DRYER OVER TEMPERATURE THERMOSTAT from the PROCESSOR H104_0414EA H104_0414ECB DRYER THERMISTOR DRYER OVER TEMPERATURE THERMOSTAT BRACKET WASHERS SCREW BRACKET SCREW WASHERS BRACKET THERMOSTAT OVER TEMPERATURE DRYER THERMISTOR DRYER ...

Page 81: ...THERMOSTAT to the BRACKET S Use the SCREW S and WASHER S from Step 2 above 9 Route the wires for the new DRYER THERMISTOR and DRYER OVER TEMPERATURE THERMOSTAT from inside the TANK to outside 10 Install the BRACKET S on the TANK Use the SCREW and WASHERS from Step 1 on Page 4 Connecting the New DRYER OVER TEMPERATURE THERMOSTAT Note Do the following steps outside the TANK on the nondrive side of t...

Page 82: ...k wires 2 bare ground wires Note The bare ground wires do not need insulation 3 Move the wires to positions that will not have contact with moving parts or be compressed by the DRYER BLOWER 4 Install the DRYER BLOWER in the PROCESSOR 5 Check that the BLOWER SLEEVE is in the correct position and no leakage of air occurs 4 cm 1 1 2 in 5 mm 1 4 in H104_0596AA SPLICE CLOSED END CASING OUTER red wire b...

Page 83: ...CKETS installed It is not necessary to install the new SPROCKETS in these PROCESSORS See Page 8 to install new SPROCKETS in a 180 LP or 180 LPS PROCESSOR 1 Install the 4 new plastic SPROCKETS for the CHAINS in the DRYER RACK See the figure above 2 Install the DRYER RACK in the PROCESSOR 3 In the 270 RA PROCESSOR only install the TOP EXIT RACK 4 Advance to Page 9 H104_0504DA H104_0504DCA SPROCKET C...

Page 84: ...y have the plastic SPROCKETS installed It is not necessary to install the new SPROCKETS in these PROCESSORS See Page 7 to install new SPROCKETS in a 270 RA PROCESSOR or a MULTILOADER 300 1 Install the 4 new plastic SPROCKETS for the CHAINS in the DRYER RACK See the figure above 2 Advance to Page 10 H127_0223DA H127_0223DCA CHAIN SPROCKET CHAIN SPROCKET ...

Page 85: ... 1369 and Below 2 For the MULTILOADER 300 only a Circle the 35 on the MOD LABEL Use permanent ink On MULTILOADERS Serial No 1369 and below see Figure 2 On MULTILOADERS Serial No 1370 and above the MOD LABEL is inside the MAGAZINE DOOR See Figure 3 b Install WET SECTION COVER SAFETY SHIELD Figure 3 MULTILOADERS 300 with Serial No 1370 and Above Circle the 35 on MULTILOADERS H104_0554AA H104_0554ACA...

Page 86: ...OVER 4 For all PROCESSORS a Install the PANELS b Close the TOP COVER or move the PROCESSOR into the MULTILOADER c Move the main wall CIRCUIT BREAKER to ON d Energize the PROCESSOR e Check for correct operation of the PROCESSOR Publication History Print Date Pub No ECO No Affected Pages File Name Notes SEP96 8B7489 2619 143 All ma3058_35_01sep96 doc New Modification Instructions 01MAY97 8B7489 2619...

Page 87: ...ma3058_35_01may97 doc Printed In USA HEALTH IMAGING EASTMAN KODAK COMPANY ROCHESTER N Y 14650 Kodak and X Omat are trademarks ...

Page 88: ...OCESSOR by replacing the ROLLERS in the FIXER WASH CROSSOVER The replacement phenolic ROLLER has a steel core which significantly reduces swelling binding and possible film transport problems The mating rubber ROLLER is being replaced because the new ROLLERS are not interchangeable with the existing ROLLERS and therefore must be replaced as a set New BEARINGS and E RINGS are also supplied Included...

Page 89: ...fault Possible damage from electrostatic discharge ESD Service Effects Update your manuals with the new Part Numbers see the table on Page 7 Special Requirements 180 LP PROCESSOR with a SORTER and 180 LPS PROCESSOR must have SORTER Mod 1 installed before attempting to download the 2 24 Software The Kodak Ektascan 2180 LASER PRINTER must have Software Version 2 16 or higher installed before the PRO...

Page 90: ...perating Software advance to Installing the Operating Software on Page 4 For the Kodak X Omat 180 LP PROCESSOR with a SORTER and all Kodak X Omat 180 LPS PROCESSORS 1 Check the SORTER Modification Label which is located on the back as you face the PRINTER edge of the hinged section of the SORTER and do one of the following If Mod 1 is installed check which Version of Operating Software is installe...

Page 91: ...Kodak X Omat MULTILOADER 300 2 57 1C7618 Kodak X Omat 180 LP PROCESSOR The BOOTSTRAP PROM must be Version 2 52 Part Number 5B6607 not included with this Mod The Kodak Ektascan 2180 LASER PRINTER must have Software Version 2 16 or higher installed 2 24 5B6623 Kodak X Omat 180 LPS PROCESSOR 180 LP PROCESSOR with a SORTER The SORTER must have SORTER Mod 1 Check the Mod Label on the SORTER The BOOTSTR...

Page 92: ...9B8929 March 1997 5 Installing the New ROLLERS BEARINGS and E RINGS FIXER WASH CROSSOVER Drive Side H127_0127da A B A B THRUST WASHER BEARING SPRING E RING SHAFT ROLLER SHAFT ROLLER H127_0127DCB ...

Page 93: ...card Save the SPRINGS SHAFTS and THRUST WASHERS 4 Install the new ROLLERS BEARINGS and E RINGS from the Mod Kit using the SPRINGS SHAFTS and THRUST WASHERS saved in the previous step Make sure that the THRUST WASHERS and other parts are assembled in the order shown 5 Install the TROUGH 6 Check the squareness of the RACK on a smooth flat surface 7 Install the FIXER WASH CROSSOVER in the PROCESSOR A...

Page 94: ...riate Mod Number on the MODIFICATION LABEL Use permanent ink a For the 270 RA PROCESSOR circle number 22 Figure 2 180 LP or 180 LPS PROCESSORS b For the 180 LP or 180 LPS PROCESSOR circle number 9 Description Old Part No New Part No Roller Drive black rubber B 594237 470085 Roller Driven phenolic A 911660 9B8662 Fixer Wash Crossover Assembly 918945 9B8445 H104_0554AA H104_0554ACA MODIFICATION LABE...

Page 95: ...Serial No 1369 and Below c For the MULTILOADER 300 circle number 37 Figure 4 MULTILOADERS 300 with Serial No 1370 and Above 2 For all PROCESSORS a Assemble the PROCESSOR b Check for correct operation of the PROCESSOR H118_0001AC H118_0001ACB LABEL MOD H118_0055AC H118_0055ACA LABEL MOD Kodak Ektascan and X Omat are trademarks ...

Page 96: ...e changes to the diameter of the new F and E ROLLER GEARS make the bottom GUIDE SHOE adjustable include new SIDEPLATE BEARINGS which have a longer service life Mods 12 24 43 will reduce wear and binding in the RACK by installing new BEARING WASHERS Important Use qualified personnel to install this modification Service Effects Make changes to the Illustrated Parts Lists to include the new part numb...

Page 97: ...arts Lists MODIFICATION KIT 7C8712 for the 270 RA PROCESSOR Mod 23 24 and the 270 INTEGRATED in a MULTILOADER Mod 41 43 includes MODIFICATION KIT 7C8713 for the 180 LP and 180 LPS PROCESSORS Mod 10 12 includes 101 1659 270 RA INTEGRATED PROCESSOR in a MULTILOADER 300 101 2495 270 RA PROCESSOR 101 4099 and 100001 100073 180 LP PROCESSORS 10001 13564 and 125001 125229 180 LPS PROCESSORS Part No Desc...

Page 98: ...are followed All of the Figures are of a 180 LP PROCESSOR The DRYER RACK in the 270 RA PROCESSOR is similar Save all of the parts removed except for the parts that are replaced by new parts in the KIT Figure 1 DRYER RACK Warning Dangerous Voltage 1 De energize the PROCESSOR 2 Remove the DRYER RACK from the PROCESSOR H127_0244DA H127_0244DCA PLENUM DRYER COVER CHAIN COVER STOP BRACKET ...

Page 99: ...top GUIDE SHOE if necessary parts not shown PLENUM STOP BRACKET CHAIN COVER newer RACKS have a larger COVER than shown Figure 2 AIR TUBES GUIDE SHOE and CAPTIVE BRACKETS Drive Side View S B H127_0242EA BRACKET WASHERS 2 GUIDE SHOE H127_0242ECC AIR TUBE GUIDE SHOE 2 GUIDE SHOE BRACKETS AIR TUBE SPRING 2 CAPTIVE BRACKETS ...

Page 100: ...IDE SHOE BRACKETS 2 CAPTIVE BRACKETS if necessary Figure 3 SIDEPLATES ROLLERS and GEARS Drive Side VIew M E F G H H127_0248EA C snap in GUDGEONS 6 C ROLLER F ROLLER IDLER GEAR H127_0248ECA GEAR 2 SIDEPLATES 14 STUDS E ROLLER 14 BEARING WASHERS 6 C ROLLERS snap in GEAR E ROLLER ...

Page 101: ...MODIFICATION INSTRUCTIONS TYPE2 6 15MAR99 7C8299 Figure 4 SIDEPLATES DRIVE CHAIN and SPROCKETS Drive Side View D A H127_0240EA H127_0240ECA 2 SIDEPLATES ...

Page 102: ...9 15MAR99 7 Figure 5 SIDEPLATES DRIVE CHAIN and SQUEEGEE ROLLERS Drive Side View Note J and K ROLLERS may have E RINGS and not SCREW FASTENERS J K L H127_0241EA SPROCKET IDLER CHAIN 2 SIDEPLATES H127_0241ECA ...

Page 103: ...om the old SIDEPLATE and install them on the new drive side SIDEPLATE Important Do not install the following parts at this time See Figure 6 E ROLLER bottom C ROLLER 2 bottom AIR TUBES 3 See Figures 3 4 and 5 Install the parts removed in Step 5 on Page 8 the new BEARING WASHERS one on each end of each C ROLLER between the SIDEPLATE and the end of the ROLLER the new F ROLLER GEAR 1C7245 located ins...

Page 104: ... is 2 70 mm 0 105 in 0 10 mm 0 005 in at both ends and in the center Note Apply a small amount of water on the BEARING WASHER to help hold it in place on the E ROLLER 7 See Figure 3 Install the E ROLLER and the bottom C ROLLER using a new BEARING WASHER at each end of each ROLLER between the SIDEPLATE and the end of the ROLLER 8 Install the 2 bottom AIR TUBES 9 See Figure 1 Install the parts remov...

Page 105: ...r 180 LPS PROCESSORS Figure 9 MULTILOADERS 300 with Serial No 1369 and Below Figure 10 MULTILOADERS 300 with Serial No 1370 and Above 1 Circle 23 and 24 on the MODIFICATION LABEL on the 270 RA PROCESSOR 10 if necessary and 12 on the MODIFICATION LABEL on the 180 LP or 180 LPS PROCESSOR 41 and 43 on the MODIFICATION LABEL on the MULTILOADER 300 H104_0554AA H104_0554ACA MODIFICATION LABEL H127_0218A...

Page 106: ... ROLLER for stubbing decrease the distance approximately 0 10 mm 0 005 in between the bottom GUIDE SHOE and the F ROLLER after making the adjustment check for film quality by processing the film Do the above procedures again as necessary to minimize the film scratching or stubbing Publication History Print Date Pub No ECO No Affected Pages File Name Notes 24MAR98 7C8299 2619 169 All ma3058_41_24ma...

Page 107: ...mb3058_43_15mar 99 fm Health Imaging EASTMAN KODAK COMPANY ROCHESTER N Y 14650 Kodak and X Omat are trademarks ...

Page 108: ...1 Required Purpose To improve the PROCESSOR reliability by changing the AC input voltage to the QUAD POWER SUPPLY to lower the temperature installing a new QUAD POWER SUPPLY installing new software to eliminate errors caused by mis adjusted ENTRANCE DETECTOR SWITCHES installing new STANDOFFS on the PROCESSOR INTERFACE CONNECTOR to minimize communication errors Important Use qualified personnel to ...

Page 109: ...s sensitive to damage from electrostatic discharge Use caution to prevent damage during all service procedures MODIFICATION KIT 7C8702 includes Service Effects Make wiring changes to the wiring diagrams DIAGRAM PACKAGE 1C7841 Special Requirements The 180 LP SORTER if fitted must have Modification No 1 1C7525 Serial Numbers 101 3999 180 LP PROCESSOR 10001 13499 180 LPS PROCESSOR Installation Time A...

Page 110: ...removed from the PROCESSOR to do the following procedures 4 Open the ELECTRICAL BOX 5 Remove from the QUAD POWER SUPPLY CONNECTORS J9 and J10 4 SCREWS inside the ELECTRICAL BOX that hold the POWER SUPPLY 4 SCREWS under the ELECTRICAL BOX that hold the POWER SUPPLY SCREWS not shown 6 Remove and discard the QUAD POWER SUPPLY QUAD POWER SUPPLY has been damaged by heat H127_0245HC 4 SCREWS 4 SCREWS CO...

Page 111: ...he outside of the ELECTRICAL BOX 3 Loosen the SCREWS for the STRAIN RELIEF on CONNECTOR J2 4 Rotate the BODY of the CONNECTOR to disassemble 5 Slide the STRAIN RELIEF backward to have access to the WIRE TERMINALS 6 Install the new WIRE No 14 on TERMINAL 4 of TERMINAL BLOCK TB3 Important Press the SOCKET TERMINALS into CONNECTOR J2 The TERMINALS should snap into position 7 Feed the SOCKET TERMINAL ...

Page 112: ... GROUND WIRE from the GROUNDING STUD 4 Remove J9 WIRE No 35 from TERMINAL 2 of TB4 J9 WIRE No 36 from TERMINAL 3 of TB4 5 Discard the old CONNECTOR J9 and WIRING ASSEMBLY 6 Remove CAPACITOR C2 from TERMINALS 2 and 3 on TB4 and discard the CAPACITOR Installing the New WIRES Inside of the ELECTRICAL BOX 1 Locate following COMPONENTS inside the ELECTRICAL BOX See the illustration on Page 3 CONNECTOR ...

Page 113: ... the ACTUATOR MAGNETS from the ENTRANCE DETECTOR RACK 1 Remove the ENTRANCE DETECTOR RACK 2 Remove and discard 2 SCREWS 2 LOCKWASHERS 2 FLAT WASHERS 2 ACTUATOR MAGNETS 3 Install the ENTRANCE DETECTOR RACK Installing the STANDOFF SCREWS on the PROCESSOR CONNECTOR P29 1 Locate CONNECTOR P29 on the NON DRIVE SIDE of the PROCESSOR 2 Remove and discard the old 2 STANDOFF SCREWS 2 LOCKWASHERS 3 Open the...

Page 114: ...NTERFACE CABLE for the PRINTER to CONNECTOR P29 4 Close the TOP COVER 5 Install the BIN ASSEMBLY if necessary 6 Energize the PROCESSOR 7 Check for correct operation of the PROCESSOR Publication History Print Date Pub No ECO No Affected Pages File Name Notes 15APR98 7C8295 2619 167 All ma3227_7_15apr98 doc First printing H127_0218AA H127_0218ACA MODIFICATION LABEL ...

Page 115: ...ma3227_7_15apr98 doc Printed In USA Health Imaging EASTMAN KODAK COMPANY ROCHESTER N Y 14650 Kodak and X Omat are trademarks ...

Reviews: