background image

9

Eastman

Over a Century of Cutting Expertise

®

Form E-564

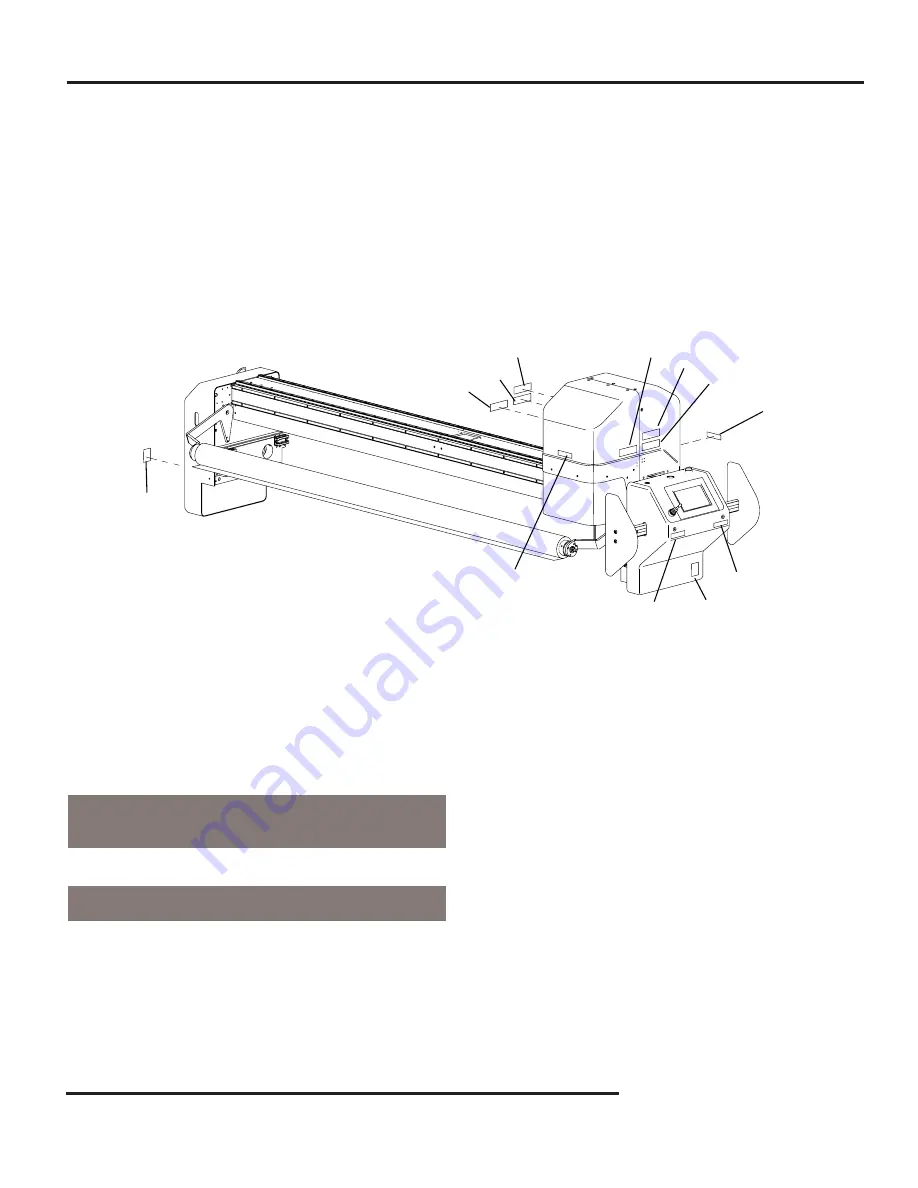
Raptor Gantry

Label Locations

ITEM  PART NO. 

DESCRIPTION 

QTY.


  1 

91-26002 

Decal, Small Eastman 

1

  2 

91-26099 

Decal, Raptor Logo (Blue)  

2     

  3 

91-26073-5 

Decal, Guard Removal Med.   2 

  4 

91-26073-2 

Decal, Hazard Voltage 

1

  5 

91-26073-10  Decal, Pinch Point 

2

  6 

91-26073-3 

Decal, Blade Hazard  

2

  7 

91-26073-4 

Decal, Guard Removal Sm.   2

3

3

4

2

5

6

7

5

7

6

2

1

Summary of Contents for Raptor

Page 1: ...tely before attempting to operate your new Raptor Raptor Form E 564 Eastman Eastman Over a Century of Cutting Expertise Technical Support 1 800 872 5595 This machine is equipped with a very sharp knife Keep hands arms and hair away from the knife area at all times Misuse of this machine or failure to follow all safety instructions on this machine and in the instruction manual may result in serious...

Page 2: ...arranty should not apply if defects are caused by product misuse or neglect if the machine has been altered or modified by the buyer or if other than genuine Eastman parts are used in the machine THIS WARRANTY IS APPLICABLE TO THIS PURCHASE ONLY SELLER DISCLAIMS ALL OTHER WARRANTIES EXPRESSED OR IMPLIED INCLUDING BUT NOT LIMITED TO THE IMPLIED WARRANTIES OF MERCHANTABILITY AND FITNESS FOR A PARTIC...

Page 3: ...ndemnification 4 Maintenance 5 Lubrication Chart 7 Raptor Label Locations 8 Raptor Gantry Label Locations 9 Aligning Cleaning and Replacing Consumable Parts 10 Knife Replacement 10 Sharpening Pad Replacement 10 Sharpener Angle Adjustment 11 Sharpener Adjustment 11 Drill Bit Replacement 13 Drill Sizes 14 Drill Bushing Sizes 15 Serpentine Belt Replacement 16 Crank Bearing and Ball Joint Replacement ...

Page 4: ...structions of this manual Do not modify this machine or disable safety features Unauthorized modification may result in serious personal injuries to the user Electri cal connections to this machine must be made by a qualified electrician familiar with applicable codes and regulations Safety labels must be kept clean and legible at all times Call the Eastman Machine factory to order replacement lab...

Page 5: ...vement or cutting Vacuum bristle surface as required to remove dust and dirt which may clog perforations Check crank and crank bearings for abnormal wear Check blade edges for damage and replace as required Ensure that the knife is securely fas tened to the coupler Power up the Raptor and listen for any abnor mal sounds If abnormal sounds exist diagnose and fix the problem to prevent serious damag...

Page 6: ...1 Grade 2 Mobil AW 2 Inspect inside conveyor base for loose screws or abnormal wear Secure or replace as needed Before performing the monthly tasks make sure the Raptor and computer are turned off at the electrical disconnect and locked out CAUTION First Working Day of Month Remove gantry covers and inspect all electrical wiring connections for nicks or abrasions Repair or replace as needed Inspec...

Page 7: ...P N 70 26059 Recipricating Spline 2000 Hrs Action to Perform Lubricant Linear Bearings Mobil NLG1 Grade 2 Moblith AW 2 67 26324 Linear Guides Machine Component 100 Hrs 67 26325 Mobil SAE 10 Non detergent Vactra No 1 h 5 6 2 5 2 3 Maintenance Frequency Lubrication Chart 7 4 8 1 1 4 4 7 Tool Head 1 Head Tool Head Compressor Oil ISO Grade 68 SAE Grade 20 Lubrication Chart Below are the lubrication po...

Page 8: ...RT NO DESCRIPTION QTY 1 91 26004 Decal Large Eastman 3 2 91 26003 Decal Medium Eastman 2 3 91 26073 6 Decal Gaurd Removal Large 4 4 91 26073 11 Decal Entanglement Hazard 2 5 91 26073 2 Decal Hazard Voltage 3 6 91 26073 9 Decal Moving Parts 2 7 91 26117 Decal Sheet Plastic Overlay 2 ...

Page 9: ...RT NO DESCRIPTION QTY 1 91 26002 Decal Small Eastman 1 2 91 26099 Decal Raptor Logo Blue 2 3 91 26073 5 Decal Guard Removal Med 2 4 91 26073 2 Decal Hazard Voltage 1 5 91 26073 10 Decal Pinch Point 2 6 91 26073 3 Decal Blade Hazard 2 7 91 26073 4 Decal Guard Removal Sm 2 3 3 4 2 5 6 7 5 7 6 2 1 ...

Page 10: ... Remove knife using Knife Replacement procedure 3 Peel Sharpening Pad from Disc Remove any excess adhesive that may be left on disc NOTE Sharpening Pad is applied using a adhesive back 4 Apply new Sharpening Pad to Disc Sharpening Pad Replacement Socket Head Screw Knife Knife Holder Clamp WARNING Always handle knives with care Safely dis pose of used knives Replacement Knife Chart 54 28440 Blade R...

Page 11: ...er Switch Guide Shaft Spacer 54 28797 Guide Shaft Presser Foot Assembly Knife Cover Latch Sharpener Angle Adjustment Socket Head Screw Adjust Screw 1 Loosen the two Socket Head Screws 2 Adjust both Adjust Screws so the sharpener pads are parallel with the knife 3 When desired position is achieved re tighten the two Socket head Screws WARNING Sharp Knife is exposed When handling the Sharpener use c...

Page 12: ...e Position WARNING Sharp Knife is exposed When handling the Presser Foot use caution 10 Close the front tool head cover and Turn the Ma chine Power Blower and Air back on for opera tion 4 Slide the Sharpener to the right as far as it will go without bending the blade 5 Rotate the Presser Foot so the Angled surface on the Knife is parallel with the sharpening pads WARNING Sharp Knife is exposed Whe...

Page 13: ...n reverse order Bushing See Page 13 Bushing Release Shaft 54 28660 Drill See Page 12 Collar 54 28598 Drill Bit Replacement Removing the Drill Bit 1 Turn the Power off to the Raptor use lockout tagout if required 2 Lift the Collar up to Release the Drill Bit NOTE Collar will only move approximately 5mm 3 Lower the Drill Bit Handle drill bit with care Failure to do so may result in serious personal ...

Page 14: ... 54 28636 187 54 28629 H187 1 4 250 54 28631 250 1 4 Closed End Drill Ass y 54 28636 250 54 28629 H250 5 16 312 54 28631 312 5 16 Closed End Drill Ass y 54 28636 312 54 28629 H312 3 8 375 54 28631 375 3 8 Closed End Drill Ass y 54 28636 375 54 28629 H375 3 64 047 54 28630 055 3 64 Solid Drill Ass y 54 28636 055 54 28629 S055 5 64 078 54 28630 070 5 64 Solid Drill Ass y 54 28636 070 54 28629 S070 3...

Page 15: ...l Bushing Ø1 0mm 2mm 54 28569 2 Drill Bushing Ø2 0mm 3mm 54 28569 3 Drill Bushing Ø3 0mm 4mm 54 28569 4 Drill Bushing Ø4 0mm 5mm 54 28569 5 Drill Bushing Ø5 0mm 6mm 54 28569 6 Drill Bushing Ø6 0mm 7mm 54 28569 7 Drill Bushing Ø7 0mm 8mm 54 28569 8 Drill Bushing Ø8 0mm 9mm 54 28569 9 Drill Bushing Ø9 0mm 10mm 54 28569 10 Drill Bushing Ø10 0mm 11mm 54 28569 11 Drill Bushing Ø11 0mm 12mm 54 28569 12 ...

Page 16: ...t tagout if required 2 Unclip Cover Latches on each side and rotate the front cover upwards 3 Remove 4 Socket Head Screws Cover Latch Socket Head Screw Socket Head Screw 4 Remove 4 Countersunk Screws and Finish ing Washers 5 Remove Toolhead Cover Finishing Washer Countersunk Screw Toolhead Cover ...

Page 17: ...rew on the Tensioner Pulley 7 Loosen Top Tension Bolt Socket Head Screw Tensioner Pulley 8 Remove 3 Socket Head Screws 9 Pull Motor and Bracket approximately 20mm or 1 to remove the belt NOTE Motor is connected to cables Handle with care Tension Bolt Socket Head Screw Motor Bracket ...

Page 18: ...are located on the top of the Reciprocat ing Drive Assembly NOTE Rotating the crank shaft and counter weight may be required 13 Reassemble in reverse order NOTE Adjust belt tension to a deflection of 1 4 or 6mm Alignment Markings Reciprocating Drive Assembly Balancing Weight Crank Shaft TOP VIEW Check Deflection Here Locking Bolt Tension Bolt WARNING Loose tension can cause excessive vibration and...

Page 19: ...o the Raptor use lockout tagout if required 2 Unclip Cover Latches on each side and rotate the front cover upwards 3 Remove Knife See page 8 4 Remove the 4 Socket Head Screws and Lock Washers that hold the Drive Assembly Cover Socket Head Screw Drive Assembly Cover Lock Washer Crank Bearing and Ball Joint Replacement Cover Latch Socket Head Screw Stabilizer Bracket Lock Washer Socket Head Screw ...

Page 20: ...e top 10 Completely remove the Reciprocating Knife Assembly from the tool head 11 Place on a flat surface to continue to replace the Crank Bearings and the Ball Joint Assembly Hex Head Screw Wedge Washer Crank Clamp Crank Shaft Insert Pin Here Socket Head Screw Lock Washer Bushing Clamp Reciprocating Knife Assembly Bearings Ball Joint Assembly Reciprocating Knife Assembly contains sharp knife Hand...

Page 21: ...ace Cap Screw Flat Washer Crank Eccentric Shaft Stud Bearings New Bearings 4 Replace the Crank Eccentric Shaft Stud Wash ers and Cap Screws NOTE Crank step located on same side as washers 5 Reciprocating Knife Assembly is ready to be re installed 6 Assemble in reverse order NOTE 1 Crank Step must face outward 2 Locating Pin Must slide through mating slot Cap Screw Flat Washer Crank Step Crank Ecce...

Page 22: ...dge Lock Washer M6 2 Piece Assy Ball Joint Requires 10mm Stroke Shaft Requires 9mm 3 The top of the Ball Joint requires a 14mm wrench and the Crank requires a 12mm wrench The Wedge Washer must be replaced anytime disassembled 4 Replace Ball Joint and Wedge Washers 5 Reciprocating Knife Assembly is ready to be re installed NOTE 1 Crank Step must face outward 2 Locating Pin Must slide through mating...

Page 23: ... and reassemble in reverse order Theta Belt Theta Belt Replacement Socket Head Screw Hex Nut Belt Tension Arm Theta Belt 1 Turn the Power off to the Raptor use lockout tagout if required 2 Remove knife using knife removal procedure 3 Loosen the 2 Hex Nuts and the single Socket Head Screw As Shown 3 Rotate the Belt Tension Arm with Idler Pulley counter clockwise to release the tension on the Theta ...

Page 24: ...Filter Cover As Shown 3 Slide out the Filter Bracket and Air Filters 4 Replace with Genuine Eastman Filters Reassemble in reverse order NOTE Use only Genuine Eastman Air Filters Failure may result in loss of vacuum pres sure damage to your machine and void your warranty Air Filter Replacement The Filter area and the bracket must be free of debris and dust Vacuuming or cleaning may be necessary Fai...

Page 25: ... block by ensuring the tab alignment is proper according to the slat arrangement As Shown 2 Apply even pressure on the surface of bristle block so that the mounting tabs snap into the slat As Shown 3 Release the E stop allowing conveyor and gantry movement and advance conveyor Inspect the remaining bristle block and replace damaged bristles as required NOTE Use only Genuine Eastman Bristle Blocks ...

Page 26: ... each side of the machine lift up the overlay bar and empty plastic overlay core and set it on flat surface Leather Strap Plastic Overlay Roll 3 Loosen the Shaft Collar Screw and remove large core stop disk 4 Remove the empty core and discard 5 Place bar into new Roll and reassemble in reverse order Shaft Collar Screw Core Stop Disk Failure to follow procedure may result in serious personal injury...

Page 27: ...e connectors 4 Remove the Position Lock Screw and Lock Washer as shown Take Off Drive Conveyor Belt Replacement Flanged Screw Side Cover Connectors Position Lock Screw Lock Washer 5 Loosen 4 mounting Screws as shown 6 Slide the Take Off Conveyor Drive pulley to the left to release the tension on the belt 7 Remove the Belt and discard 8 Reassemble in reverse order 9 Tension the belt so the deflecti...

Page 28: ...e Pause Paddle Guide Rail out as shown 4 Remove the 4 Countersunk Screws and 4 Finishing Washers Remove the cover Countersunk Screw Pause Paddle Finishing Washer Pause Paddle Guide Rail Countersunk Screw Finishing Washer Cover 5 Loosen Socket Head Screw to release the belt tension 6 Remove Belt 7 Replace the drive belt and reassemble in reverse order 8 When tensioning the belt set the tensioner pu...

Page 29: ...nd turning counter clockwise while holding the X Car Large Pulley in place Socket Head Screw Clamp Bearing Housing X Car Drive Gear X Car Large Pulley Insert Pin Here Turn Bearing Housing Counter Clockwise from behind Base Plate Operator Side Only Base Plate NOTE For Non Operator side the X Car Large Pulley must be removed by removing the eight Socket Head Screws in the middle NOTE This replacemen...

Page 30: ...ew X Car Drive Gear Key X Car Drive Gear 8 Re install New X Car Drive Pulley and Key 9 Re install the Set Screws for X Car Drive Gear Key X Car Drive Gear Set Screw NOTE Use Loctite 222MS set screws 10 Reassemble the X Car Drive Assembly in reverse order See page 28 for replacement of X Motor belts NOTE Use Loctite 680 Green on shaft when installing X Car Drive Gear ...

Page 31: ... to swing back into position once the belt is removed 5 The Tension Pulley Spring must be replaced when belt is replaced With pliers remove and replace 6 Using a 1 open end wrench rotate the Tension Arm Assembly clockwise CW Wrap the new or replacement Belt around the Blower Pulley and then onto the Motor Pulley 7 Once the Belt is in place and the wrench is removed verify that the Belt is seated i...

Page 32: ...rare case that a Controller Card needs replacement the loading of the proper Con figuration Files should be done with the help of Eastman s Technical Service Department If the Raptor Machine s Computer is hooked up to the internet Eastman s Technical Service Department has the capability of remotely ac cessing your machine through the internet and loading the proper files for you If not techni cal...

Page 33: ... 24V supply cur rent capacity for the system or check and fix X9 wiring E0082 SD card is not inserted No SD card inserted or SD card inserted with wrong orientation Insert SD card with correct orientation E0083 SD card is write protected SD card protection clip in wrong position Remove with protection from SD card E0084 SD card hardware not in stalled No I O option boad installed or SD card device...

Page 34: ...olatile memory stamp invalid Non volatile memory stamp is cor rupted or invalid Reset the drive to default memory values F106 Non volatile memory data Non volatile memory data is corrupted or invalid When this fault occurs after a firmware download it is not an indi cation of a problem clear the fault and perform a save to the drive Reset the drive to default memory values n107 Positive switch lim...

Page 35: ...oad the FPGA version that is com patible with the firmware n137 Homing and feedback mismatch The configured homing mode is not supported by the motor feedback type used Change homing mode F138 Instability during auto tune Drive current IL CMD or velocity feedback VL FB exceeds allow able limit BODE IFLIMIT or BODE VFLIMIT Occures in BODE MODE 5 when complex mechanics belts and complaint loads are ...

Page 36: ...sk n153 Velocity limit violation exceeding max limit A new target velocity calculated internally due to an exception and is being limited due to user velocity limit Activation of any new motion or us ing of DRV CLRFAULTS will clear the warning Check motion task tar get velocity settings and parameters to make sure that the values entered will not exceed the VL LIMITP and VL LIMITN setting n154 Fol...

Page 37: ...ith n160 when you try to trigger amotion task 128 such as MT MOVE 130 Trigger only motion task between 0 and 128 Activation of any new mo tion or using of DRVCLR FAULTS will clear the warning n164 Motion task is not initial ized Appears with n160 when you try to trigger a non initialized motion task Initialize themotion task first before starting the task Activation of any new motion or using of D...

Page 38: ...lt is user generated and is caused by user settings Users can configure a digital input to trigger this fault DINx MODE 10 The fault occurs according to this input setting Clear the input F247 Bus voltage exceed al lowed thresholds Hardware problem in bus measure ment Troubleshoot and repair hardware problem F248 Option board EEPROM EEPROM failure detected Restart drive If problem persists exchang...

Page 39: ...ive by adjusting lower acceleration decel eration ramps F312 Brake released when it should be applied Brake disengaged unexpectedly Check cabling and general function ality F401 Failed to set feedback Feedback is not connected or wrong feedback type selected Check primary feedback X10 F402 Analog signal amplitude fault Analog signal amplitude is too low Analog fault resolver signal ampli tude or s...

Page 40: ...de is above maximum level Check primary feedback X10 F426 Resolver error Resolver excitation fault Check primary feedback X10 F427 Analog low Analog signal amplitude low Check primary feedback X10 F428 Analog high Analog signal amplitude high Check primary feedback X10 F429 Incremental low Incremental encoder signal amplitude is below minimum level Check primary feedback X10 F430 Incremental high ...

Page 41: ... device Reset the fault on the drive with DRV CLRFAULTS if the problem persists then return the feedback to the manufacturer for repair F462 Tamagawa encoder counting overflow Multi turn counter has overflowed Reset the fault on the drive with DRV CLRFAULTS F463 Tamagawa encoder overheat The temperature of the encoder sub strate exceeds overheating detection temperature during main power on Reset ...

Page 42: ...ck the motor connections and WS IMAX very low current may produce this error F486 Motor velocity exceeds EMU speed Motor velocity exceeds themaximum speed the emulated encoder output can generate Reduce value of DRV EMUE PULSEIDTH F487 Wake and Shake Vali dating Positive Move ment Failed After applying a positive current mo tor moved in the wrong direction Check motor phase wiring and motor encode...

Page 43: ...hnical support F521 n521 Regen over power Too much power stored in regen resistor Either get larger regen resistor or use DC bus sharing to dissipate power F523 Bus over voltage FPGA Bus over voltage hard fault Check mains voltage and check system brake capacity F524 n524 Drive foldback Maximum drive power has been exceeded The power has been limited to protect the drive Motion requires too much p...

Page 44: ...rammed F535 Power board over tem perature fail The power board temperature sensor indicates more than 85 C Reduce the load of the drive or ensure better cooling F601 Modbus data rate is too high Modbus controller data rate is too high Reduce data rate F602 Safe torque off Safe torque off function has been triggered Reapply supply voltage to STO if safe to do so n603 OPMODE incompatible with CMDSOU...

Page 45: ...ound User program attempted writing an invalid recorder parameter F815 Data invalid User program attempted executing an invalid command F816 Data too high User program contains a parameter that is above the accepted range F817 Data too low User program contains a parameter that is below the accepted range F818 Param type out of range User program attempted to write a value which was out of a range...

Page 46: ...r off Check airflow and operat ing environment are within hardware specifications Allow unit to cool before power on E02 Out of memory KAS runtime is stopping Memory leak memory corrupted or hardware memory failure Power off on If problem is recur rent check release notes for firm ware updates or return hardware for repair E03 Fan failure CPU cooling fan was not able to operate properly Check temp...

Page 47: ... not complete or the PLC pro gram did not complete within the timeout period due to excessive CPU loading Stop the application or power off on Reduce the sample rate simplify the application or reduce the application cycles and re start the application E24 PLC application cannot be started 1 Maintenance operation is in progress 2 Controller is in online configmode 3 AKD Restore failed 4 The IDE ve...

Page 48: ...ad the updat ed application Re start the application E37 EtherCAT failed to return to init state EtherCAT network initialization failed due to a network commun ciation error Check the EtherCAT network wiring and de vices state Re start the application E50 Backup to SD card failed An unrecoverable error oc curred during the backup opera tion Repeat the backup to SD card operation If it fails again ...

Page 49: ...s Reset to factory de faults A21 Recoverable process or thread failed to respond during operation KAS non runtime code failed during normal operation and was automati cally restarted If problem is recurrent power off on Check release notes for firmware up dates A23 CPU is overloaded Reduce the sample rate simplify the application or reduce the application cycles A30 EtherCAT missed a send frame du...

Page 50: ...rts following error 1 Irms or Ipeak set too low 2 current or velocity limits apply 3 accel decel ramp is too long 1 verify motor drive sizing 2 verify that IL LIMITN P VL LIMITN P are not limiting the drive 3 reduce DRV ACC DRV DEC Motor overheating 1 motor operating above its rating 2 motor current settings incorrect 1 verify motor drive sizing 2 verify motor continuous and peak current values ar...

Page 51: ... Axis E Chain Assembly X Axis X1 Motor Cable X Axis X2 Motor Cable X Axis Y Motor Cable X Axis Knife Motor Cable X Axis Theta Motor Cable Network Slice I O Cable DB25 M F Cable f Air Line Signoff Comments Raptor Machine Check painted surfaces for scratches or damage use touchup paint as required Visually check all labels and decals Clean or replace as required Check overhead light system for prope...

Page 52: ...r Secure Theta Motor drive pulley set screws Examine cylinder motion Inspect the knife intellicut system for any loose parts or wiring Inspect the drive belt for knife motor Comments Signoff Control Panel Assembly Check UIT control assembly and cables Check the joy stick for proper opera tion Check tools on off switch wiring light bulb Secure all screws Comments Signoff ...

Page 53: ... cables for any wear cracks or loose connections Check all screw terminals to ensure that wiring is secure Inspect take off I O cable for proper secure ness and damage Check take off motor feedback cable Check take off motor power cable Comments Signoff Bristle Conveyor Examine surface for damaged bristles Inspect edge seals for damage Check excessive wear on drive sprockets Inspect Bristle drive ...

Page 54: ...les for and wear Check all screw terminals to ensure wiring is secure Examine Solenoid Block Pressure regulator valve body flow control valve and air lines a Check for air leaks Check and secure all set screws b Large Pulley for signs of wear and damage c Y motor drive pulley for signs of wear and damage Inspect Linear bearings for signs of wear or damage Check secure all screws Check Y Y Y Home l...

Page 55: ...car power cable filtered SynqNet In Cable SynqNet Out Cable UIT Cable Y car Power Cable Y car I O Cable Airline tubing Check electronics tray is secure Check wiring and cables for signs of wear Check all screw terminals to ensure wiring is secure Check secure gear rack screws Check secure all remaining hard ware Check secure linear rail oil or grease rail as required See Lube Chart Comments Signof...

Page 56: ...ing Raptor Maximum Gantry Speed 40 in sec 102 cm sec Maximum Conveyor Speed 8 in sec 20 cm sec Cut Accuracy 0 010 in 0 025 cm Gantry Weight 260 lbs 118 kg Machine Voltage 208 220 380 400 415 440 575 VAC 3 Phase 50 60 Hz Blower Operating Voltage 220 440 VAC 3 Phase 60Hz Minimum Operating Pressure 75 psi Volume of Air Service 30 SCFM Machine Size Long 228 579cm Machine Size Wide 110 279cm Table Widt...

Reviews: