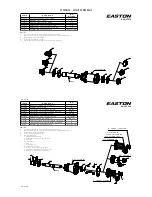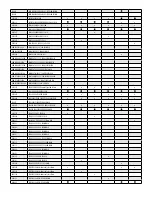
BEARING REMOVAL
Front Hubs:
1. Use pick to remove inner seals (note orientation for correct reinstallation)
2. Choose correct drift for removal:
Hub Model
Easton Vault Front Hub: 516
Removal Drift
Vault 33 - Bearing Removal Drift For Front Hubs With 18x30
Bearings
3. Insert removal drift in rotor-side of axle
4. Hammer drift until drive side bearing is ejected. Use care to safely catch axle as it gets
hammered out
5. Reinsert axle into rotor-side bearing
6. Insert removal drift into drive-side of axle and hammer drift until rotor-side bearing is
ejected Use care to safely catch axle as it gets hammered out
7. Clean hub shell, axle, seals and end caps
Rear Hubs:
1. Using the plastic mallet, hammer the drive-side end of the axle to eject the rotor-side
bearing and axle from the non-drive side of hub shell. Use care to safely catch axle as
it’s hammered out.
2. Flip axle and re-insert short (rotor-side) end of axle through hub shell and into drive-
side bearing
3. Using the plastic mallet, hammer the axle to eject the drive-side bearing from the hub
shell. Use care to safely catch axle as it gets hammered out
4. Clean hub shell, axle, seals and end cap
BEARING INSTALLATION
General notes/warnings
:
• Install/Press only one bearing at a time, guiding bearing with 2nd drift in opposite
bearing bore
• Always fully install rear drive-side bearing first or for front hubs rotor-side bearing first
• Orient bearings so that red seals face outward
• No grease or Loctite is required in the bearing bores
• Never press a bearing using the stepped side of a bearing drift. Only press bearings with
drift flat side contacting bearings.
1. Assemble Installation Drift onto bearing press. For Drift 32 that has one side with step
(counter bore), orient drift so that fully flat side will be contacting bearing to be pressed
Hub Model
Easton Vault Rear Hub: 525
Easton Vault Front Hub: 516
Drift # for 1st
bearing press
Vault 34 - Bearing Installation Drift
For Rear Hubs With 6902 Bearings,
Drive Side
Vault 32- Bearing Installation Drift
For Front Hubs With 18x30 Bearings
2. Determine if hub axle should be assembled with 1st bearing for 1st bearing press:
Hub Model
Easton Vault Rear Hub: 525 Easton Vault Front Hub: 516
Bearing installed on axle
for 1st bearing Press
Yes
Yes
FULL CONTACT SIDE-
USE WHEN DRIFT IS
PRESSING BEARING
INTO HUB SHELL
STEPPED SIDE-
USE WHEN DRIFT IS
ALIGNING AXLE DURING
1ST BEARING PRESS.
INSTALL OVER AXLE, WITH
STEP FACING AXLE
FLANGE
3. Assemble new 1st bearing (and axle if applicable) onto to Installation Drift on hub press
tool. Red seal oriented to face outward (red seal faces drift, not hub). Make sure drift flat
side fully supports/contacts inner and outer bearing races
Hub Model
Easton Vault Rear Hub: 525
Easton Vault Front Hub: 516
Bearing
8022798 - Bearing 6902 CM AM
8022803 - Bearing 18x30 CN AM
4. Confirm axle orientation: Easton front Center Lock hubs (516) have a longer bearing
journal on rotor-side. All rear hubs have longer bearing journal on drive-side.
5. Assemble hub shell onto hub bearing press with rear drive side or front rotor-side bearing
bore toward new 1st bearing.
6. Select correct drift to act as alignment guide for hub bearing press tool
Hub Model
Easton Vault Rear Hub: 525
Easton Vault Front Hub: 516
Drift # for opposite
bore guide during 1st
bearing press
Vault 35 - Bearing
Installation Drift For Rear
Hubs With 6902 Bearings,
Non-Drive Side
Vault 32 - Bearing
Installation Drift For Front
Hubs With 18x30 Bearings
7. For Drift 32 & 35 that have one side with step (counter bore), orient drift so that stepped
side faces axle flange into hub shell (to ensure there is clearance to axle flange to allow
1st bearing to fully seat).
8. Place drift for alignment guide onto hub bearing press and into opposite (empty) bearing
bore.
9. Tighten Hub Bearing Press:
a. Use a firm force on handles of bearing press and make sure bearing is firmly seated
10. Loosen hub bearing press tool
11. Remove installation (alignment guide) drift
12. Optional step: remove hub press tool and confirm bearing rotates w/o any roughness.
13.
*IMPORTANT*
Hub Axle: confirm already installed (all rear hubs + 516 front hubs)
14. Check axle for correct orientation
15. Assemble new 2nd bearing onto axle. Red seal faces outward
16. Reinstall Installation Drift
17.
*IMPORTANT*
Ensure Drift 32 and 35 are oriented so that full contact side of drift is
touching the bearing to fully support inner and outer bearing races during press step
18. Tighten Hub Bearing Press: Use a moderate force on handles of bearing press. Forces
too low or too high can
result in excessive drag and premature wear
19. Removal Hub Bearing Press and all Installation Drifts
20. Confirm bearings rotate w/o any roughness
21. Confirm hub axle cannot be moved/shifted side to side between bearings
HUB RE-LUBE AND REASSEMBLY
1. Apply a thin layer of light grease to cover the following hub shell bearings:
a. 525 Rear rotor-side
b. 516 Front: both sides
2. 516 hubs only: Reassemble inner seals - correct orientation is lip pointing outwards
3. Rear only:
Optional step: Use small flat head screwdriver and cloth to clean dirt and grease from
groove behind the cassette body shield. Use care to not scratch sealing surface or bend
shield.
Optional step: re-lube (light grease) the drive ring on the cassette body and oil the seal lip
& pawl pockets.
a. Assemble 0.7mm cassette body spacer on axle, between hub shell bearing and cassette
body
b. Assemble cassette body, turning counter-clockwise to engage pawls
c. Apply thin coat of thin cassette body grease to Shimano HG outer cassette body bearing,
for XD, XDR, Micro Spline, and Campagnolo bodies apply and thin coat of waterproof
grease to outer cassette body bearing
4. Reinstall end caps
a. 525: longer end cap on rotor-side
b. 516 front hub: longer end cap on (Center Lock) rotor-side


