background image

To order parts and supplies: 800.345.1178  >>  eastwood.com 

5

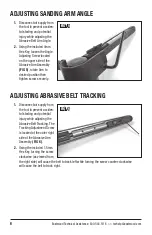
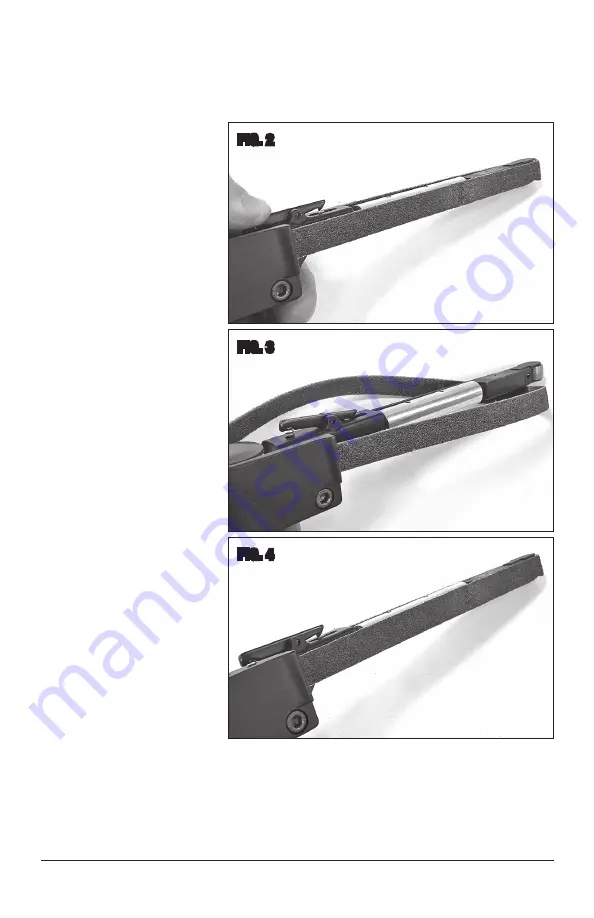
ABRASIVE BELT REPLACEMENT

The Abrasive Belts are quickly and easily changed. No tools are required.  
The following steps describe how to do this:

1. 

Disconnect air supply from 
the tool to prevent acciden-
tal starting and potential 
injury while removing or 
installing an Abrasive Belt.

2. 

The end of the Abrasive 
Belt Arm is spring loaded to 
keep the proper tension on 
the Abrasive Belts. While 
holding the tool firmly, push 

inward

 on the end of the 

Abrasive Belt Arm while de-
pressing the Thumb-Lever 
Latch 

(FIG 2)

.  

NOTE:

 The Guide Pin will 

move inward until it locates 
under the Latch portion 
of the Thumb-Lever Latch 
holding it in the retracted 
position while the Abrasive 
Belt is changed 

(FIG 3)

.

3. 

Pull the worn Abrasive Belt 
free of the Drive Drum and 
discard.

4. 

Slide the replacement 
Abrasive Belt over the  
Drive Drum and Idle Roller 
at the end of the Abrasive 
Belt Arm 

(FIG 4)

.  

NOTE:

 Be sure the Abrasive 

Belt is slid fully over the 
Guide Bar located on the 
upper surface of the  
Abrasive Belt Arm.

5. 

Depress the Thumb-Lever Latch to release the Guide Pin restoring full spring pressure.

FIG. 2

FIG. 3

FIG. 4

Summary of Contents for 31455

Page 1: ...1 2 X 18 PROFESSIONAL MINI BELT SANDER INSTRUCTIONS Part 31455 ...

Page 2: ...1 80 Grit 1 2 x 18 Abrasive Belt 1 100 Grit 1 2 x 18 Abrasive Belt 1 1 4 NPT Air Inlet Coupling SPECIFICATIONS RPM 16 000 free speed Air Motor Variable speed 4 vane ball bearing Air Consumption 7 1 CFM 201 L min Inlet thread size 1 4 FNPT Required Belt Size 1 2 x 18 minimum 16 000 RPM DANGER indicates a hazardous situation which if not avoided will result in death or serious injury WARNING indicat...

Page 3: ...grinding or sanding as the tool body can suddenly kick back or twist causing severe hand or wrist injury Belts can also be torn with excessive side force causing them to disintegrate and eject sharp pieces at high velocity This tool will vibrate during use Repeated exposure to vibration may cause physical injury Always disconnect tool from air supply when changing abrasive belts to prevent acciden...

Page 4: ...ever located at the left rear of the tool handle to regulate motor speed FIG 1 Note that the down position will result in slower speed while up will increase speed Depress Throttle Paddle inward with fingers to operate tool Keep the broad work surface of the Abrasive Belt parallel to the work surface whenever possible to minimize uneven wear and maximize usable life Always maintain a firm grip whi...

Page 5: ...inward on the end of the Abrasive Belt Arm while de pressing the Thumb Lever Latch FIG 2 NOTE The Guide Pin will move inward until it locates under the Latch portion of the Thumb Lever Latch holding it in the retracted position while the Abrasive Belt is changed FIG 3 3 Pull the worn Abrasive Belt free of the Drive Drum and discard 4 Slide the replacement Abrasive Belt over the Drive Drum and Idle...

Page 6: ...y FIG 5 rotate Arm to desired position then tighten screw securely ADJUSTING ABRASIVE BELT TRACKING 1 Disconnect air supply from the tool to prevent acciden tal starting and potential injury while adjusting the Abrasive Belt Tracking The Tracking Adjustment Screw is located at the outer right side of the Abrasive Arm Assembly FIG 6 2 Using the included 1 5mm Hex Key turning the screw clockwise as ...

Page 7: ...LESHOOTING PROBLEM CAUSE CORRECTION Tool Doesn t Respond to Trigger Depression Insufficient Air Supply Verify sufficient air supply Should be 7 1 cfm or more Moisture in Air Line Check for moisture in air line and tool inlet Tool Performance is Slow or Sluggish Insufficient Air Supply Verify sufficient air supply Should be 7 1 cfm or more Moisture in Air Line Check for moisture in air line and too...

Page 8: ...8 email techelp eastwood com PDF version of this manual is available online eastwood com 31455manual The Eastwood Company 263 Shoemaker Road Pottstown PA 19464 USA US and Canada 800 345 1178 Outside US 610 718 8335 Fax 610 323 6268 eastwood com ADDITIONAL ITEMS 31458 5 Pack of 40 Grit 1 2 x 18 Abrasive Belts 31456 5 Pack of 80 Grit 1 2 x 18 Abrasive Belts 31457 5 Pack of 120 Grit 1 2 x 18 Abrasive...

Reviews: