To order parts and supplies: 800.343.9353 >> eastwood.com
5
FRAME ASSEMBLY
NOTE:
When assembling components in the next stages, it is impor-
tant to only hand tighten all hardware to allow for alignment.
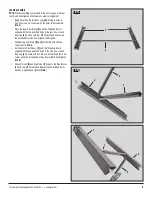
• Begin by setting the two Rear Legs
[A]
(having 8 holes &
2 notches) on a soft surface with the outer corners upward
(FIG 3)
.
• Place the long, Rear Brace
[E]
with the Threaded Inserts
aligned with the two punched holes in the rear face of each
Rear Leg
[3]
. Secure with four M8 Socket Head bolts using
the included 5mm Hex Key to lightly hand tighten.
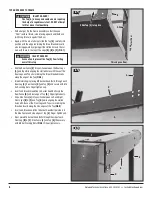
• Flip Rear Leg and Brace
[A]
&
[E]
assembly with outside
corners down
(FIG 4
).
• Set the short, Side Braces
[F]
with the Threaded Inserts
aligned with the two punched holes in the side face of each
Rear Leg
[A]
. Secure with four M8 x 15 Socket Head Bolts per
corner using the included 5mm Hex Key to lightly hand tighten
(FIG 5)
.
• Add Left Front
[B]
and Right Front
[C]
Legs to the Side Braces
[F]
with two M8 Socket Head Bolts using the included 5mm
Hex Key to lightly hand tighten
(FIG 6)
.
FIG. 4
FIG. 5
FIG. 6
A
✓
✓
E
✓
✓
✓
✓
A
E
F
✓
✓
✓
✓
A
E
F
C


