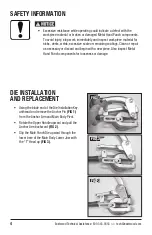
• Move the Upper Handle and Anchor Arm forward
capturing the “T” Head of the Male Die in the
“T” Slot of the Anchor Arm
(FIG 4)
.
• Re-install the Anchor Pin by aligning the pivot
bore of the Anchor Arm and the Main Body and
threading the Anchor Pin back into place
(FIG 5)
.
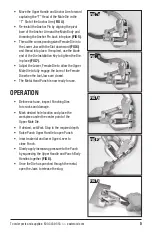
• Thread the corresponding sized Female Die into
the Lower Jaw with the Slot downward
(FIG 6)
and thread into place. If required, use the blade
end of the Die Installation Key to tighten the Die
in place
(FIG 7)
.
• Adjust the Lower, Female Die to allow the Upper
Male Die to fully engage the bore of the Female
Die when the tool Jaws are closed.
• The Metal Hand Punch is now ready for use.
OPERATION
• Before each use, inspect Punching Dies
for cracks and damage.
• Mark desired hole location and place the
workpiece under the center point of the
Upper Male Die.
• If desired, set Work Stop to the required depth.
• Raise Punch Upper Handle to open Punch.
• Insert material and lower Upper Lever to
close Punch.
• Slowly apply increasing pressure to the Punch
by squeezing the Upper Handle and Punch Body
Handles together
(FIG 8)
.
• Once the Die has punched through the metal,
open the Jaws to release the slug.
To order parts and supplies: 800.343.9353 >> eastwood.com
5
FIG. 4
FIG. 5
FIG. 6
FIG. 7
FIG. 8


