GUN SETTINGS
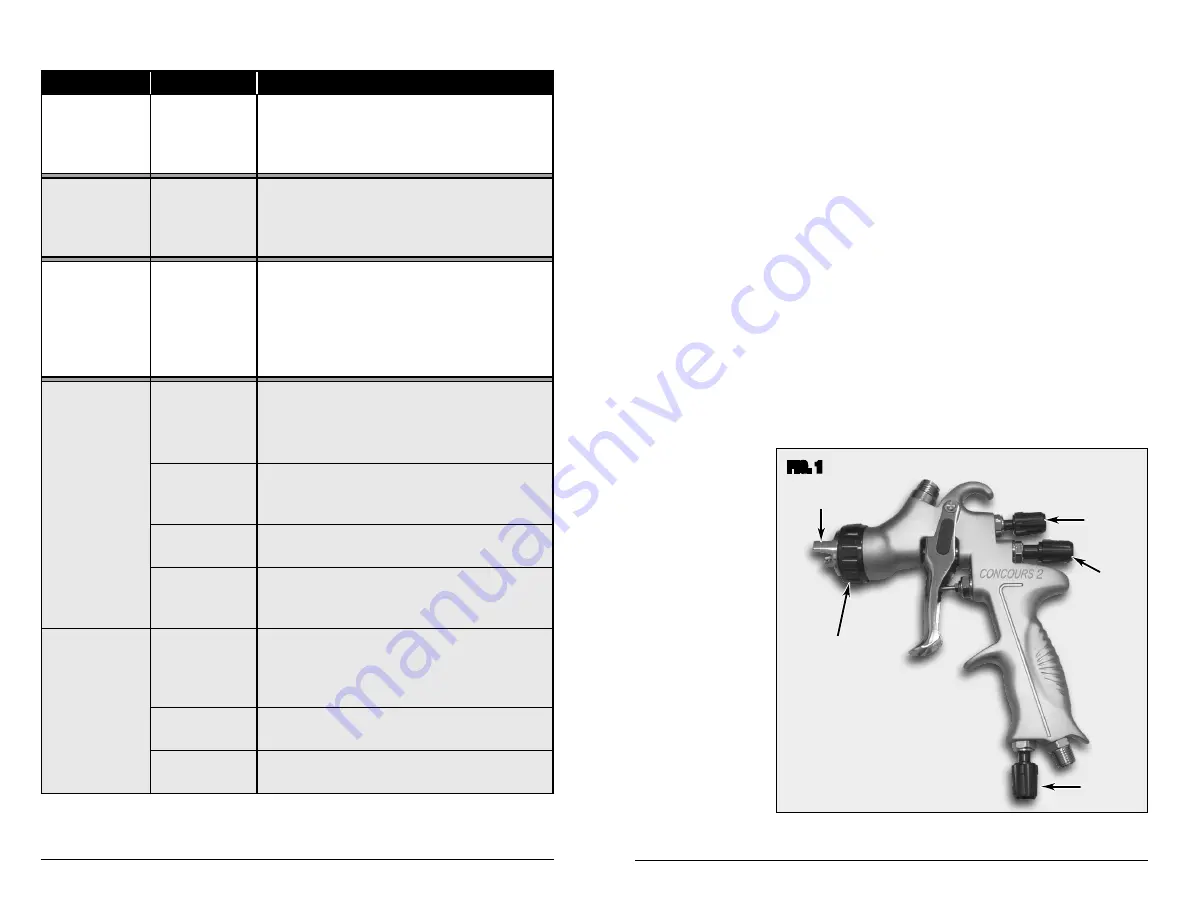
• Air Cap
- Make sure the Air Cap is properly oriented in a horizontal plane to produce a vertical fan
spray pattern by viewing the HVLP Paint Gun from the front. To adjust, loosen Retaining Ring by
rotating counter-clockwise slightly, adjust Air Cap then re-tighten Retaining Ring
(Fig 1)
.
• Fluid Control
– The Fluid Control knob (located at mid-rear of gun body) regulates the distance
the Needle travels and the amount of paint flowing through the gun. Note: Generally for higher
viscosity coatings, a wider opening is desired while a closer opening is better suited for lower
viscosity fluids. To adjust, rotate the Fluid Control Knob outward (counter-clockwise as viewed
from the rear) to increase flow and turn inward to reduce flow
(Fig 1)
.
• Fan Control
– The Fan Control knob (located at the upper-rear of the paint gun body) controls
the size and shape of the spray pattern of “fan”. Rotating the knob counter-clockwise (as
viewed from the rear of the gun) will produce a larger and softer spray pattern while rotating it
clockwise will result in a smaller, sharper, round pattern. For most painting conditions, a larger,
softer fan is desired
(Fig 1)
.
• Air Control
– The Air Control knob (located at the bottom of the gun handle adjacent to the
air inlet) is opened by rotating in a counter-clockwise direction (as viewed from the bottom of
the gun). This is for “fine tuning” the airflow to the gun. You will generally want to set the inlet
pressure at the regulator, start with the Air Control in the full open position and decrease air as
needed
(Fig 1
).
• With practice,
you will quickly
acquire a “feel”
for the gun and
will be producing
professional
results.
• When you have
achieved your
optimal knob
settings, note their
positions with
the indicators on
the gun body and
knobs. This will
assist in quickly
“tuning” the gun in
future uses.
8
Eastwood Technical Assistance: 800.343.9353 >> techelp@eastwood.com
To order parts and supplies: 800.343.9353 >> eastwood.com
5
Fan
Control
Air Cap
✓
FIG. 1
✓
Air
Control
Retaining
Ring
Fluid
Control
✓
✓
✓
PROBLEM
CAUSE
CORRECTION
Gun produces
an uneven
spray pattern
or fan
Paint or film
buildup on Air
Cap blocking
air holes
Disconnect air supply and clean buildup from Air
Cap
Gun “spits”
or sputters;
discharges
large droplets
Paint or film
buildup on
Needle &
Nozzle
Disconnect air supply and clean buildup from
Needle & Nozzle. Note: Use of solvent may be
helpful, removal of the Nozzle may be necessary
Gun dispenses
only a small
amount of
paint or none
at all
Clump or piece
of paint film
blocking paint
inlet port
Disconnect air supply; remove paint cup, remove
blockage from paint inlet area then strain paint or
coating to remove clumps or film
Heavy textured
or “orange
peel” paint
appearance
Paint Gun is
too close to
surface
Keep within 8" to 12"
Inlet air
pressure too
low
Increase inlet air pressure and or decrease fluid
flow
Incorrect
thinner/reducer
Check paint manufacturer’s reducing/thinning
instructions
Incorrect
material mix
ratios
Check paint manufacturer’s mix ratio instructions
Excessive runs
and sags
Paint Gun
being moved
too slowly over
surface
Speed up gun motion over surface
Excessive fluid
flow
Decrease fluid flow by adjusting “fluid” knob
Paint mixed too
thin
Check paint manufacturer’s reducing/thinning
instructions
TROUBLESHOOTING


