background image

4


Eastwood Technical Assistance: 800.343.9353  >>  techelp@eastwood.com

To order parts and supplies: 800.343.9353  >>  eastwood.com 

9

SET-UP

•  Remove all components from carton, identify them and become familiar with their purpose.
•  A 3/8" I.D. 

minimum

 air hose at a 25' 

maximum

 length is strongly recommended for 

best results. Smaller I.D. hose and greater length may reduce available CFM and produce 
unsatisfactory results.

•  A clean, dry, regulated air supply is required. The use of an additional “on the gun” regulator is 

strongly recommended to accurately control gun pressure while painting.

•  Clean out the paint cup as well as the paint gun air and paint passages with a solvent such as 

Eastwood PRE

 or acetone to remove any residual manufacturing impurities before use. Dry 

thoroughly.

IMPORTANT NOTES BEFORE PAINTING:
  1.  Please note that many variables affect the adjustment of a paint gun including paint  
    viscosity and type, atmospheric conditions such as humidity, barometric pressure and  
    temperature as well as air inlet pressure and operator preference. Always “tune” the  
    gun before each use as prevailing conditions may not be the same as the previous use.
  2.  It is always best to test spray on sheets of cardboard or masking paper with the actual  
    paint you will be applying while making your adjustments to become familiar with the  
    gun and achieve the ideal Fluid Control Setting. 
  3.  Remember that a small amount of product used at this point can avoid    


    disappointment in your results and the need to re-do your work later.
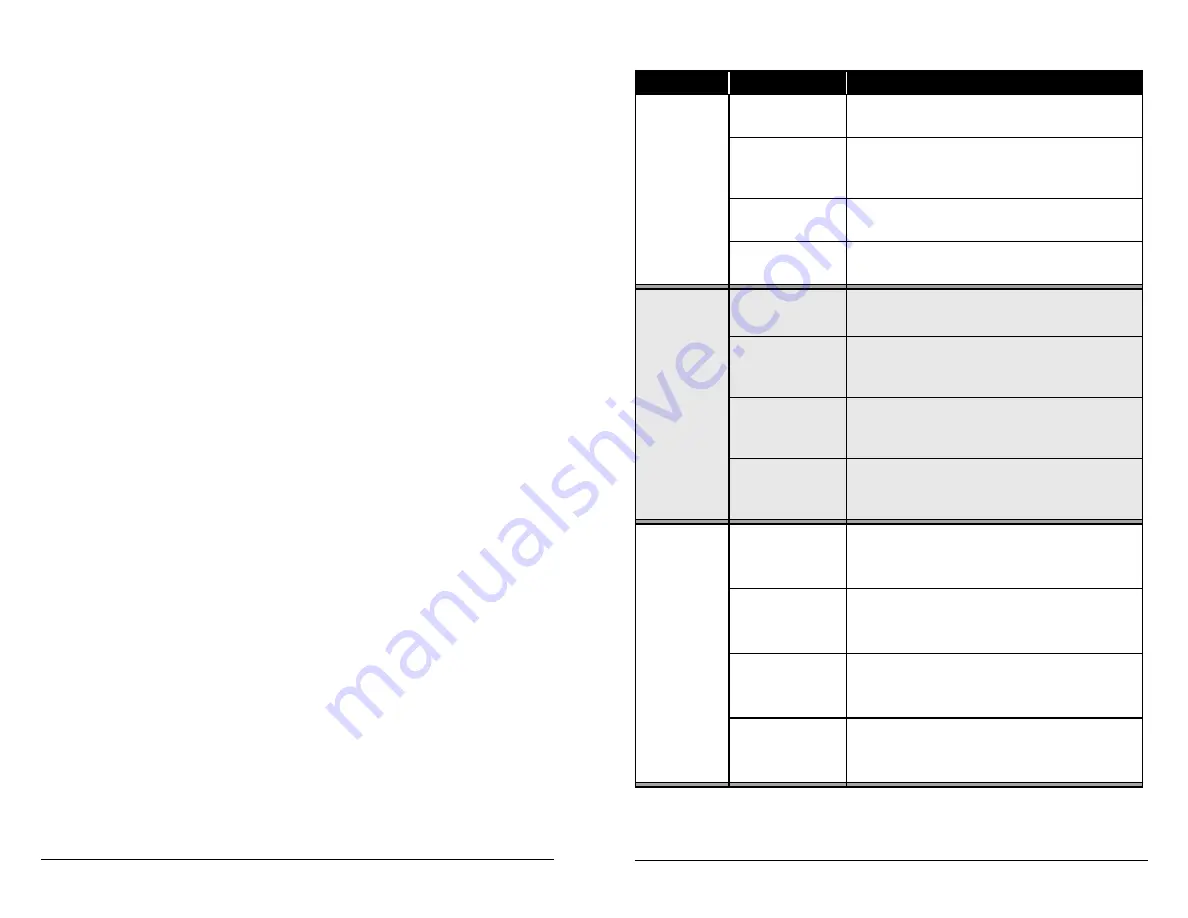
PROBLEM

CAUSE

CORRECTION

“Dry” paint 

appearance

Paint Gun is too 

far from surface 

Keep within 8" to 12"

Paint Gun being 

moved too fast 

over surface

Slow down gun motion over surface

Inlet air pressure 

too high

Decrease gun inlet air pressure and or increase 

fluid flow

Incorrect thinner/

reducer

Check paint manufacturer’s reducing/thinning 

instructions

Thin paint 

appearance

Paint Gun is too 

far from surface

Keep within 8” to 12”

Paint Gun being 

moved too fast 

over surface

Slow down gun motion over surface

Inlet air pressure 

too high

Decrease gun inlet air pressure and or increase 

fluid flow

Incorrect thinner/

reducer

Check paint manufacturer’s reducing/thinning 

instructions

Paint 

spray is 

sputtering

Paint Gun is dirty 

or contaminated

Disassemble and clean gun with suitable solvent

Nozzle or Air cap 

loose. 

Tighten Nozzle and or Air Cap

Needle tip or 

Nozzle seat 

damaged

Replace Needle/Nozzle set

Gun being tipped 

too far down

Operate gun with tip tilted no more than 45º down 

or up

TROUBLESHOOTING 

(CONTINUED)

Summary of Contents for CONCOURS 2 16287

Page 1: ... available online eastwood com 16287manual The Eastwood Company 263 Shoemaker Road Pottstown PA 19464 USA US and Canada 800 343 9353 Outside US 610 718 8335 Fax 610 323 6268 eastwood com Item 16287 ADDITIONAL ITEMS 12846Z Eastwood Aerosol Injected Cleaner 10041Z Eastwood PRE Aerosol 11949Z Eastwood Low VOC PRE Aerosol 16186 Eastwood Professional Paint Gun Cleaning Set 31624Z Kresto GT Paint Shop H...

Page 2: ...bodied coatings 1 1 3mm Stainless Steel Needle and Nozzle Set for single stage base coats clears 1 600ml solvent resistant composite Paint Cup 1 Paint Gun Wrench 2 Cleaning Brushes 1 1 4 FNPT Quick Disconnect Fitting 1 Regulator 1 Aluminum Storage Case SPECIFICATIONS 4 25 CFM 30 PSI 2 Bar 1 4 male NPT air input threads M16 x 1 5 NPS paint cup inlet attachment threads 1 7 mm stainless steel needle ...

Page 3: ... INJURY HAZARD This Paint Gun can quickly spray while handling when connected to an air supply causing serious personal injury Always disconnect the Paint Gun from the air supply before adding paint changing nozzles removing clogs or other maintenance Use only Eastwood Aerosol Injected Cleaner acetone or lacquer thinner to clean guns Use of chlorinated or halogenated hydrocarbon solvents can corro...

Page 4: ...to test spray on sheets of cardboard or masking paper with the actual paint you will be applying while making your adjustments to become familiar with the gun and achieve the ideal Fluid Control Setting 3 Remember that a small amount of product used at this point can avoid disappointment in your results and the need to re do your work later PROBLEM CAUSE CORRECTION Dry paint appearance Paint Gun i...

Page 5: ...Fig 1 With practice you will quickly acquire a feel for the gun and will be producing professional results When you have achieved your optimal knob settings note their positions with the indicators on the gun body and knobs This will assist in quickly tuning the gun in future uses 8 Eastwood Technical Assistance 800 343 9353 techelp eastwood com To order parts and supplies 800 343 9353 eastwood co...

Page 6: ...and removing Retaining Ring Fig 1 Remove Nozzle with a 10mm wrench which is included Fig 2 Remove the tan plastic oval shaped Air Manifold from the front of the Gun Body Fig 3 Unthread and remove Fluid Control Knob from rear of Paint Gun body REASSEMBLY Set the tan plastic Air Manifold into the oval shaped recess in the front of the Gun Body Fig 5 Replace Needle by sliding into bore in rear of Pai...

Page 7: ...and removing Retaining Ring Fig 1 Remove Nozzle with a 10mm wrench which is included Fig 2 Remove the tan plastic oval shaped Air Manifold from the front of the Gun Body Fig 3 Unthread and remove Fluid Control Knob from rear of Paint Gun body REASSEMBLY Set the tan plastic Air Manifold into the oval shaped recess in the front of the Gun Body Fig 5 Replace Needle by sliding into bore in rear of Pai...

Page 8: ...Fig 1 With practice you will quickly acquire a feel for the gun and will be producing professional results When you have achieved your optimal knob settings note their positions with the indicators on the gun body and knobs This will assist in quickly tuning the gun in future uses 8 Eastwood Technical Assistance 800 343 9353 techelp eastwood com To order parts and supplies 800 343 9353 eastwood co...

Page 9: ...to test spray on sheets of cardboard or masking paper with the actual paint you will be applying while making your adjustments to become familiar with the gun and achieve the ideal Fluid Control Setting 3 Remember that a small amount of product used at this point can avoid disappointment in your results and the need to re do your work later PROBLEM CAUSE CORRECTION Dry paint appearance Paint Gun i...

Page 10: ... INJURY HAZARD This Paint Gun can quickly spray while handling when connected to an air supply causing serious personal injury Always disconnect the Paint Gun from the air supply before adding paint changing nozzles removing clogs or other maintenance Use only Eastwood Aerosol Injected Cleaner acetone or lacquer thinner to clean guns Use of chlorinated or halogenated hydrocarbon solvents can corro...

Page 11: ...bodied coatings 1 1 3mm Stainless Steel Needle and Nozzle Set for single stage base coats clears 1 600ml solvent resistant composite Paint Cup 1 Paint Gun Wrench 2 Cleaning Brushes 1 1 4 FNPT Quick Disconnect Fitting 1 Regulator 1 Aluminum Storage Case SPECIFICATIONS 4 25 CFM 30 PSI 2 Bar 1 4 male NPT air input threads M16 x 1 5 NPS paint cup inlet attachment threads 1 7 mm stainless steel needle ...

Page 12: ... available online eastwood com 16287manual The Eastwood Company 263 Shoemaker Road Pottstown PA 19464 USA US and Canada 800 343 9353 Outside US 610 718 8335 Fax 610 323 6268 eastwood com Item 16287 ADDITIONAL ITEMS 12846Z Eastwood Aerosol Injected Cleaner 10041Z Eastwood PRE Aerosol 11949Z Eastwood Low VOC PRE Aerosol 16186 Eastwood Professional Paint Gun Cleaning Set 31624Z Kresto GT Paint Shop H...

Reviews: