


•
Always preheat the oven to 450°F (350°F for 10093
and 10286 Gloss Clear)
. All ovens vary; this may take 5-10
minutes to achieve 450°F.
• Carefully place the coated piece into the 450°F oven
and close the door.
• Check the piece every 5 minutes until the entire piece
has flowed out or glossed over. Some edges or thinner
cast sections of the piece may flow out or gloss over
early, but wait until the entire piece has flowed out.
•
At this point, set oven temperature to 400°F (350°F for 10093 and 10286
Gloss
Clears)
and your timer to 20 minutes.
• Always read powder instructions for specific cure temperatures.
• Allow the piece to cure with the oven on for the entire 20 minutes.
• After the 20 minute cure, remove the part from the oven or turn the oven off,
crack the door open and allow the piece to slowly cool.
• Once cool, the piece can be second coated, or the tape, plugs, and other
masking material can be removed, and the part returned to service.
Note:
Larger and/or heavy cast pieces may take 10-30 minutes to flow out or gloss
over – this in normal. Simply continue to check the piece until complete flow has
been achieved, then set your temperature and timer as described above for curing.
Also:
Gloss should go into an oven preheated to 350° F and allowed to cure at
350° F after complete flow out has occurred. Curing at higher temperatures may
cause yellowing.
Powder coatings cure with heat. The high temperature changes the powder from
it’s dry solid state to a “glossy” liquid state. This is called the “flow out” or “gloss
over”. The time the powder is in this liquid state and “flows” is called the gel time.
To help maximize chip resistance and produce a smooth coating, the substrate
(piece you are coating) must be brought up to the cure temperature
quickly
and
allowed to stay at that temperature for the specified cure time. To properly cure
the HotCoat powders and achieve full chemical, heat (up to 350°F), and chip
resistance, along with the smoothest possible finish follow the steps below.
Note:
Most powders inherently have a slight orange peel (the surface condition and
preparation will affect smoothness). Refer to the troubleshooting section (page
15) for more information, and follow the cure process below:
Before Touching or Cleaning the Emitter
The gun becomes less efficient as powder builds up on the
gun emitter. To remove powder build-up from the emitter,
release the activation switch, and momentarily touch the
emitter to the ground clamp (the resulting spark indicates the
system is now discharged). Wipe off the electrode with a dry
cloth. When you are finished applying the powder to the part,
release the activation switch, touch the emitter to the ground
clip, set the gun down and unplug the power unit.
DO NOT USE A GAS OVEN!
12
For technical assistance e-mail: techelp@eastwood.com
C
URING
THE
P
OWDER
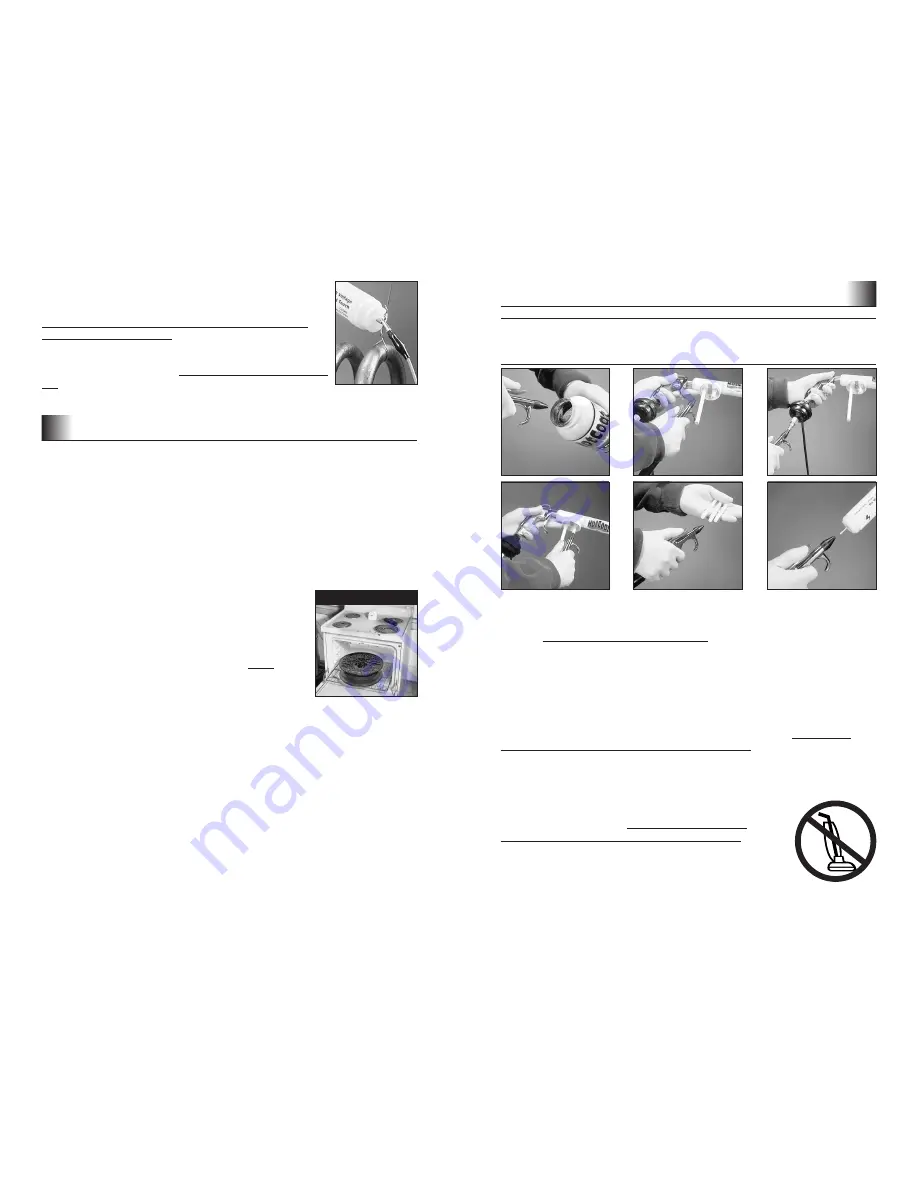
Cleaning the Gun
When you are finished using one color you must clean the gun before using
another. To clean the unit, unplug it so no voltage is in the unit. To discharge
the gun, touch the emitter to the ground clip. Disconnect the air supply. Store
powder in the original powder container.
Now the gun is safe to handle. Unscrew the cup, pour the remaining powder
back into the original powder container. Using compressed air, clean the
discharge and pick up tubes, cup, static tubes, and deflector thoroughly with
no more than 30 psi compressed air. With your gloves on, gently twist off the
deflector and remove the three static tubes.
Do not use solvents when cleaning your powder coating system. The gun and
components are to be cleaned with compressed air only. To make your clean up
easier use our
17 pc. Cleaning Brush Kit (#34109)
. Using the brushes in this set
allow you to blow the powder right out of the gun. With your blow gun, thoroughly
clean the inside and outside of all the static tubes and deflector. Direct air into the
nozzle and the pick up tube to make sure no powder remains.
The only other cleaning necessary is to clean up the powder
on the floor or workspace.
WARNING: Powder dust
in heavy concentrations is potentially flammable!
Due to the possible explosion risk, never use an electric
vacuum, ShopVac or wet/dry vac to clean up powder!
Always sweep up powder.
Blow remaining
powder out of bottle
with air hose
Blow remaining powder
out of pick-up tube
Blow air
through
static tubes
and deflector
Direct air down
nozzle to remove
powder
Clean inside
of lid
Press trigger and
blow remaining
powder out of the
discharge tube
To order parts and supplies, call 1-800-345-1178 or www.eastwood.com
13
C
LEANUP
TECH TIP:
Use clean disposable gloves during all gun cleaning operations.
It is also important to unplug the gun first and keep your dust mask on while
cleaning the gun.


