10
wELDING
IMPORTANT NOTE:
These instructions are intended only to provide the user with some familiarity of
the Eastwood TIG200 DC. TIG welding is a highly complex procedure with many
variables. If you have no experience with TIG welding; it is extremely important
to seek the advice of someone experienced in TIG welding for instruction, enroll
in a local technical school welding course or study a comprehensive how-to DVD
and obtain a good quality reference book on TIG welding as there is a moderate
learning curve necessary before achieving proficiency in TIG Welding. Before
attempting to use this unit on an actual project or object of value, practice on a
similar material as there are many variables present and settings required when
TIG welding different metals such as steel and stainless steel. It is also strongly
recommended that the user adhere to the American Welding Society guidelines,
codes and applications prior to producing welds where safety is affected.
1. Turn the Power Switch to the on position.
2. Slowly open the gas cylinder valve.
NOTE:
Always open valve fully to
avoid shielding gas leakage.
3. Depress gun trigger switch or foot pedal and adjust the flow regulator.
(Refer to Data Chart for actual settings)
.
4. Grounding is very important, place the Ground Cable Clamp on a clean, bare
area of your work piece as close to the welding area as possible to minimize
the chance of shock. Scrape, wire brush, file or grind a bare area to achieve
a good ground to assure safety.
5. Use a dedicated stainless steel brush or flap-disc to clean the areas to be
welded. Do not use the brush or flap-disc for any other purpose.
6. Making sure all your safety gear is in place (Welding Mask, Welding Gloves,
non-flammable long sleeve apparel) and the area is completely free of
flammable material.
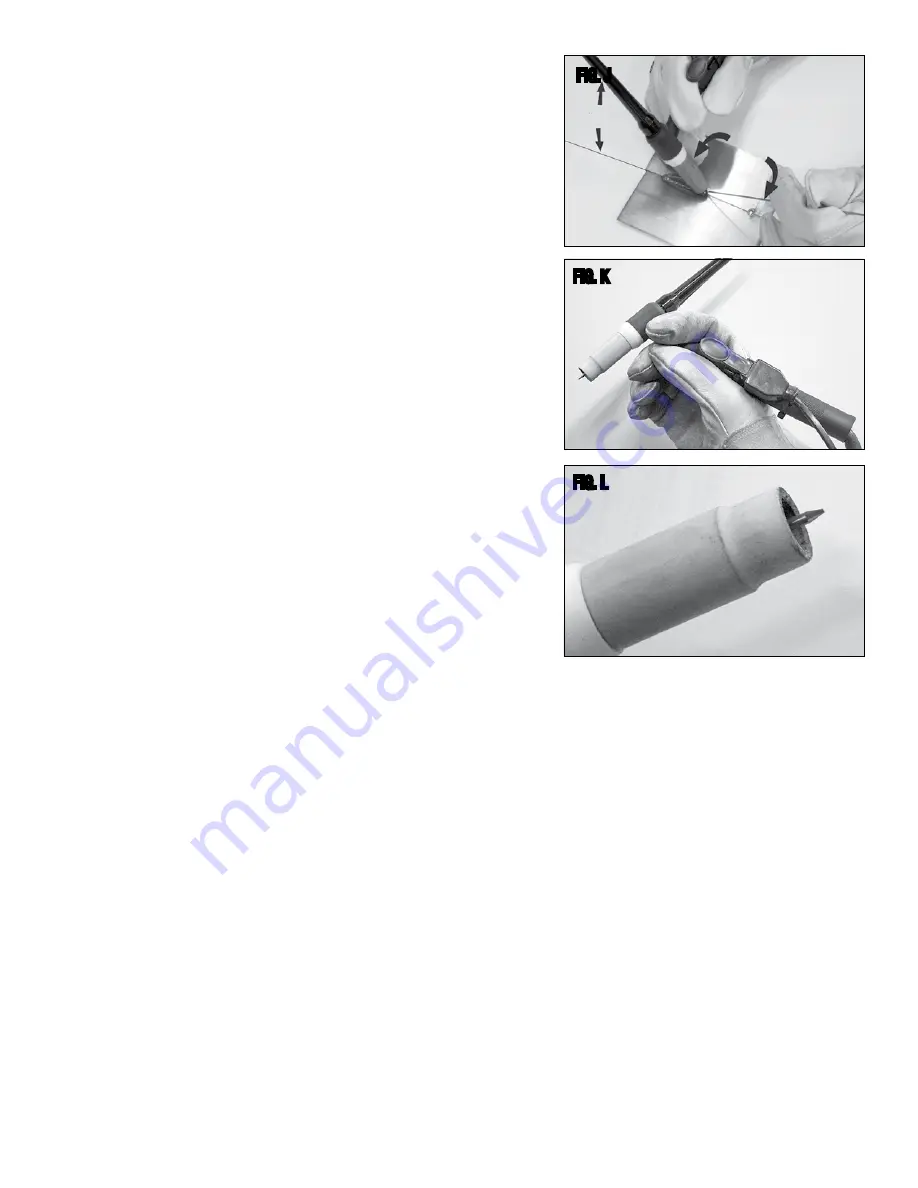
7. Although it is a matter of developing a personal style, a good starting point for best results is achieved by holding the tip at a 75°
angle backward and approx. 20° to the right of the weld. Hold the Filler Metal Rod at a 90° angle to the Tungsten Tip (Fig. J).
Never allow the Tungsten Tip to touch the welding surface or material rod. Doing so will quickly destroy the tip and contaminate
the weld. If this happens, remove the Tungsten and regrind the tip. It is best to hold the tungsten tip 1/8” from the surface.
8. With your Welding Shield and all safety gear in place, depress the foot pedal or trigger and practice “Forming A Puddle” with the
Tungsten Tip. Once you become familiar with this step. Practice the “Dip and Pull” technique with the Filler Metal Rod and Torch.
“Dip and Pull” is the practice of forming a puddle, moving the torch while maintaining the puddle and adding filler rod metal to the
puddle by “dipping and pulling” as you go; being careful not to allow the tungsten to contact the puddle or rod.
9. Keep in mind that you MUST let the shielding gas flow over the weld after releasing the trigger or pedal. Failure to do so will
allow the welded area to oxidize compromising the weld integrity.
10. Constantly be aware that TIG welding quickly generates heat in the work piece and torch. Severe burns can quickly occur by
contacting hot metal pieces.
11. When done, shut off the Power Switch and close the Shielding Gas Tank valve completely.
FIG. J
FIG. K
FIG. L
75°
90°


