background image

.

.

15

14

After Sales Support

MODEL:  STS2406  PRODUCT CODE: 10170  07/2019

customercare@winplus.com.au

1300 663 907

AUS

After Sales Support

MODEL:  STS2406  PRODUCT CODE: 10170  07/2019

customercare@winplus.com.au

1300 663 907

AUS

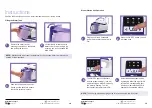
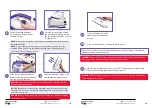
Once the selected steam setting 
light has stopped flashing and the 
iron thermostat light is OFF, the unit 
is ready for use. 

Select the desired soleplate 
heat setting by rotating the iron 
temperature dial.

Press the iron release button and 
rotate the iron clockwise to release 
from the locking mechanism.

Direct a short burst of steam in the 
air to release any condensation. 

NOTE:

 Always refer to garment manufacturer recommendations for the correct 

temperature setting.

NOTE:

 During heating the iron may emit a small amount of steam for a few 

seconds, this is normal. The thermostat light and steam setting light may  
illuminate or flash at times during use.

NOTE:

 Particles may come out of the soleplate when you use the iron for the 

first time. This is normal; the particles are harmless and stop coming out of the 
iron after a short while. 

6.

5.

7.

8.

WARNING:

 Take care not to touch the hot soleplate when releasing the iron, 

contact could result in burns.

WARNING:

 Do not direct steam from the iron towards any persons, animals or 

combustable items.


To iron without steam do not press the steam button.

TIP:

 You can provide a quick shot of steam at any time during ironing by pressing and 

releasing the steam button as desired.


Once you have finished ironing, turn the unit OFF by pressing and holding the ON/

OFF button and removing the plug from the power point.

To iron with steam, press the 
steam button and release as 
desired.

9.

10.

WARNING:

 Before storing, ensure the Steam Station Iron has completely cooled down. 

This may take up to 2 hours.

WARNING:

 Never leave iron face down on any surface. Always place iron back on the 

main unit or stand the iron vertically in between ironing strokes. 

11.

Summary of Contents for STS2406

Page 1: ...Model Number STS2406 steam station iron INSTRUCTION MANUAL Version 1 3 After Sales Support MODEL STS2406 PRODUCT CODE 10170 07 2019 1300 663 907 customercare winplus com au AUS...

Page 2: ...ched on Phone 1300 663 907 Mon Fri 8 30am 6 00pm AEST Email customercare winplus com au Web www winplus com au Important Getting the most out of your Steam Station Read the manual carefully It will he...

Page 3: ...n choosing to buy an Easy Home product All products brought to you by Easy Home are manufactured to the highest standards of performance and safety and as part of our philosophy of customer service an...

Page 4: ...to all rights and remedies in respect of the product that the consumer has under the Competition and Consumer Act 2010 and similar state and territory laws Our goods come with guarantees that cannot...

Page 5: ...50Hz 10A rated power supply 5 To avoid electrical shock do not place the cord plug or Steam Station Iron in water or other liquids 6 Do not operate appliance with wet hands or operate in a wet workin...

Page 6: ...scale Function 120g min Max Steam Delivery Model Specification STS2406 Input 220 240V AC 50Hz Power 2000 2400W Iron Power 1000W Boiler Power 1400W Tank Capacity 1 7L Maximum Continuous Steam Rate 120g...

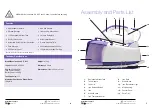
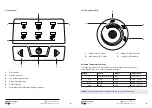
Page 7: ...n 6 LOW MEDIUM HIGH Steam Setting Indicators 2 1 3 4 2 Iron Temperature Dial 1 Max Setting For Linen 2 High Setting For Cotton 3 Medium Setting For Wool 4 Low Setting Fibres Silk Soleplate Temperature...

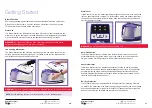
Page 8: ...asing the iron ensure the base is on a flat stable surface If the water is low the low water level indicator light will illuminate At this point the iron can generate little to no steam To refill the...

Page 9: ...osition Gently pull the handle to ensure the tank is correctly in place 3 Position the Steam Station Iron on a firm level table bench or ironing board Filling the Water Tank Instructions Press the ON...

Page 10: ...ash at times during use NOTE Particles may come out of the soleplate when you use the iron for the first time This is normal the particles are harmless and stop coming out of the iron after a short wh...

Page 11: ...the future In the event it is to be disposed of please recycle all packaging material where possible If you require another copy of this instruction manual please contact customercare winplus com au...

Page 12: ...once complete the boiler cap and seal are in place Hints and Tips Always check your garment fabric for an attached care label with ironing instructions Follow these ironing instructions to avoid dama...

Page 13: ...point that is turned ON Ensure you have pressed the ON OFF button If there has been no water in the water tank or boiler the boil dry protection may have engaged Refer to page 11 Check the iron temper...

Page 14: ...sending the product for repair You should also be aware that rather than repairing goods we may replace them with refurbished goods of the same type or use refurbished parts in the repair process Plea...

Page 15: ...LAUNDRY...
Reviews: