background image


17 

EN

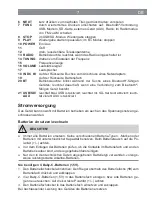
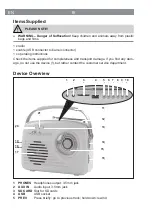
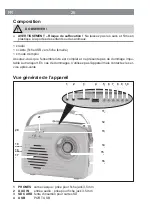
6 NEXT

Press brie

fl

 y: go to next track; hold down: fast-forward

7 FUNC

Press repeatedly to switch between: Bluetooth

®

 connection, USB me-

dium, SD card, external device (AUX), radio; in radio mode: switch from 
FM to AM

8 STOP

In USB/SD mode: stop playback

9 PLAY

Start / pause playback; in BT mode: stop

10 POWER

On / Off

11 

 Handle

12 


Telescopic aerial that can be rotated / pulled out

13 RADIO

Operating lamp: lights up when the radio is switched on

14 TUNING 

Turn to set the frequency

15 

 Frequency 

display

16 VOLUME

Volume control

17 

 Speaker

18  IN DC 6V

On the back: socket for connecting a mains adapter 

19 


On the back: battery compartment

20 BT 

Operating lamp: 

fl

 ashes while searching for a Bluetooth

®

-enabled device, 

lights up constantly when a connection has been made to a Bluetooth

®

-

enabled device

21 USB/SD/

AUX

Lit up blue: USB is activated; lit up red: SD card is activated: lit up violet: 
AUX is activated

Power Supply

The device can both be operated with batteries and be connected to the mains power 
supply.

Inserting / Changing Batteries

PLEASE NOTE!


Always replace all batteries together. Do not use batteries of different types or brands, 

or batteries with different capacities. When replacing batteries, ensure the correct 

polarity (+ / –).


Before inserting the batteries, check whether the contacts in the battery compartment 

and on the batteries are clean, and clean them if necessary.


Use only the battery type speci

fi

 ed in the technical data, preferably powerful alkaline 

batteries.

You require 4 Baby C batteries (1.5 V).

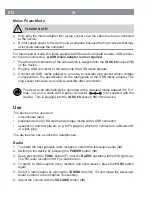
1.  Remove the battery compartment cover: Press the catch above the battery compart-

ment (

19

) towards the battery compartment and 

fl

 ip it open.

2.  Insert four Baby C batteries (1.5 V) into the battery compartment, or replace old bat-

teries with new ones. Pay attention to the correct polarity (+ / –). 

3.  Insert the battery compartment cover into the battery compartment and 

fl

 ip it shut.

Replace the batteries when the power of the device starts to wane.

Summary of Contents for 06842

Page 1: ...DE Gebrauchsanleitung ab Seite 3 EN Operating Instructions starting on page 13 FR Mode d emploi partir de la page 23 NL Gebruiksaanwijzing vanaf pagina 33 Z 08374_06842 M DS V2 0618 08374 06842...

Page 2: ......

Page 3: ...Gebrauchsanleitung vor Gebrauch lesen Schaltzeichen f r Gleichstrom Schutzklasse II Nur in Innenr umen verwenden Erkl rung der Signalw rter GEFAHR warnt vor schweren Verlet zungen und Lebensgefahr WAR...

Page 4: ...Kinder j nger als 8 Jahre und Tiere sind vom Ger t fernzuhalten WARNUNG Verletzungsgefahr Ver tzungsgefahr durch Batteries ure Batterien k nnen bei Verschlucken le bensgef hrlich sein Batterien und Ge...

Page 5: ...ntr gern fernhalten um Datenverlust aufgrund des Magnetfeldes des Ger tes zu vermeiden Keine schweren Gegenst nde auf das Ger t stellen Die Anschlussleitung so verlegen dass sie nicht gequetscht oder...

Page 6: ...Vollst ndigkeit und Transportsch den berpr fen Bei Sch den das Ger t nicht verwenden sondern den Kundenservice kontaktieren Ger te bersicht 11 17 21 1 2 3 4 5 6 7 8 9 10 12 14 16 20 13 15 19 18 1 PHO...

Page 7: ...uchtet rot SD Karte ist aktiviert leuch tet violett AUX ist aktiviert Stromversorgung Das Ger t kann sowohl mit Batterien betrieben als auch an das Spannungsnetz ange schlossen werden Batterien einset...

Page 8: ...blichen Netzadapter 6V DC max 1A und Kabel mit einem Hohlstecker betrieben werden nicht im Liefe rumfang Dieser wird in die IN DC 6V Buchse 18 des Ger tes gesteckt Benutzung Das Ger t kann benutzt wer...

Page 9: ...R Taste einschalten 4 Die FUNC Taste 7 so oft dr cken bis die USB SD AUX Betriebsleuchte 21 blau leuchtet 5 Die Wiedergabe ber die Tasten PREV 5 NEXT 6 STOP 8 PLAY 9 sowie den Lautst rkeregler 16 steu...

Page 10: ...keregler 16 die niedrigste Lautst rke einstellen 2 Den Klinkenstecker des Kopf oder Ohrh rers in den PHONES Kopfh reraus gang 1 am Ger t stecken 3 Die gew nschte Lautst rke einstellen Reinigung und Au...

Page 11: ...in Minimum eingestellt Die Lautst rkeeinstellung berpr fen Wenn ein externes Ger t angeschlossen ist Die Ger te sind nicht richtig mitei nander verbunden Die Verbindung beider Ger te berpr fen und ggf...

Page 12: ...r folgenden Internetadresse verf gbar https www dspro de produktinformationen datenblaetter und konformitaetserklaerungen Bestimmt zum Vertrieb in den Mitgliedstaaten der EU AT CZ ES GR IT MT RO BE DE...

Page 13: ...ormation Read operating instructions before use Circuit symbol for direct current Protection class II Only use indoors Explanation of the Signal Words DANGER warns of serious injuries and danger to li...

Page 14: ...rs of age and animals must be kept away from the de vice WARNING Danger of Injury Danger of burns from battery acid Batteries can be deadly if swallowed Keep batteries and the device out of the reach...

Page 15: ...rder to avoid any loss of data caused by the magnetic field of the device Do not place any heavy objects on the device Lay the connecting cable in such a way that it does not become squashed or bent a...

Page 16: ...heck the items supplied for completeness and transport damage If you find any dam age do not use the device but rather contact the customer service department Device Overview 11 17 21 1 2 3 4 5 6 7 8...

Page 17: ...up violet AUX is activated Power Supply The device can both be operated with batteries and be connected to the mains power supply Inserting Changing Batteries PLEASE NOTE Always replace all batteries...

Page 18: ...e device can alternatively be operated with a standard mains adapter 6V DC max 1A and a cable with a barrel connector not supplied with the device This is plugged into the IN DC 6V socket 18 of the de...

Page 19: ...that the device is switched off Press the POWER button 10 to switch off the device 2 Plug the USB connector of a storage medium into the USB socket 4 3 Switch on the device by pressing the POWER butto...

Page 20: ...volume which impinges on your ears for a lengthy period of time can cause permanent hearing damage You should therefore avoid constant listening at a high volume via headphones or earphones 1 Use the...

Page 21: ...sound can be heard The volume is set to a minimum level Check the volume setting If an external device is connected The devices are not connected to one another correctly Check the connection of both...

Page 22: ...de produktinformationen datenblaetter und konformitaetserklaerungen Designated for sale in the following member states of the European Union AT CZ ES GR IT MT RO BE DE FI HU LT NL SE BG DK FR HR LU P...

Page 23: ...t continu Classe de protection II utiliser uniquement l int rieur de locaux Explication des mentions d avertissement DANGER Vous avertit d un risque de blessures graves et mortelles AVERTISSEMENT Vous...

Page 24: ...animaux et des enfants de moins de 8 ans AVERTISSEMENT Risque de blessures Risque de br lures caus es par l lectrolyte des piles L ingestion des piles peut tre mortelle Conservez l appareil et les pi...

Page 25: ...upports de donn es magn tiques afin d viter les pertes de donn es caus es par le champ magn tique de l appareil Ne posez pas d objets lourds sur l appareil Faites cheminer le cordon de raccordement de...

Page 26: ...ez vous que l ensemble livr est complet et ne pr sente pas de dommage impu table au transport En cas de dommages n utilisez pas l appareil mais contactez le ser vice apr s vente Vue g n rale de l appa...

Page 27: ...e en bleu le port USB est activ s allume en rouge la carte SD est activ e s allume en violet AUX est activ Alimentation lectrique L appareil peut fonctionner sur piles ou bien tre raccord au secteur I...

Page 28: ...via un adaptateur secteur courant 6 V cc max 1 A et un cordon avec une fiche femelle non fourni Celui ci se branche sur la douille IN DC 6V 18 de l appareil Utilisation L appareil s utilise comme une...

Page 29: ...ez la touche FUNC 7 jusqu ce que les voyants de service USB SD AUX 21 s allument en bleu 5 Commandez la lecture via les touches PREV 5 NEXT 6 STOP 8 PLAY 9 et le r glage du volume 16 6 Arr tez l appar...

Page 30: ...2 Branchez la fiche jack du casque ou de l oreillette dans la sortie casque PHONES 1 de l appareil 3 R glez le volume d sir Nettoyage et rangement OBSERVER Assurez vous avant tout nettoyage que l appa...

Page 31: ...e est r gl au niveau mini mum Contr lez le r glage du volume Si un appareil externe est raccord Les appareils ne sont pas correcte ment connect s l un l autre Contr lez la connexion des deux appareils...

Page 32: ...esse suivante https www dspro de produktinformationen datenblaetter und konformitaetserklaerungen Destin la distribution dans les pays membres de l Union europ enne AT CZ ES GR IT MT RO BE DE FI HU LT...

Page 33: ...ksaanwijzing v r gebruik lezen Symbool voor gelijkspanning Elektrische veiligheidsklasse II Alleen in binnenruimten gebrui ken Uitleg van de signaalwoorden GEVAAR waarschuwt voor ernstig letsel en lev...

Page 34: ...ten uit de buurt worden gehouden van het apparaat WAARSCHUWING Gevaar voor letsel Gevaar voor verwondingen door etsende werking door batterijzuur Batterijen kunnen levensgevaarlijk zijn wanneer ze wor...

Page 35: ...gegevensdragers om dataverlies te voorkomen op grond van het magnetische veld van het apparaat Zet nooit zware voorwerpen op het apparaat Leg het aansluitsnoer zo dat het niet bekneld zit of geknikt w...

Page 36: ...vering volledig is en geen transportschade heeft opgelopen Bij scha de het apparaat niet gebruiken maar contact opnemen met de klantenservice Apparaatoverzicht 11 17 21 1 2 3 4 5 6 7 8 9 10 12 14 16 2...

Page 37: ...USB is geactiveerd brandt rood SD kaart is geactiveerd brandt paars AUX is geactiveerd Stroomvoorziening Het apparaat werkt op batterijen en kan tevens op het stroomnet worden aangesloten Batterijen...

Page 38: ...liere netadapter 6V DC max 1A en snoer met een voedingsplug worden gebruikt niet in de leveringsom vang Deze wordt in de IN DC 6V bus 18 van het apparaat gestoken Gebruik Het apparaat kan worden gebru...

Page 39: ...knop inschakelen 4 De FUNC knop 7 zo vaak indrukken tot het USB SD AUX controlelampje 21 blauw brandt 5 De weergave via de knoppen PREV 5 NEXT 6 STOP 8 PLAY 9 alsook de volumeregelaar 16 bedienen 6 H...

Page 40: ...volumeregelaar 16 het laagste geluidsvolume instellen 2 De jackplug van de koptelefoon of oordopjes in de PHONES koptelefoonuitgang 1 op het apparaat steken 3 Het gewenste geluidsvolume instellen Rei...

Page 41: ...mum ingesteld De volume instelling contro leren Als er een extern apparaat is aangesloten de apparaten zijn niet juist met elkaar verbonden De verbinding van beide appa raten controleren en eventueel...

Page 42: ...internetadres https www dspro de produktinformationen datenblaetter und konformitaetserklaerungen Bestemd voor distributie in de lidstaten van de Europese Unie AT CZ ES GR IT MT RO BE DE FI HU LT NL S...

Page 43: ......

Page 44: ......

Reviews: